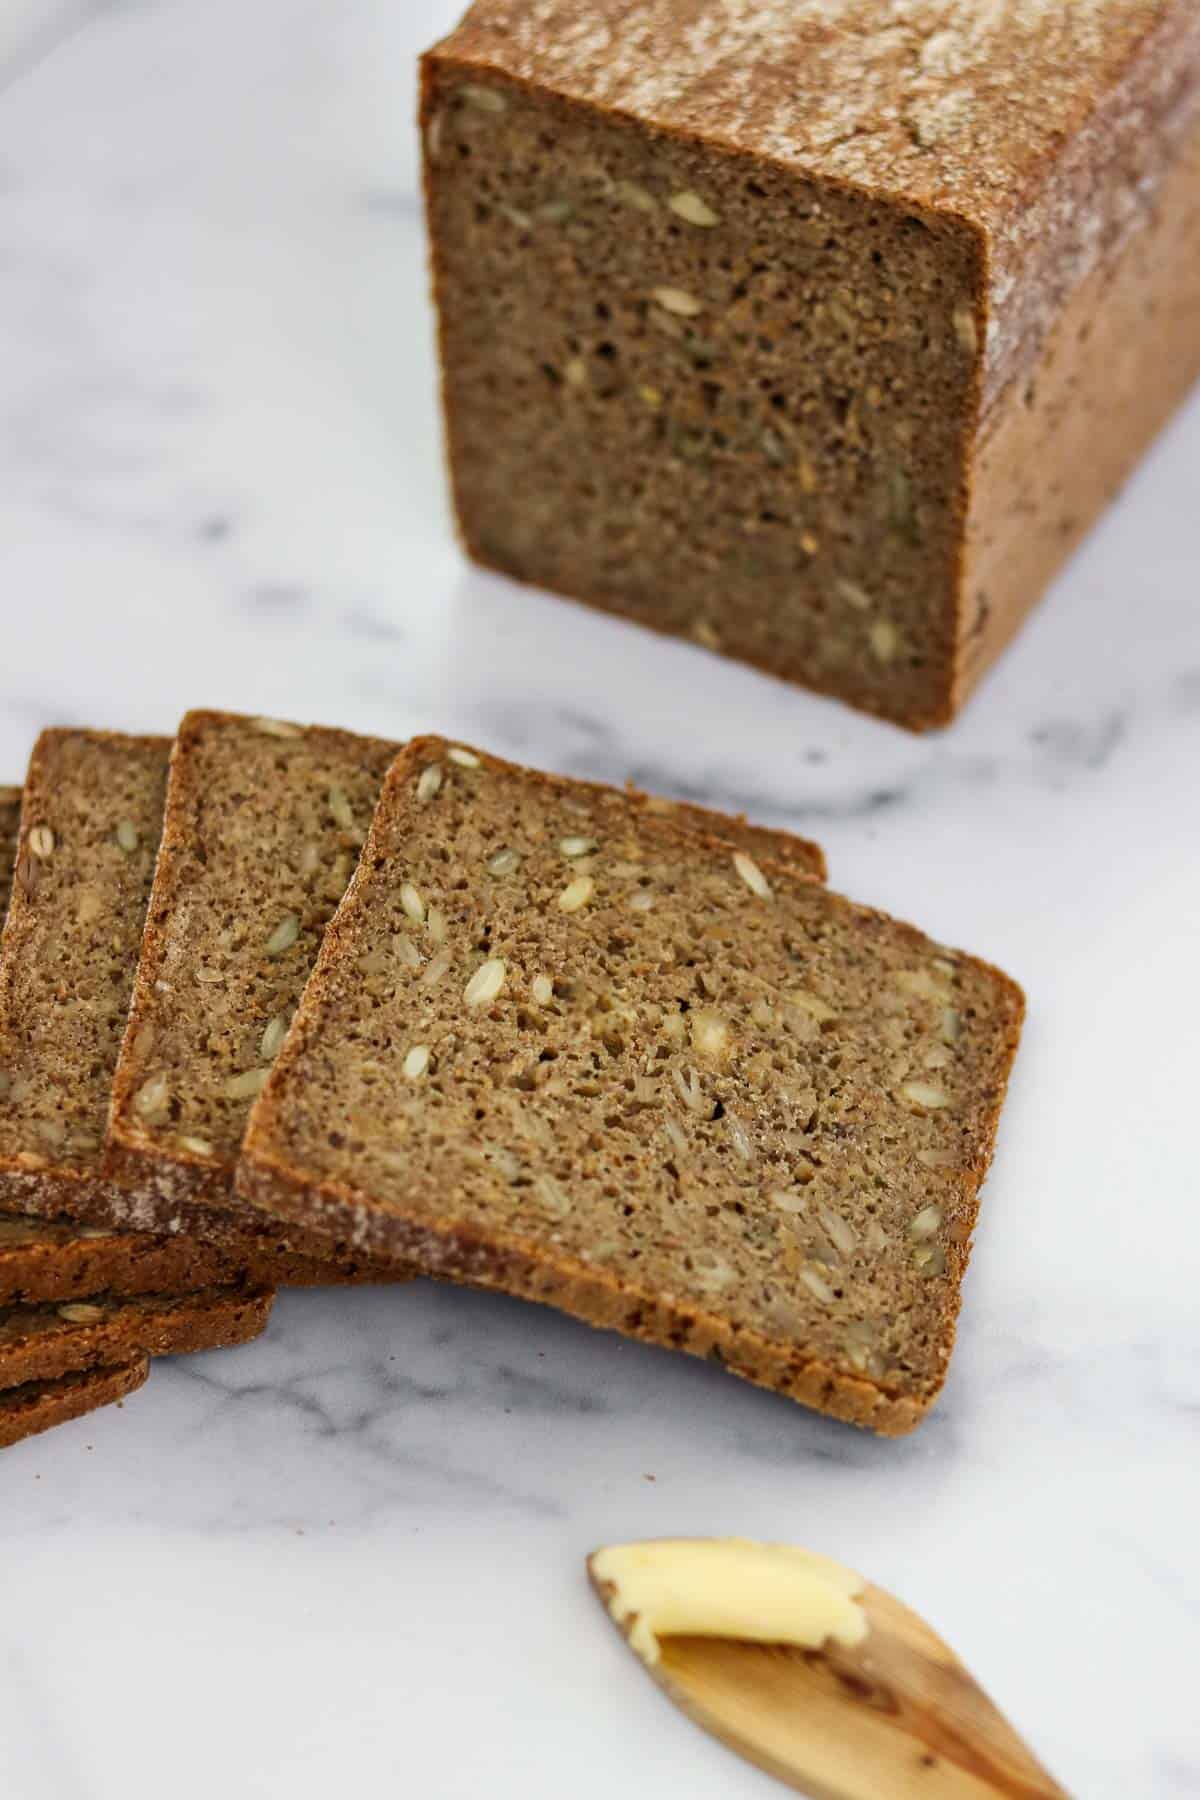
Easy Overnight Danish Rye Bread (Rugbrød)
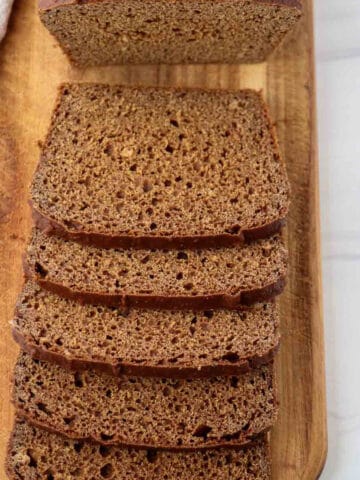
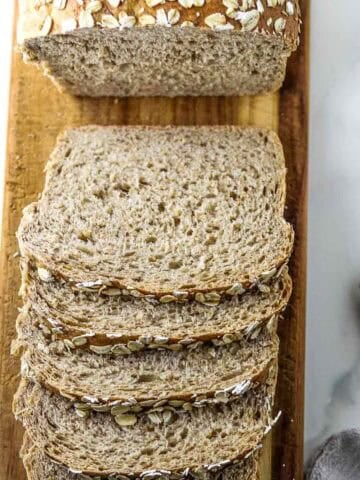
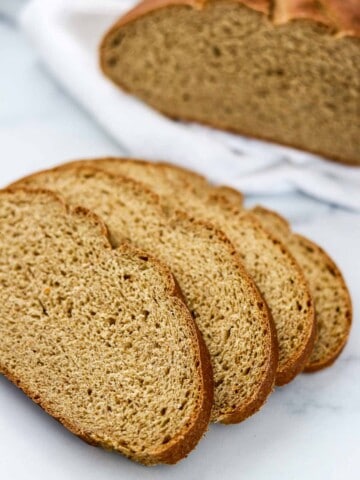
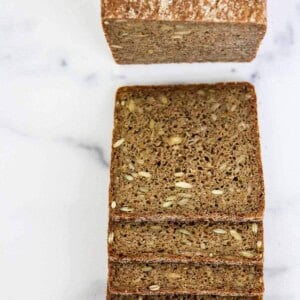
Danish Rye Bread (Rugbrød) is dense, hearty, and packed with rye flour, whole grains, and a variety of nutritious seeds. A true staple of Nordic cuisine, this richly flavored, slightly tangy bread is the foundation of smørrebrød (Danish open-faced sandwiches) and a key part of the Scandinavian diet.
If you've ever tried to find authentic rugbrød in the U.S., you know it can be a challenge. Most store-bought rye bread here is closer to deli rye or pumpernickel, lacking the depth and texture of traditional Danish rye. But the good news? You can make it at home-easily!
If you keep a sourdough starter around, you might also want to consider trying my recipe for Sourdough Danish Rye Bread (Rugbrød) which is also really delicious!
Jump to:
Ingredients
For the Soaker:
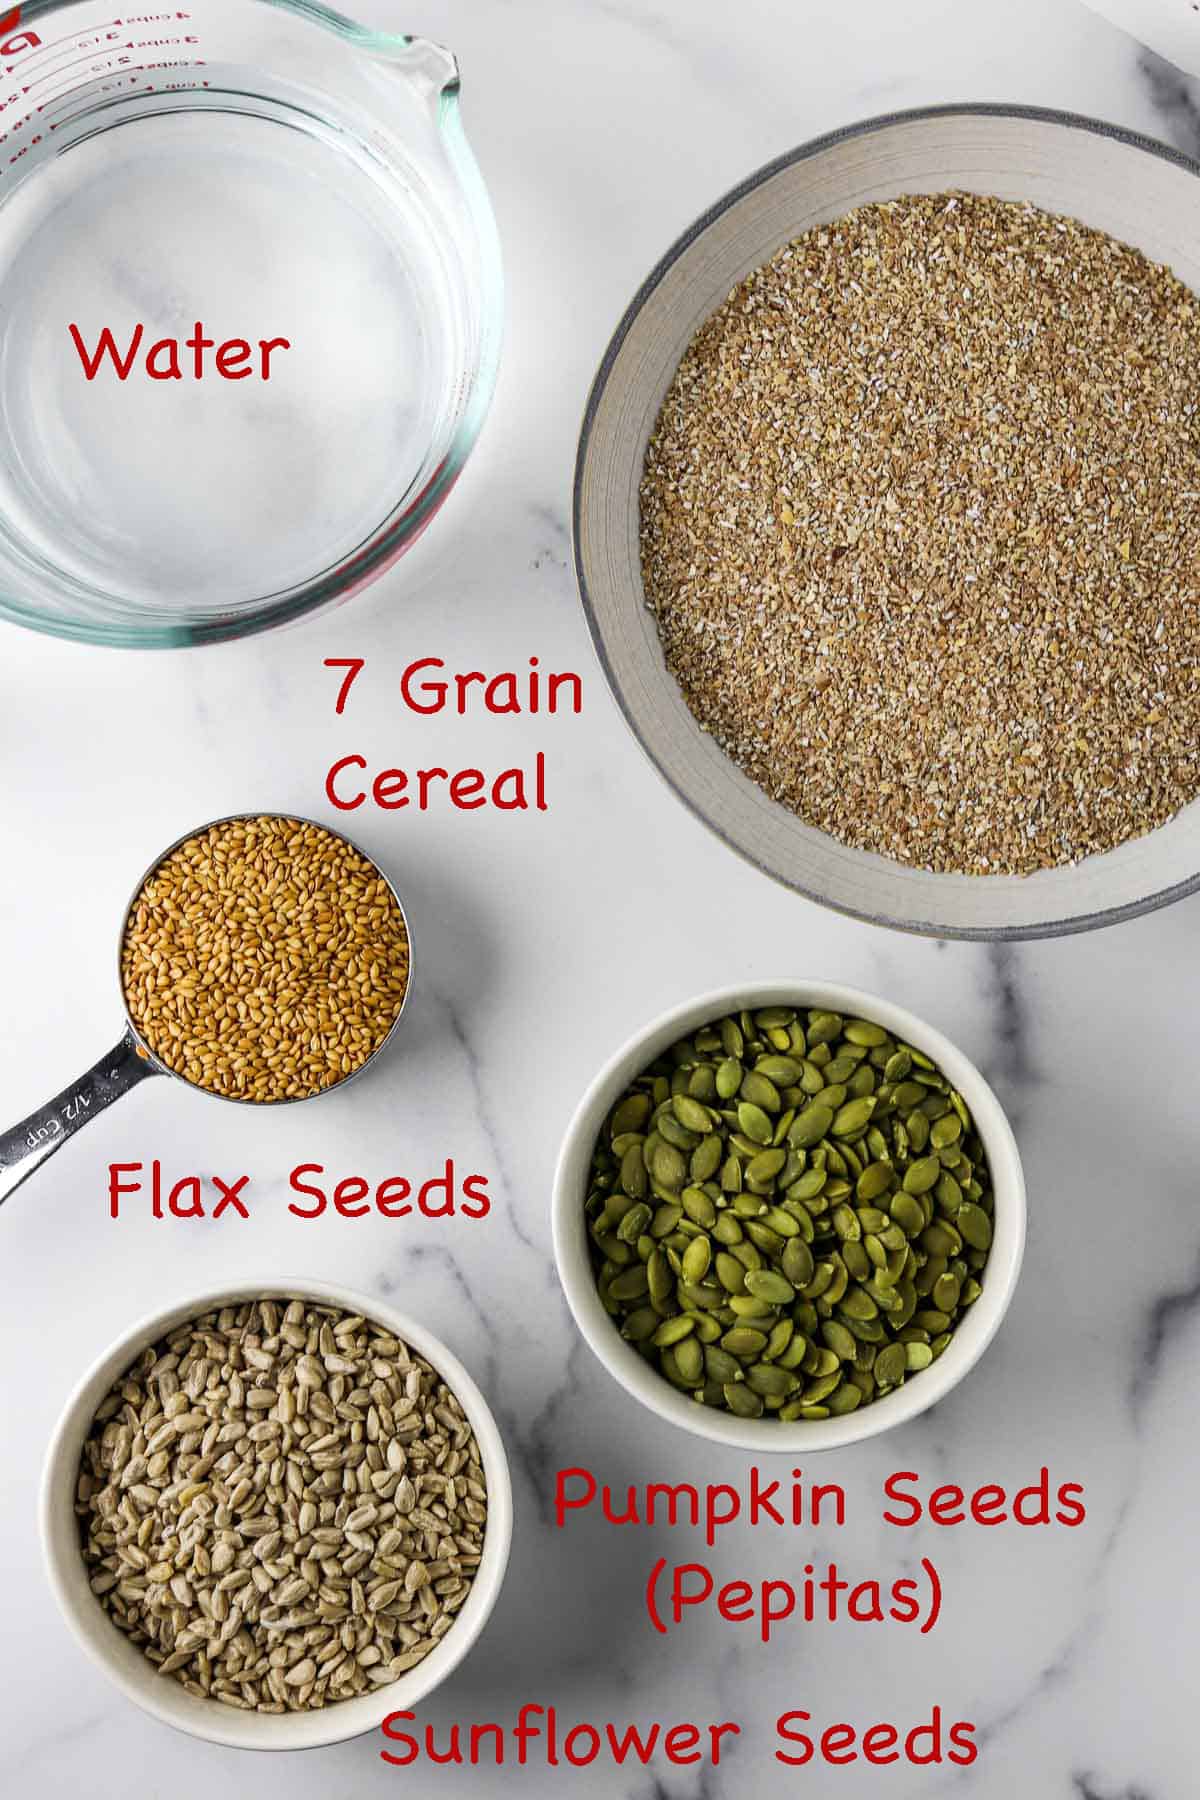
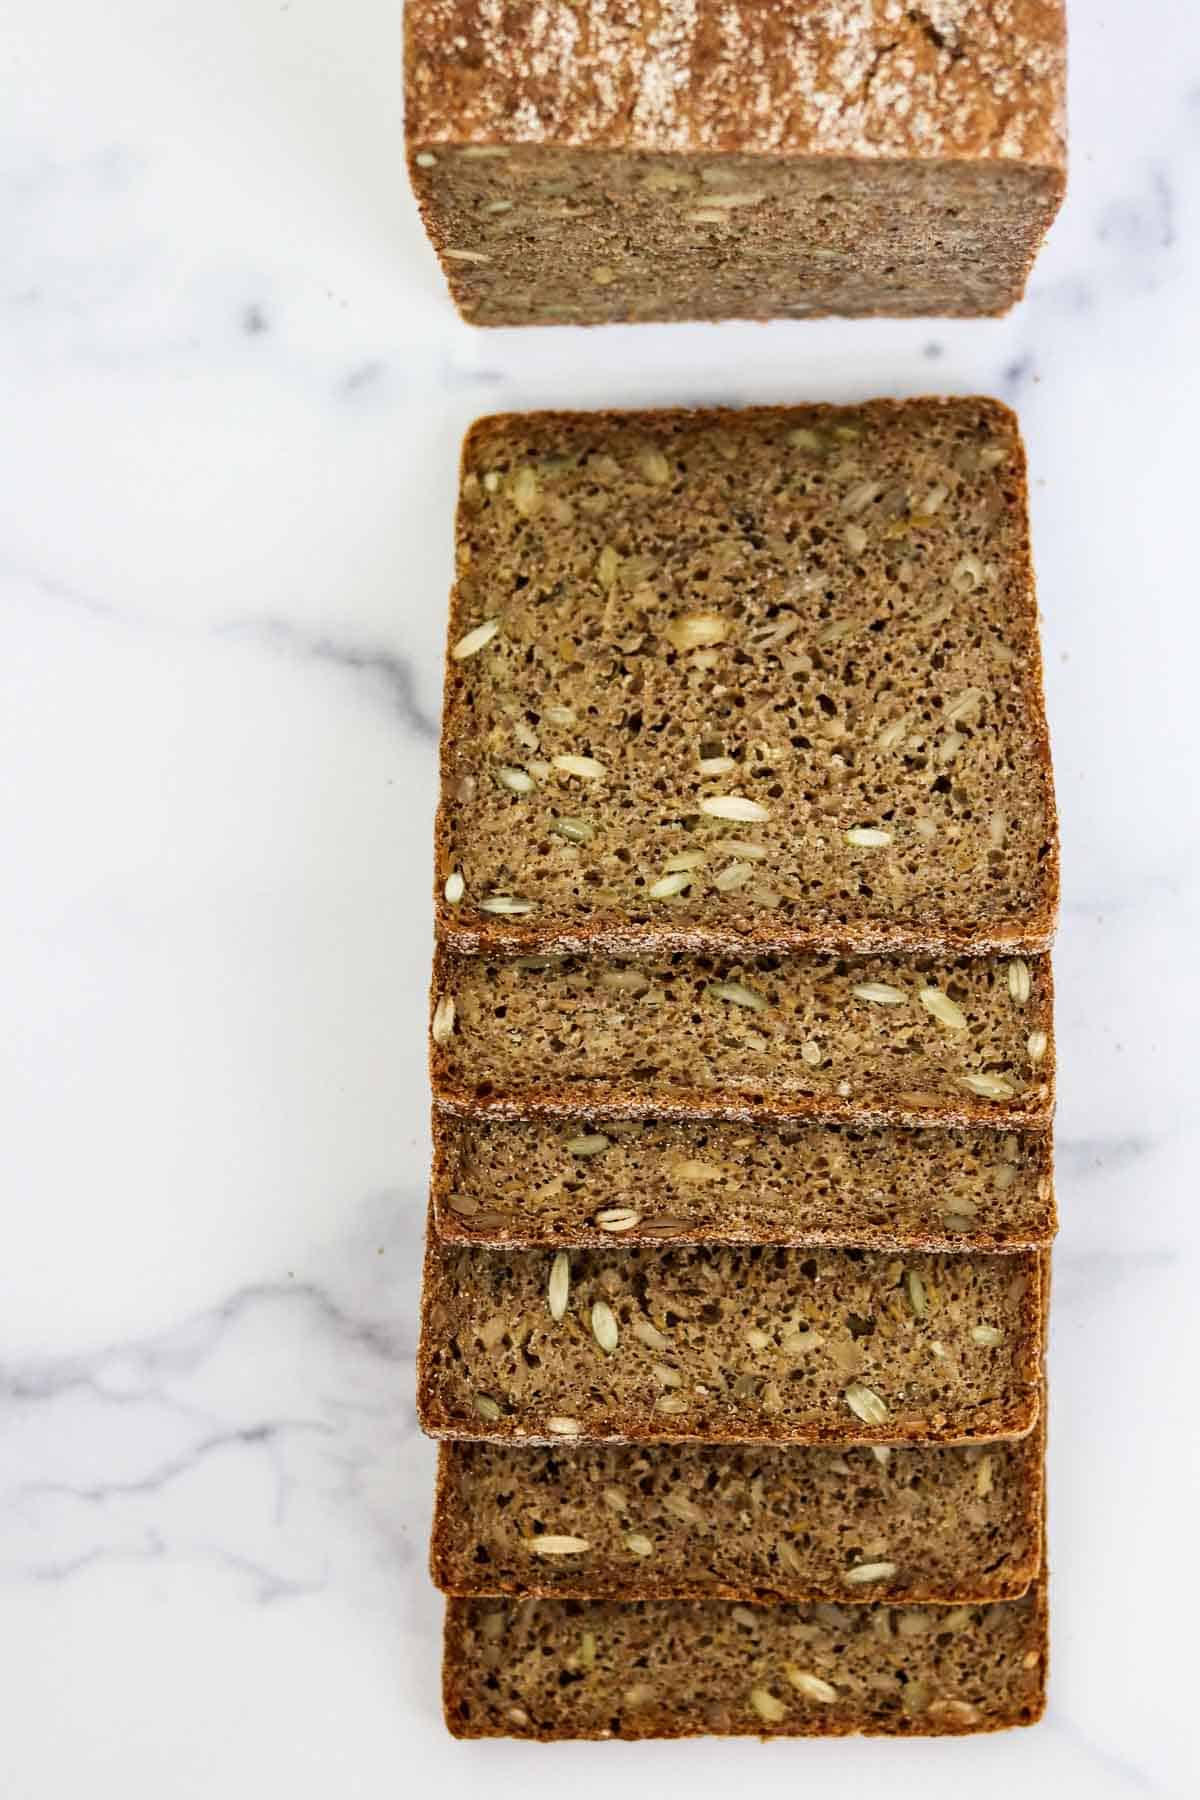
- 7 grain cereal - provides the hearty backdrop of the bread. Traditional rugbrød recipes call for rye chops which are just coarsely chopped pieces of rye grains. Because rye chops can be hard to find in the U.S., this recipe calls for a 7 grain cereal mix instead (feel free to use rye chops if you have access to them! They work just as well here). 7 grain cereal mix is simply a combination of several different coarsely chopped grains including wheat, rye, triticale, oats, oat bran, barley and/or brown rice. I often use the Bob's Red Mill brand, but have also had good luck with this mix from Nuts.com.
- Sunflower, pumpkin and flax seeds - bring texture, flavor and nutrients to this hearty, substantial loaf.
For the Dough:
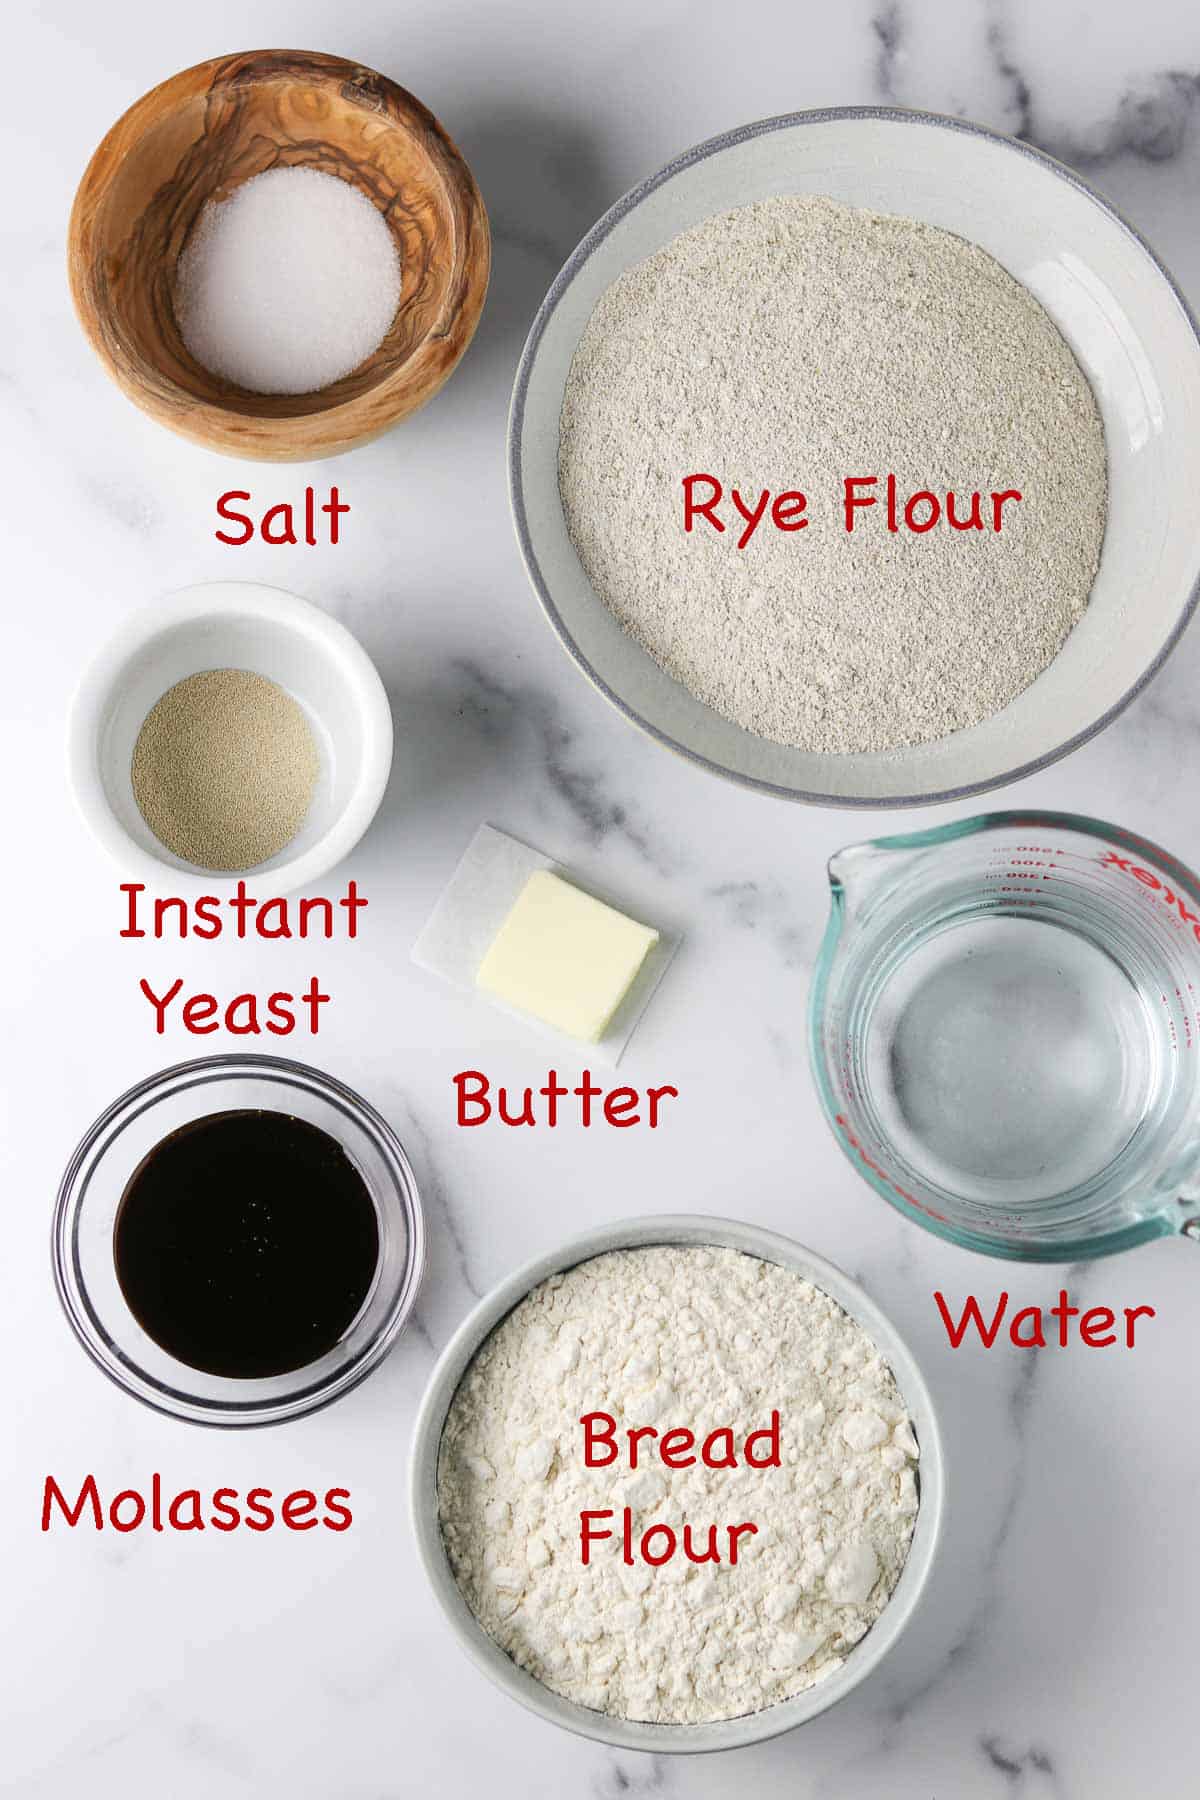
- A combination of bread flour and rye flour - is key to providing the gluten structure this bread needs to keep its shape.
- Instant yeast - serves as the leavener. Please note that instant or rapid rise yeast and active dry yeast are two different things. The essential difference between the two is that instant yeast can be mixed right in with the dry ingredients whereas active dry yeast is designed to be proofed in warm liquid prior to adding it to the recipe. Instant yeast is also more reliable, effective and fast-acting.
- Molasses - not only sweetens and flavors the dough, it also helps deepen the dark brown color of the final loaf.
- Water
- Salt
- Butter - for greasing the pan.
The Equipment
- a sturdy stand mixer
- a 13 x 4 inch pullman pan with lid
How To Make Danish Rye Bread (Rugbrød)
The Night Before:
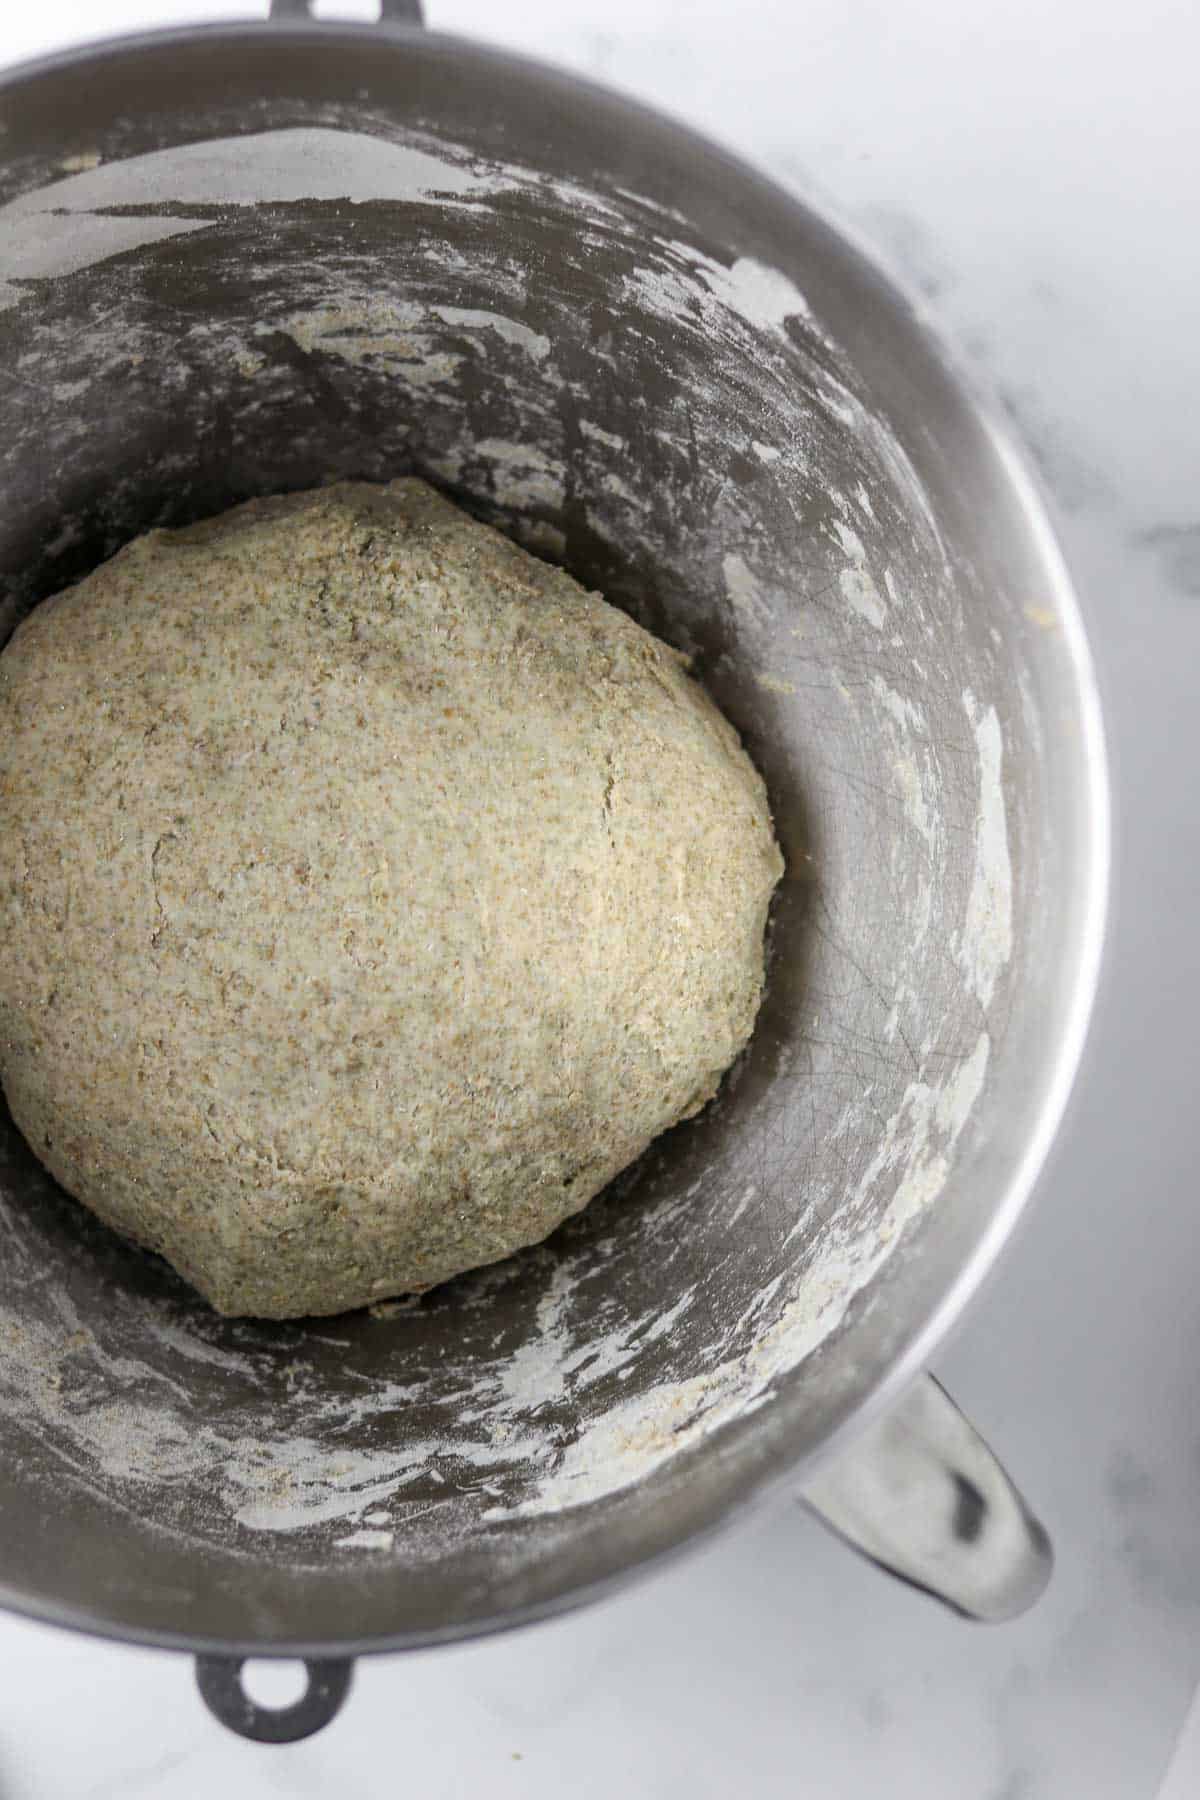
- 8-12 hours before you plan to make the bread, combine the rye flour, bread flour, instant yeast and cold water together in a large bowl (I just use the bowl that goes with my stand mixer since that is where it will eventually go....one less bowl to wash). Hold back on the molasses and salt for now. Stir to combine as best you can (mixture will be thick), and then knead briefly with your hands until you have a cohesive mixture. The dough will be very thick and clay-like in texture. Cover with plastic wrap and set aside at room temperature.
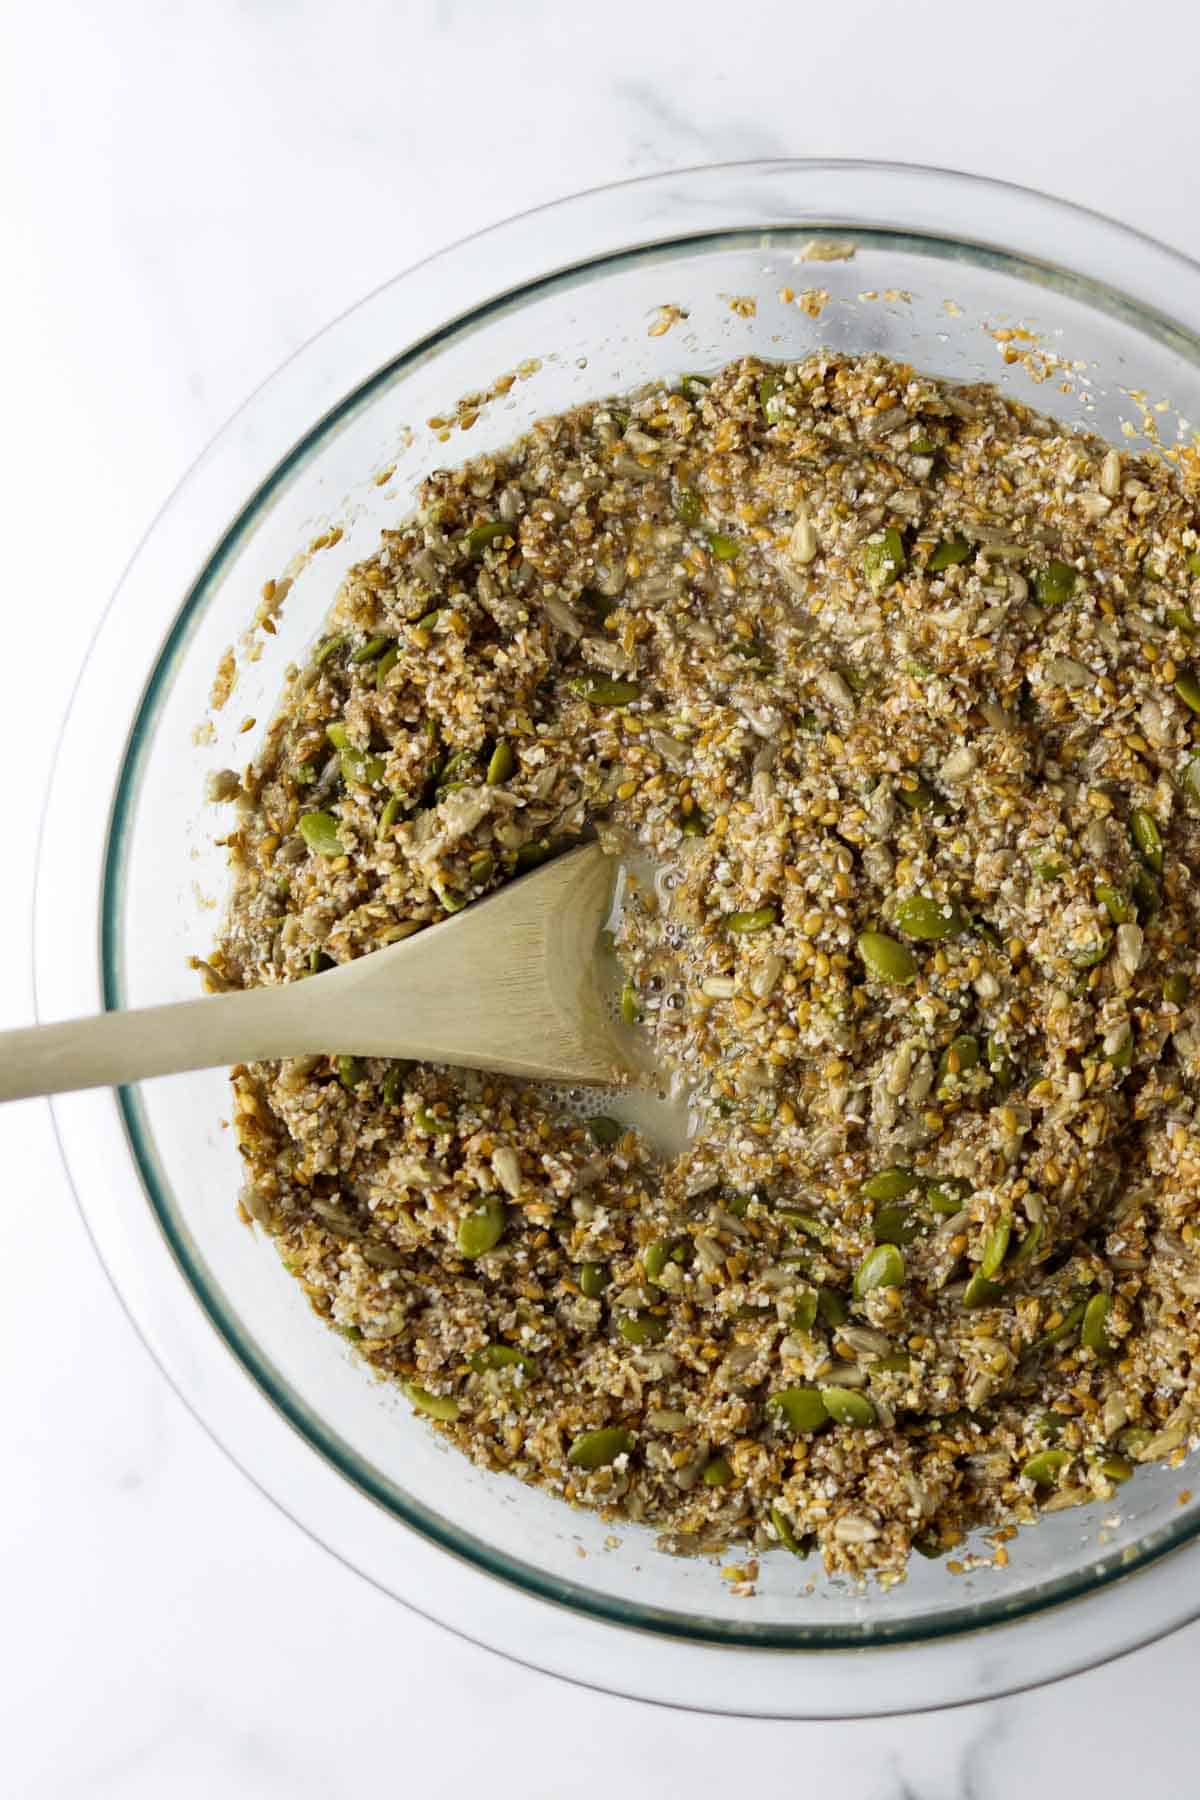
- At the same time, mix the soaker together: Combine all the ingredients for the soaker together in a medium bowl. Cover with plastic wrap and set aside at room temperature.
The Morning of Baking:

- 8-12 hours later, finish mixing the dough: Grease a 13 x 4 inch pullman loaf pan with butter and dust with rye flour, including the lid. Set aside. Combine the dough, molasses, salt and the soaker (do not drain the soaker. Go ahead and put in the water and the soaked seeds) in the work bowl of a stand mixer. Using the paddle attachment, mix on low for 2-3 minutes, scraping down the sides occasionally. Increase the speed to medium and continue to mix for another 2-3 minutes. The dough will be very sticky at this point.
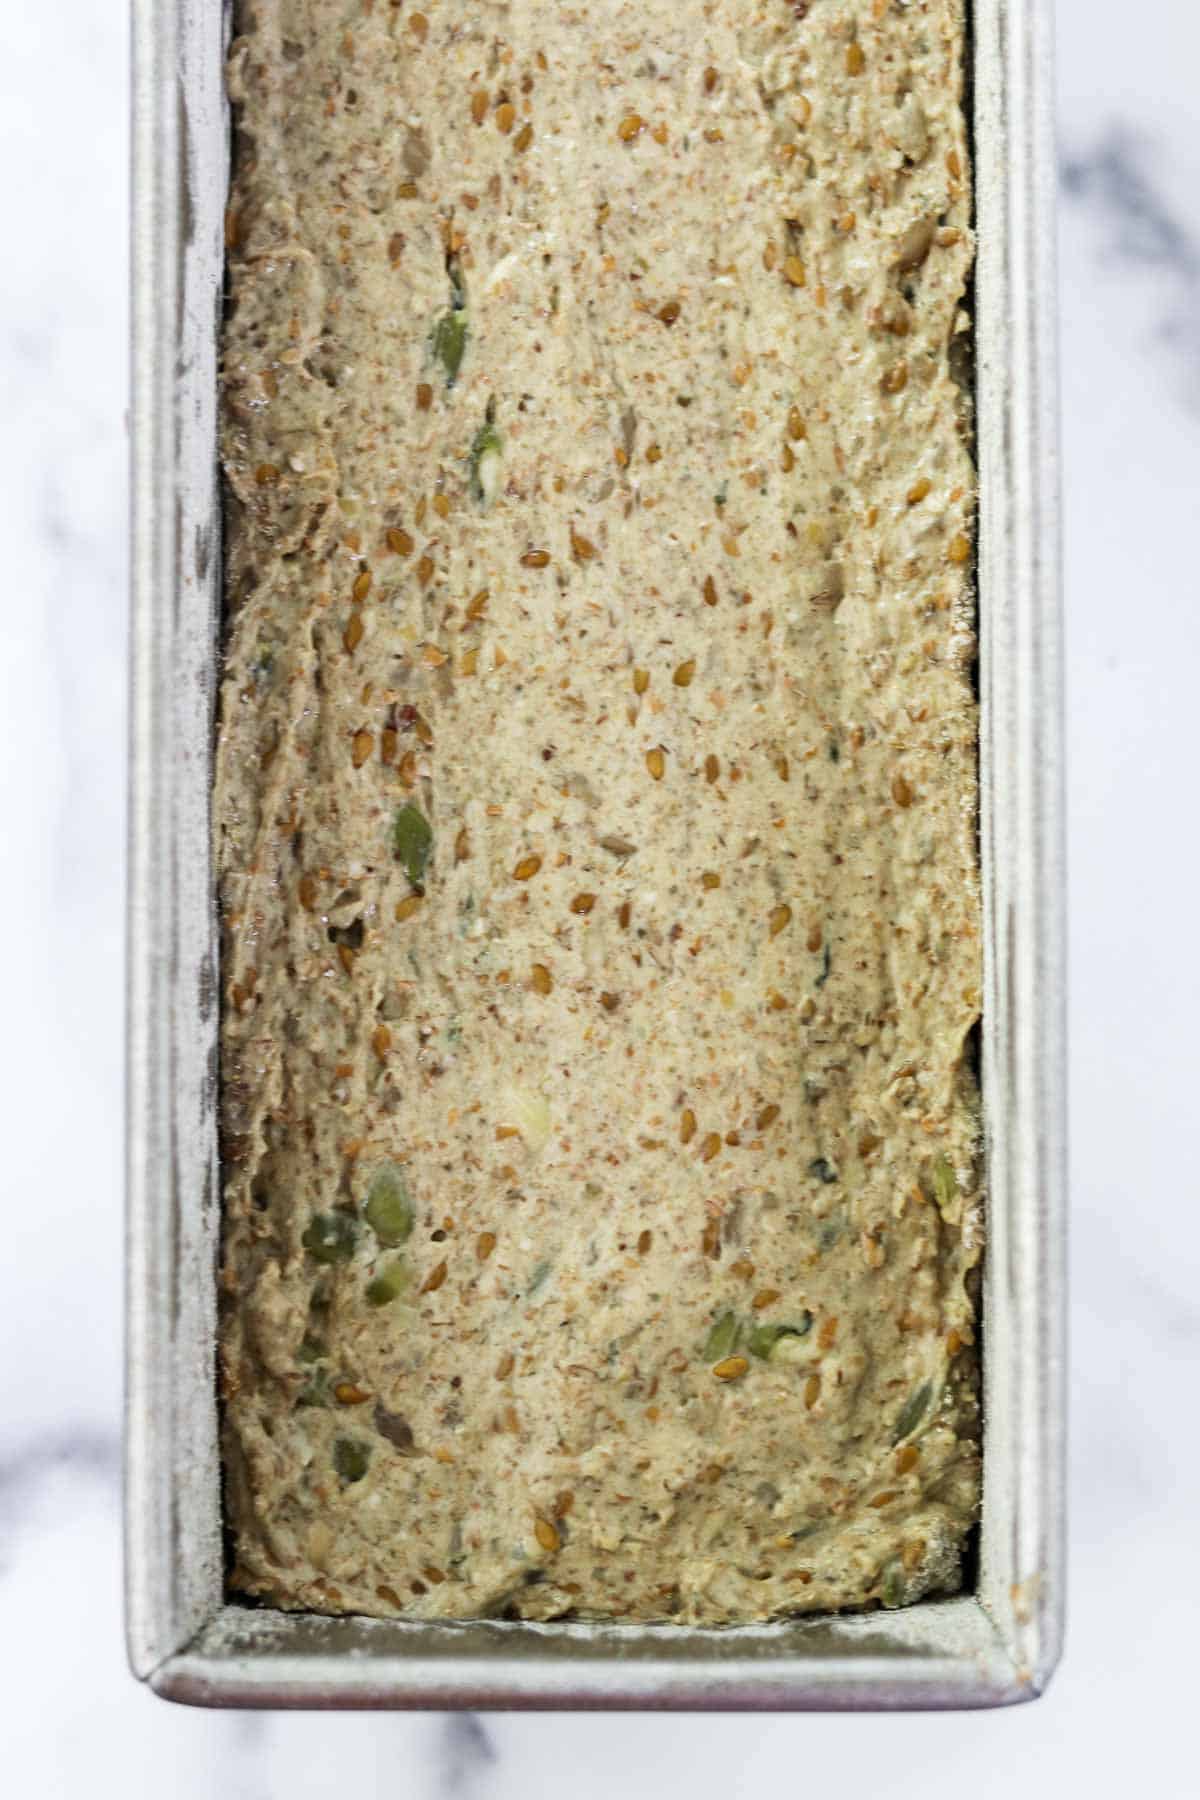
- Scrape or spoon the dough into the prepared pan and smooth out the top. Damp fingers or a moistened spatula can help with this if you are having a hard time getting the top smooth.
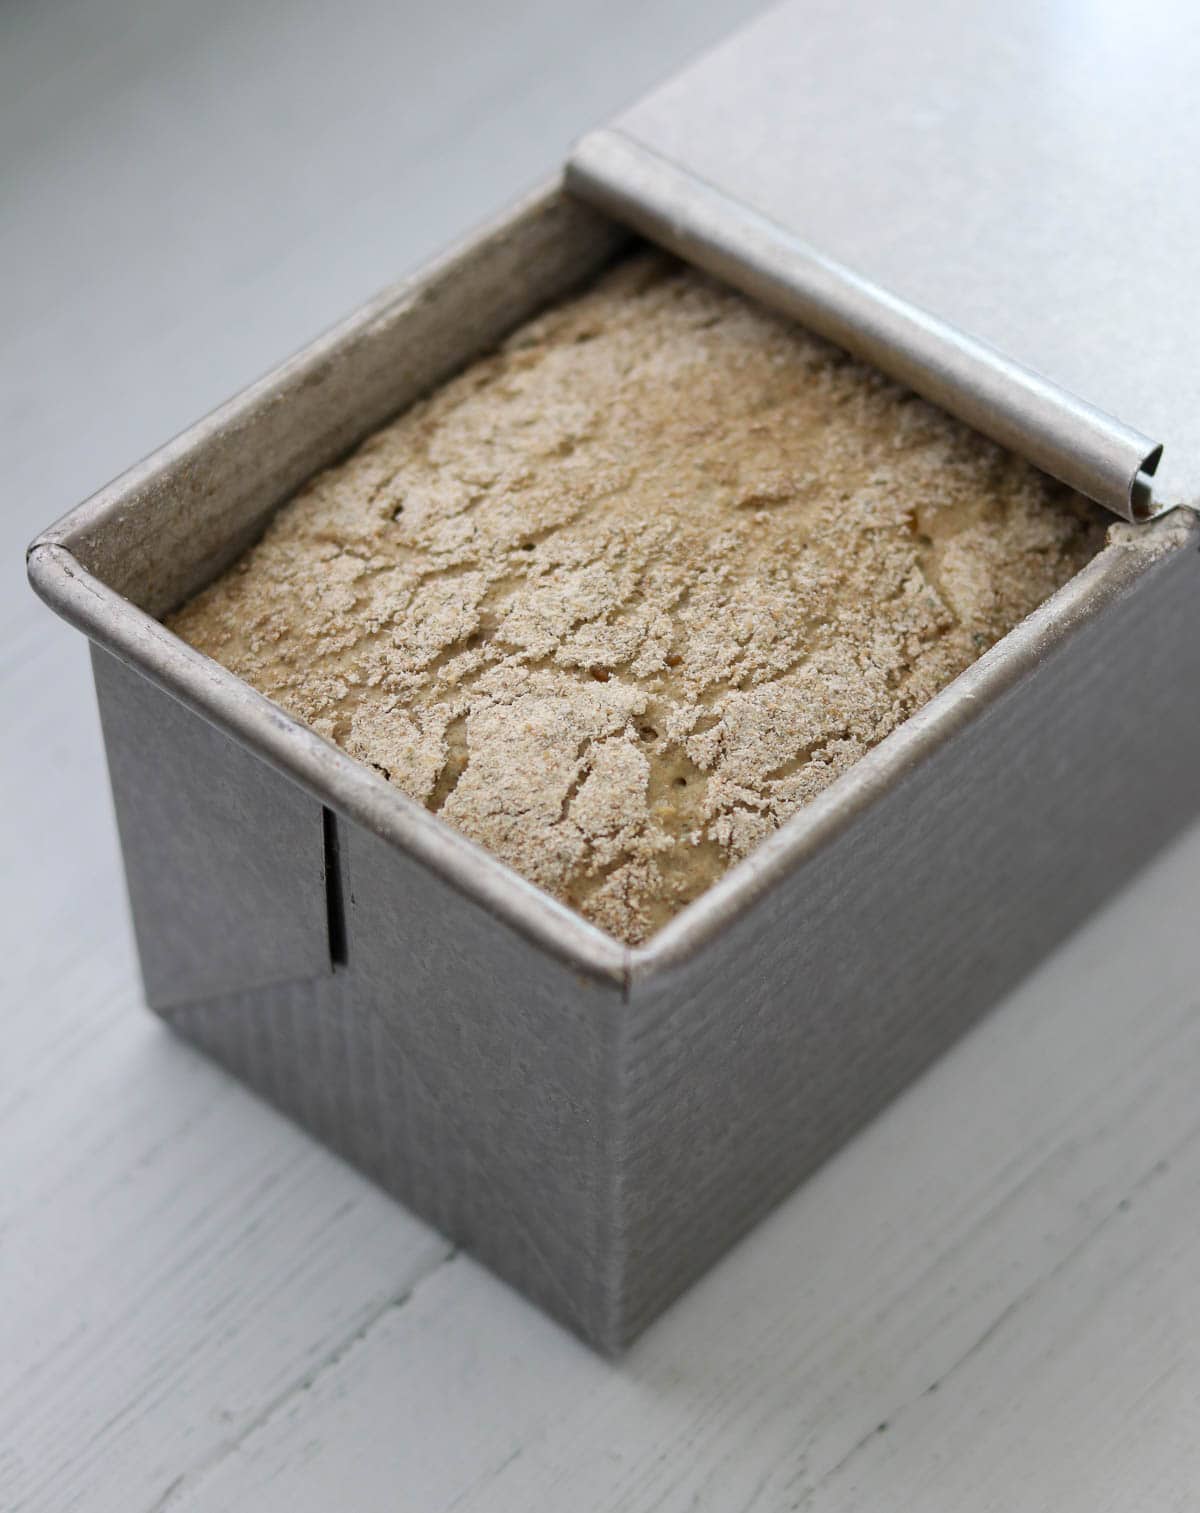
- Dust the top of the loaf with a thin, even layer of rye flour and place the pullman lid cover on top of the pan. Let the dough rise for 1½ -3 hours at room temperature or until it is about ½ inch from the top of the pan. The time that it takes for your dough to rise will largely depend on the temperature of the dough and your kitchen.
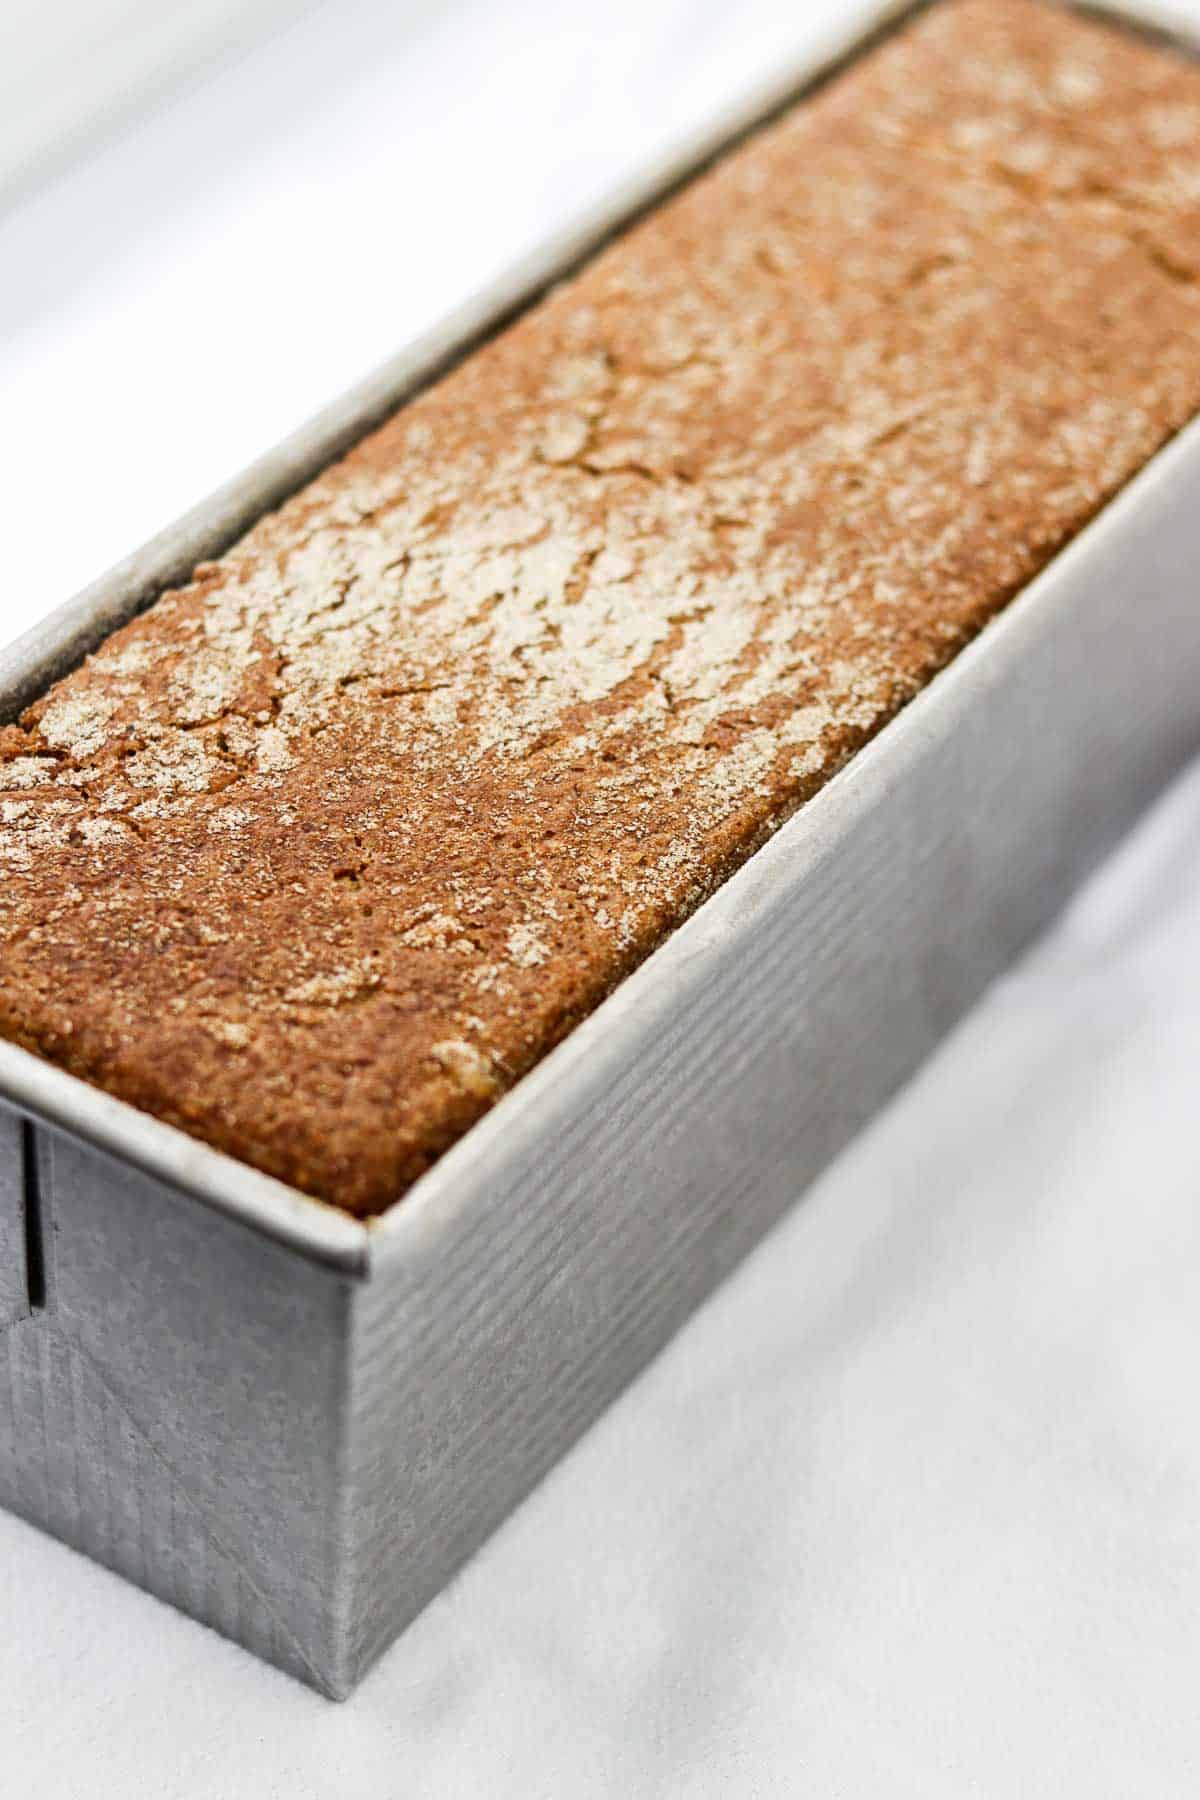
- Meanwhile, preheat the oven to 500 degrees. Bake the loaf with the lid on for 15 minutes. Reduce the temperature to 400 degrees and continue to bake, covered, for an additional 15 minutes. Remove the pan from oven and carefully slide the lid off. Reduce the temperature to 325 degrees and bake, uncovered, for an additional 45 minutes.
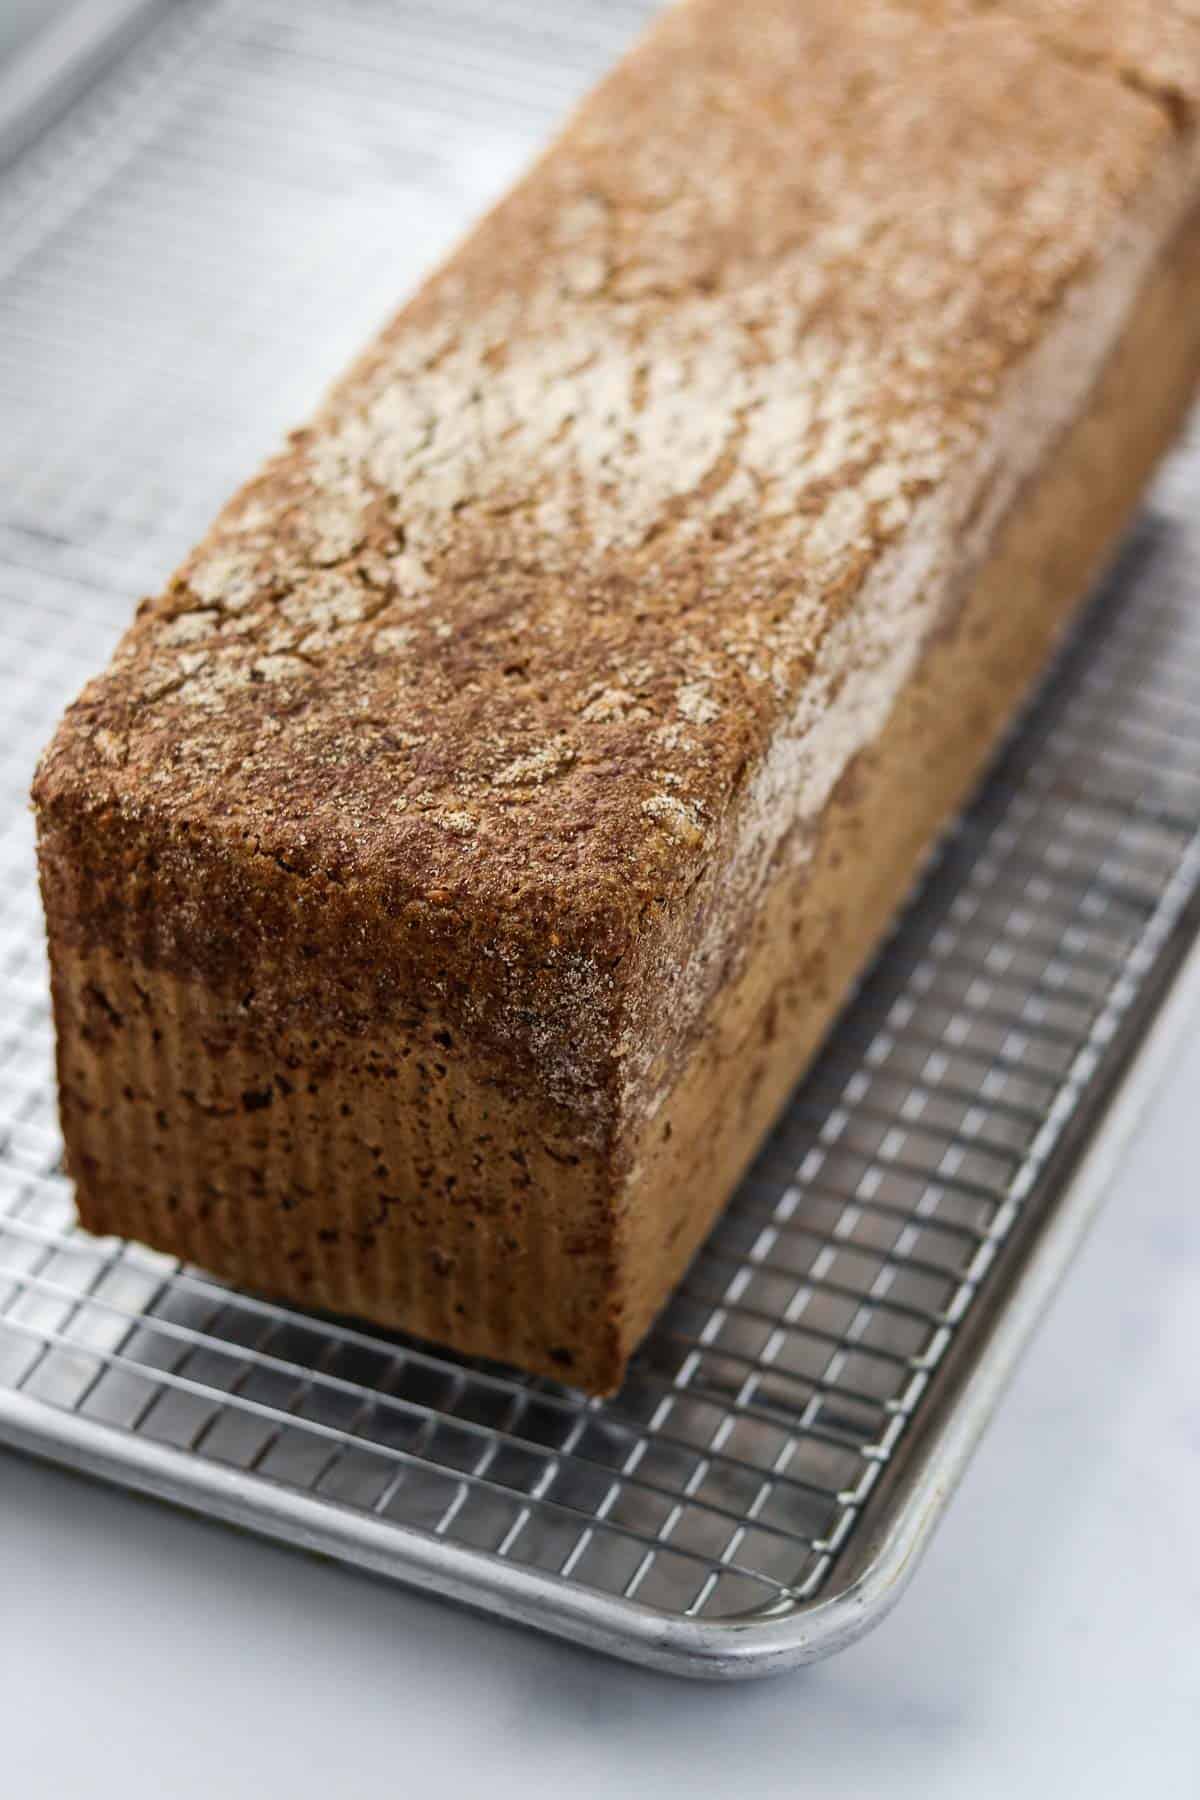
- Remove from the oven and immediately turn the loaf out onto a metal cooling rack set inside a rimmed baking sheet. Return the bread to the oven for an additional 10 minutes. Remove from the oven and allow the bread to cool completely before slicing, at least 3 hours or overnight if you can wait! Rye bread is even better a day after baking.
- Remove from the oven and allow the bread to cool completely before slicing, at least 3 hours or overnight if you can wait! Rye bread is even better a day after baking.
Expert Tip
- Wait a day before enjoying your bread! Unlike wheat breads which are best eaten shortly after cooling, both the texture and flavor of rye bread improves after a rest of 12-24 hours. Once the bread has cooled completely, wrap it loosely in foil and cut into it the following day.
Recipe FAQs
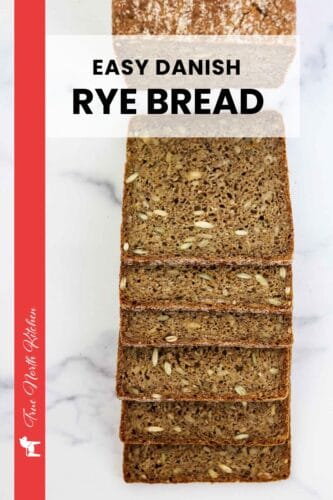
Rugbrød simply means "rye bread" in Danish. It is a sturdy, dense loaf that is comprised of rye flour, chopped rye grains and is often studded with sunflower, pumpkin and/or flax seeds. It is often baked in a 13 x 4 inch pullman pan with a lid. This helps the rye bread bake properly and gives it its characteristic square shape.
It can be stored loosely wrapped in foil at room temperature for about 5 days.
Yes! Rugbrød freezes very well. Tightly wrap the bread (either a whole or partial loaf or slices) in plastic wrap and then either tightly wrap it in foil or place it inside of a freezer bag. It will keep for a couple of months.
I have had many readers tell me they have split the dough into two 9 x 5 loaf pans instead of using the pullman pan with excellent results. Use a heavy baking sheet as a "lid" for the covered portion of the baking and keep the baking times and temperatures the same.
If you have a smaller mixer, it may be difficult to get all of the dough in the bowl at one time. If that is the case, simply mix half of the overnight dough, molasses, salt and the soaker and then mix the second half. Combine all of the dough together in the loaf pan for baking.
Rye breads, particularly those baked here in America, often have a variety of ingredients added to them to enhance their color (making them darker in appearance) and flavor. Common additions include caramel coloring (no thank you), stout beer, cocoa powder, espresso powder and molasses. Rugbrød, in contrast, has very little additional flavoring, perhaps just a little molasses for sweetening. It is meant to be a very straightforward bread so that it can serve as a neutral base for a variety of different sandwich toppings.
Sometimes I will come across a rugbrød recipe that calls for flavor enhancers such as caraway, fennel or anise seed in the dough, but this seems to be more of an exception than the rule.
How and What to serve with Rugbrød
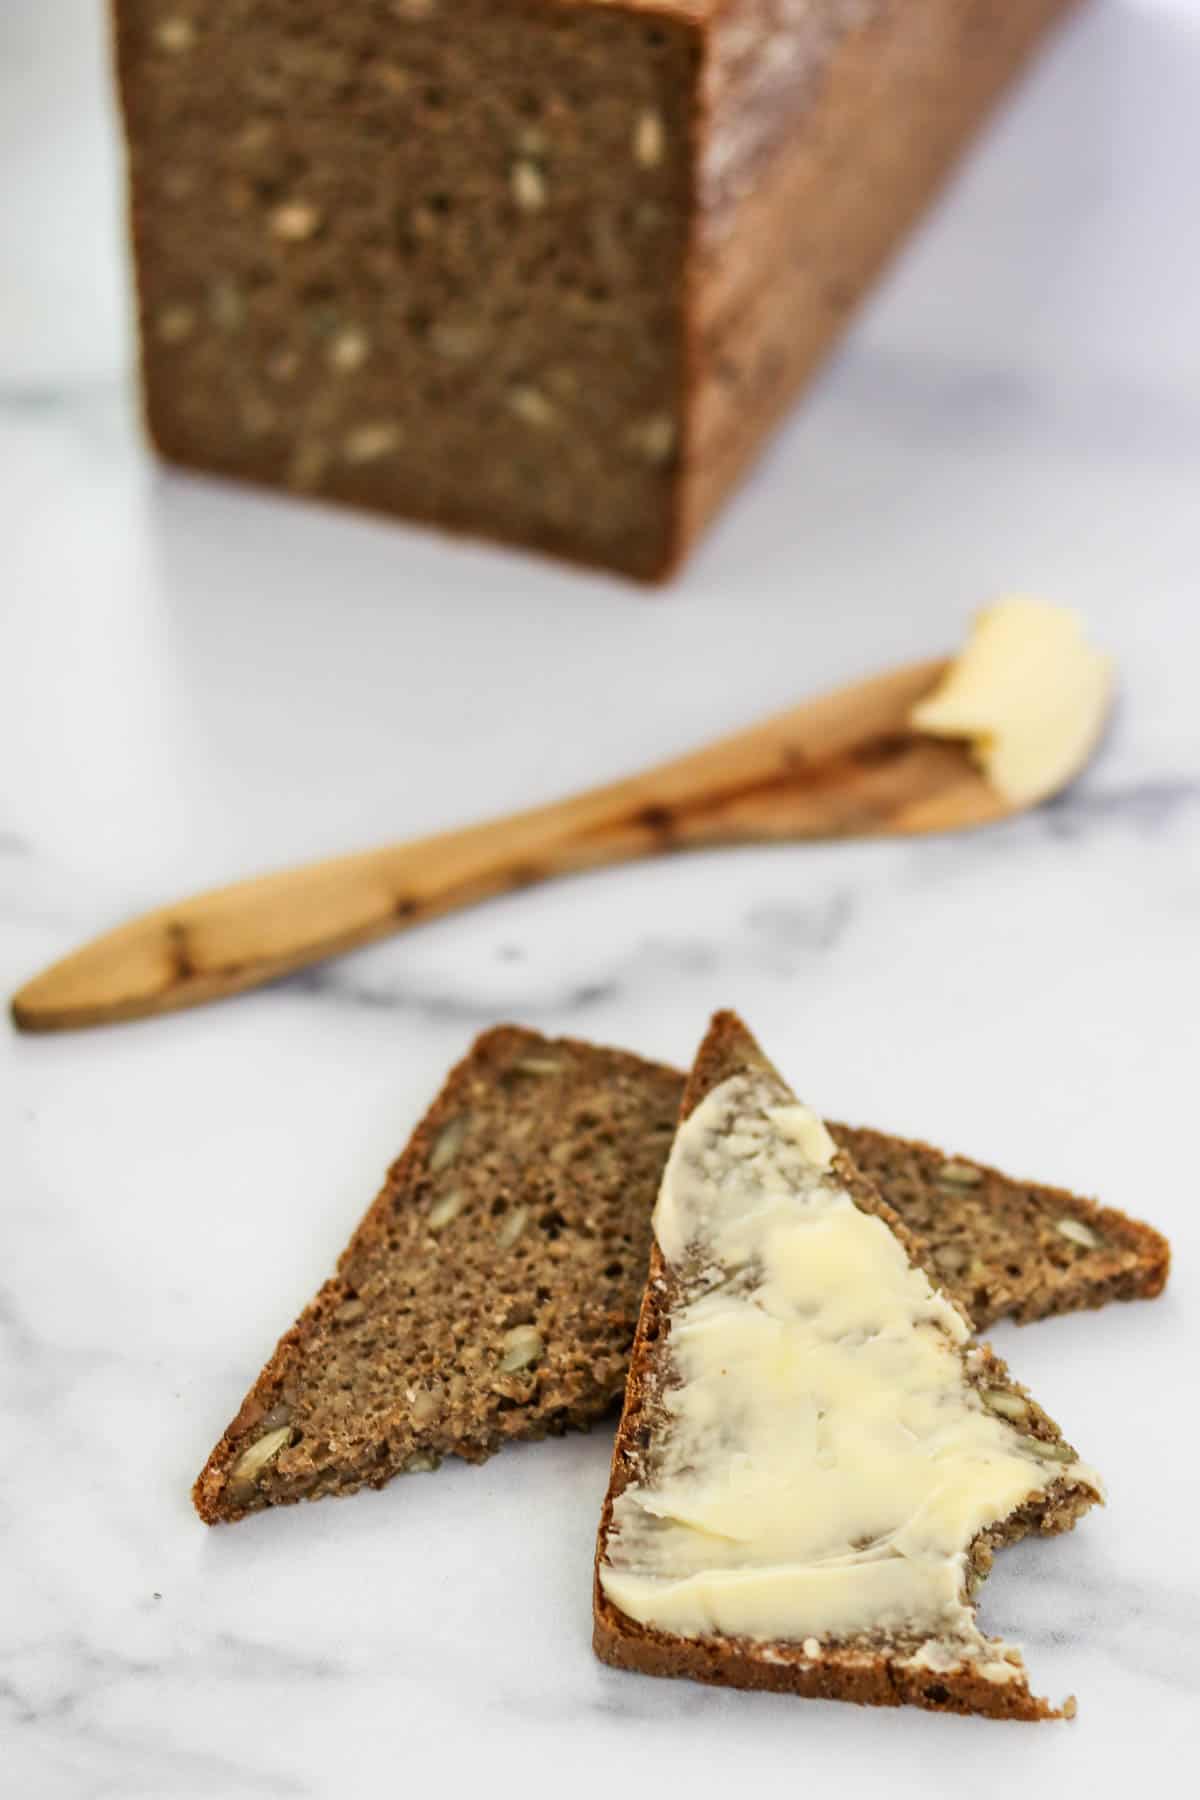
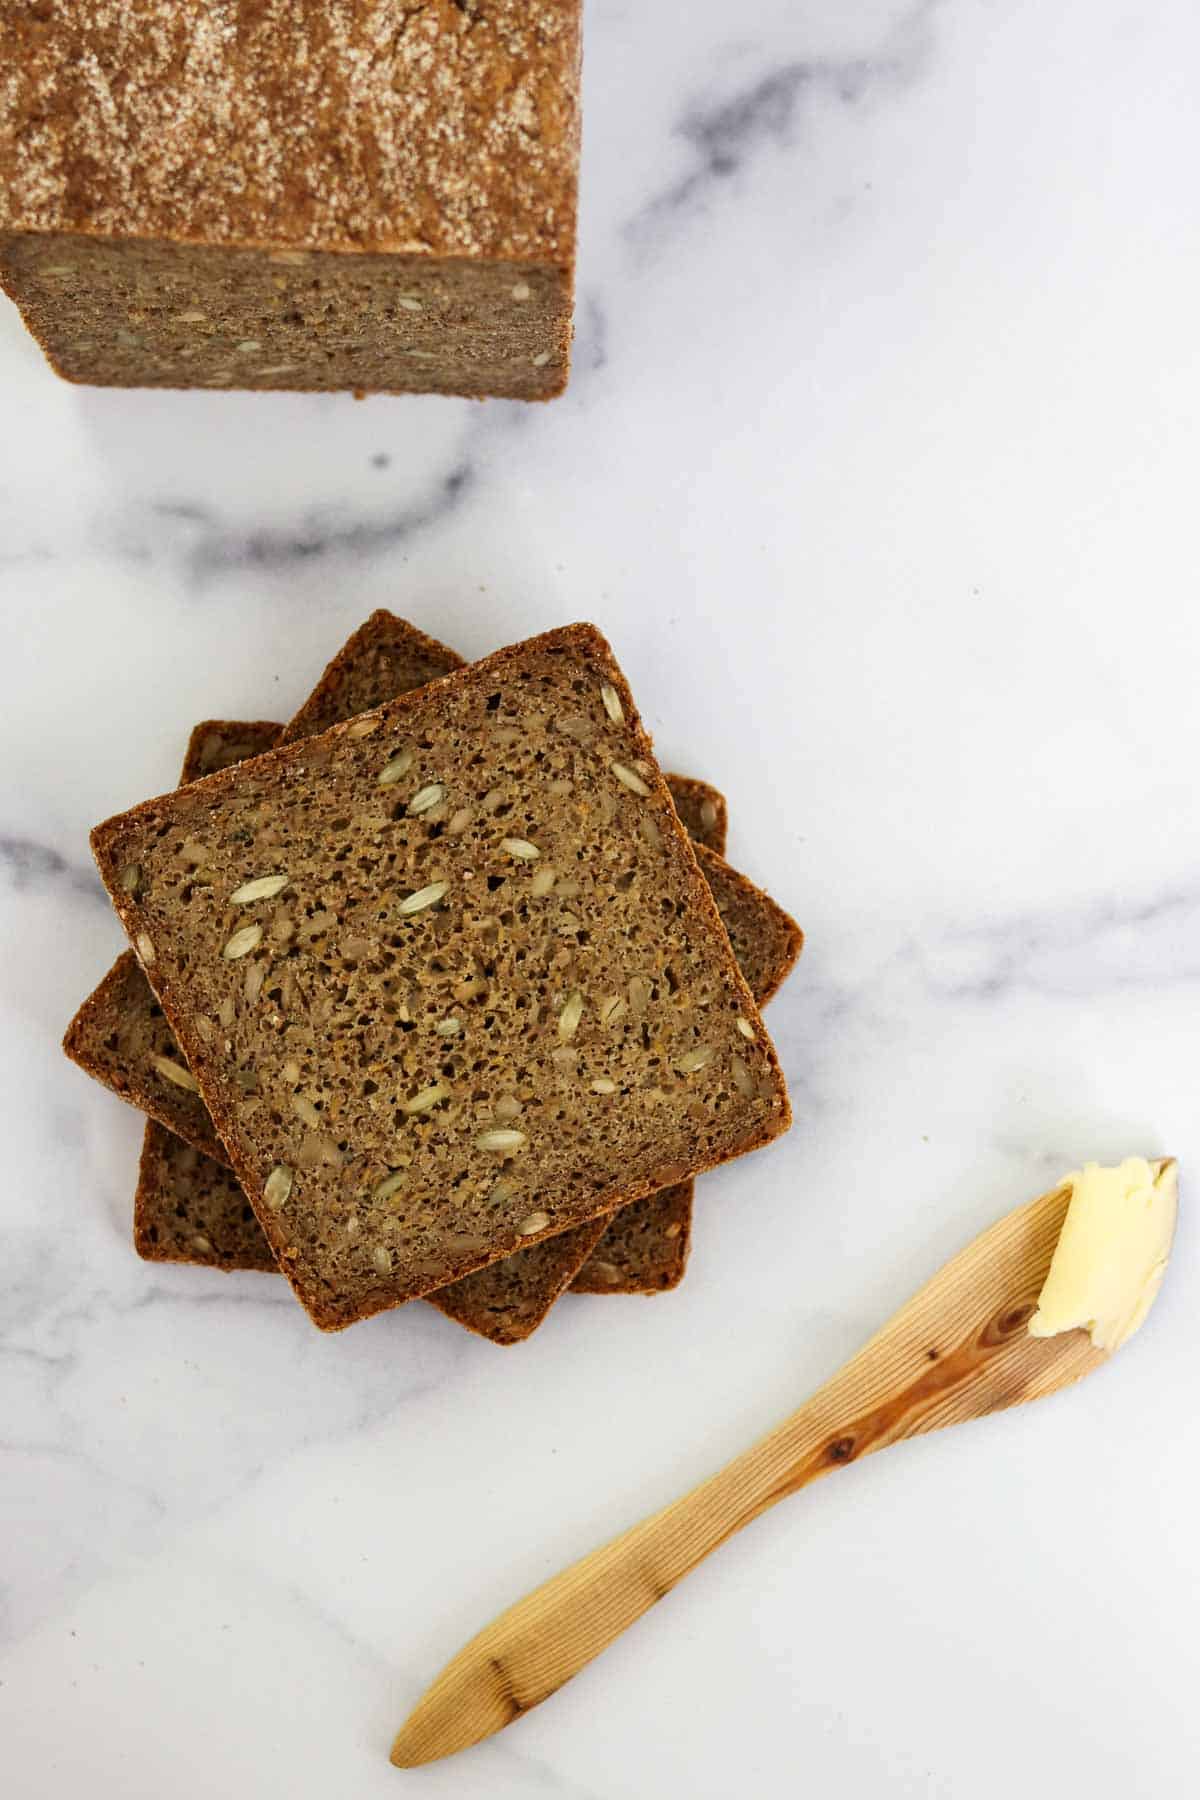
When it is served, Rugbrød is typically sliced thin (a little less than a quarter of an inch) and buttered liberally with salted butter. There is actually a word in Danish, tandsmør, which means "tooth butter". It refers to buttering your bread generously enough so that when you bite into it you can see your teeth marks in it.
It may be enjoyed as is, simply slathered with butter, or it can be piled with additional ingredients to form the base of smørrebrød , the famous Danish open-faced sandwiches. Check out this post about How to Make Smørrebrød at Home for everything you need to know about making these deliciously beautiful open-faced sandwiches with your rugbrød!
Related Recipes
Looking for more Scandinavian rye bread recipes? Give these a try:

If you tried this Danish Rye Bread (Rugbrød) recipe or any other recipe on my website, please leave a 🌟 star rating and let me know how it goes in the comments below. I love hearing from you!
Recipe
Easy Overnight Danish Rye Bread (Rugbrød)
Ingredients
For the Soaker:
- 2 ½ cups 7 grain hot cereal mix such as Bob's Red Mill brand or rye chops see note below
- 1 cup raw sunflower seeds
- 1 cup raw pumpkin seeds (pepitas)
- ½ cup flax seeds
- 2 ⅔ cups cold water
For the Dough:
- 2 cups dark rye flour I use the Bob's Red Mill brand, plus more for dusting the pan and loaf
- 2 cups bread flour
- 1 teaspoon instant dried yeast
- 1 ½ cups cold water
- 4 teaspoons salt
- ¼ cup molasses
- Butter for greasing the pan
Special Equipment Needed:
- Stand mixer
- Pullman pan with lid (13 x 4 inches in size)
Instructions
- For the Soaker: Combine all the ingredients for the soaker in a medium bowl. Cover with plastic wrap and let sit at room temperature overnight, approximately 8-12 hours.
- For the Dough: Combine both flours, yeast and water in a separate bowl. Stir to combine as best you can (mixture will be thick), and then knead briefly with your hands until you have a cohesive mixture. Dough will be very thick and clay-like in texture. Cover with plastic wrap and let sit at room temperature overnight, about 8-12 hours.
- Grease a 13 x 4 inch pullman pan with lid with butter and dust with rye flour, including the lid. Set aside. Combine the soaker, flour mixture, salt and molasses in the bowl of a stand mixer. Fit mixer with paddle attachment and mix on low speed for 2-3 minutes until everything is thoroughly combined, scraping down the sides of the bowl from time to time. Increase speed to medium and mix for an additional 2-3 minutes, stopping to occasionally scrape down the sides of the bowl. Mixture will be quite sticky.
- Transfer the dough to the prepared pan. Smooth out the top and sift a thin layer of rye flour over the surface of the dough. Place lid on pan and let the dough rise for 1½ -3 hours at room temperature or until it is about ½ inch from the top of the pan. The time that it takes for your dough to rise will largely depend on the temperature of the dough and your kitchen.
- Meanwhile, preheat the oven to 500 degrees. Bake the loaf with the lid on for 15 minutes. Reduce the temperature to 400 degrees and continue to bake, covered, for an additional 15 minutes. Remove the pan from oven and carefully slide the lid off. Reduce the temperature to 325 degrees and bake, uncovered, for an additional 45 minutes. (The loaf should have an internal temperature of 205-210 degrees F on an instant read thermometer at this point). Remove from the oven and immediately turn the loaf out onto a metal cooling rack set inside a rimmed baking sheet. Return the bread to the oven for an additional 10 minutes. Remove from the oven and allow the bread to cool completely before slicing, at least 3 hours. Rye bread is even better a day after baking. If you can wait until the following day, let the completely cooled bread sit at room temperature loosely wrapped in foil overnight before slicing. The bread will keep at room temperature for 3-5 days loosely wrapped in foil. Freeze for longer storage.

Hi, want to thank you for the recipe. I couldn't find that cereal or rye chop, so I used mixed wholegrain oats and it works just fine. Oh and I used date syrup instead of molasses. Bread is great. I let it ferment longer, I think it was about 15-16hours but it was for good. Second ferment was about 2-3hours. My only thing is bread is little less salty to my taste but that is not fault of recipe. Just my personal taste. And I didn't try it with anything yet, just ate three slices out of curiosity. It is really simple recipe, always welcome these.
I'm so glad you enjoyed it and that the substitutions worked well. Thanks so much for leaving a comment!
Kristi
Sought out a recipe for rugbrød after a recent trip to Denmark, and this one exceeded expectations. I don’t have a stand mixer and used my hands to mix the dough instead. Followed the directions to the letter and left the bread to cool overnight. The loaf turned out hearty and tasty - so delicious with butter or as the base of smørrebrød. The recipe made a large, dense loaf, so I froze most of it. It defrosts and toasts well.
Thanks for your comment, Barbara!
Kristi
I just got back from Denmark, where I fell in love with smorrebrod and wanted to start making it at home. I came across this recipe to use as an authentic base for it. At first I was a little nervous to attempt bread, but this recipe is almost foolproof (i.e. me-proof, ha!). The instructions are so clear and I had a really fun time with the whole process...it made me feel like a competent baker. And it tastes SO good and hearty. I agree with her tips that the bread tastes better after at least 24 hours. It makes a large loaf, so we cut it into thirds and froze what we couldn't use right away. I am very excited to try all of your different smorrebrod variations with this loaf. A number of the dry ingredients were not available at markets in my area, but I had no problem finding them online. It is definitely worth the cabinet space to invest in a Pullman pan (to get that classic shape), but I bet it would still work in a normal loaf pan.
So excited to find this recipe. Was easy to make. One question, I used a 13 x 4 Pullman pan and my dough overflowed and spilled out of pan. I had let it rise 2 hours. Did I have too much dough? Should I have checked it at 1.5 hours? I thought your recipe was for a 13 x 4 pan so didn’t weigh the dough. If I should weigh it, what would be the amount? I did clean it up, buttered and floured lid and continued by putting in oven. It smells wonderful and am hoping it turns
out.
Hi Deanne,
I hope the bread turned out well despite a rocky start! It sounds like the dough was a bit overproofed. It can be unpredictable in terms of timing. Depending on the temperature of the dough, the kitchen, etc. Sometimes it rises more quickly than others. I would just keep a closer eye on it next time and check it's progress earlier and more frequently.
Kristi
The bread did turn out very nice except that the center was undercooked. What should be the internal temperature before removing from oven? Also, my dough fills my pan (13 x 4 pullman)to
1 1/2 “ from top of pan. Is this too much dough? I used your recipe and measured in grams. I have a second batch soaking so wanting to know before I bake if I should take some out or if this is the right amount.
The recipe is a keeper and tasted delicious so I just want to fine tune it to get it as good as yours!
Thanks,
Deanne
Hi Deanne,
I usually go for 205-210 degrees F. Please let me know if you give it another try!
Kristi
Is there a benefit to using Red Mill 10 grain hot cereal instead of the 7 grain?
Either one will work just fine!
This is the first time I have made this bread. we just got back from Denmark. I am Danish and have lived in Copenhagen (my favorite city) and am very grateful for this recipe. I just wished I could have made it for min mor. Thank you. It is delicious!
Hi Kathi,
Thanks so much for your nice comment! I'm so glad you enjoyed the bread.
Kristi
I made this bread yesterday and had my first slice today. AMAZING!
I only had active yeast so I proofed it in 1/2 cup of warm water before adding it to the remaining 1 cup of water in the dough. I had no issues with the rise, it even was ready before the 1.5 hr mark.
Being in Canada I had access to the Red River multi grain cereal that worked well.
That's great, Nancy! Glad the active dry yeast worked well. Thanks so much for leaving a comment!
Kristi
Thanks so much for your comment, Ivana! I'm glad you enjoyed the bread.
I tried this recipe few times already and it is a hit. It's tasty and really really delicious
In the US, the seeds known as pepitas or green pumpkin are larger than yours. I didn't realize the dough had to sit so long before baking, so I left the soaker for another 7 hours as it caught up with my dough. My KitchenAid paddle mashed the seeds when I combined the soaker and dough. The finished bread was great just not as course as yours.
I discovered this bread in Denmark last year and absolutely love it. I brought a loaf from a bakery home in my suitcase and decided if I ever visit again I'll take an entire suitcase full home! I have tried this recipe a couple of times, as well as another similar one. One thing I run into every time is not having the temperature reach 205, even if I cook it an extra 10 minutes. I don't think my thermometer is off, because it seems to work with other cooking. How long is too long to leave it in so that I can get it to 205?
Hi Lisa,
Thanks for your comment and question! As long as you are happy with the texture of the bead, I wouldn't worry about. What temperature is your loaf getting to?
Kristi
Sometimes it is difficult to mix the soaker with the overnight dough. The dough is very thick and gloopy and does not combine well with the soaker. I end up having to smoosh it together with my fingers to get it to come together. Any tips?
Hi Timothy, thanks for your question! You are right....the dough is definitely thick and gloopy. I have a high-powered mixer which definitely helps. And I think you probably have the right idea using your hands. Sometimes they are a better tool than a spoon!
Kristi
I just made this. It's excellent. The flavor is amazing. Thank you.
Hello there, I was wondering about the oven temperature, I have a normal oven that reach 250 degrees celsius max, can you clarify what temperature do you mean in celsius? Thanks in advance !
I would go ahead and set the oven to 250 C to start. That is close enough to 500 F. Hope this helps!
I am going to make for the second time, I really liked it. Thanks
Made this twice so far. I had to bloom the yeast. It’s so tasty!!