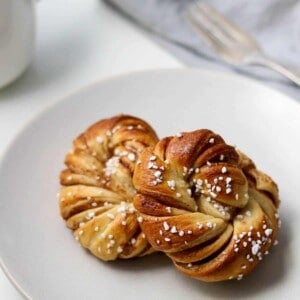
Authentic Swedish Cinnamon Buns (Kanelbullar)
Looking for the best recipe for Swedish Cinnamon Buns (Kanelbullar)? Look no further. These buns are billowy soft on the inside, warmly spiced with cardamom and swirled with buttery cinnamon sugar. They are everything a Swedish Cinnamon Bun should be and more.

A Quick Look at the Recipe
- ✅ Recipe Name: Swedish Cinnamon Buns (Kanelbullar)
- ⏰ Prep Time: 45 minutes + 2 hours and 45 minutes rising time
- 🔥 Bake Time: 12 minutes
- 👥 Yield: 12 buns
- 👩🍳 Expert tip: Grind your own cardamom for the best flavor
- ⭐️ What makes it special: Made with the tangzhong method which produces extra soft, fluffy buns that stay fresh for longer than traditional methods
Jump to:
Why You'll Love this Recipe
- ♥️ These buns are unbelievably soft and fluffy thanks to the tangzhong method - a little extra step in the recipe that makes a big difference.
- ♥️ Authentic flavor - freshly ground cardamom and a swirl of buttery cinnamon and sugar throughout.
- ♥️ They look fancy and impressive but the shaping is actually really easy.
Swedish Cinnamon Buns (Kanelbullar) are a beloved pastry in Sweden, known for their warm, comforting flavor and distinctive spiral shape. Kanelbullar are often associated with the Swedish tradition of "fika," which is a social coffee break that often involves baked goods like these cinnamon buns.
Scandinavia is home to some of the most delicious yeasted buns in the world, including bakery favorites such as Traditional Swedish Cardamom Buns (Kardemummabullar), St. Lucia Buns (Lussakatter) and Norwegian School Buns (Skolleboller or Skollebrød). Swedish Cinnamon Buns (Kannelbullar) are on that same level and just as easy to make at home!
Want to try a Norwegian version of cinnamon buns next? Give my Skillingsboller (Norwegian Cinnamon Buns) a try. For everything you need to know about Scandinavian sweet buns and links to all of my bun recipes, check out The Ultimate Guide to Scandinavian Sweet Buns here.
⭐️⭐️⭐️⭐️⭐️ I have tried multiple versions of Swedish cinnamon buns, and my family has declared this to be their favorite version. I had heard of the tangzhong method but had never tried it before using this recipe; it truly makes a dramatic difference! - Patrick
Ingredients
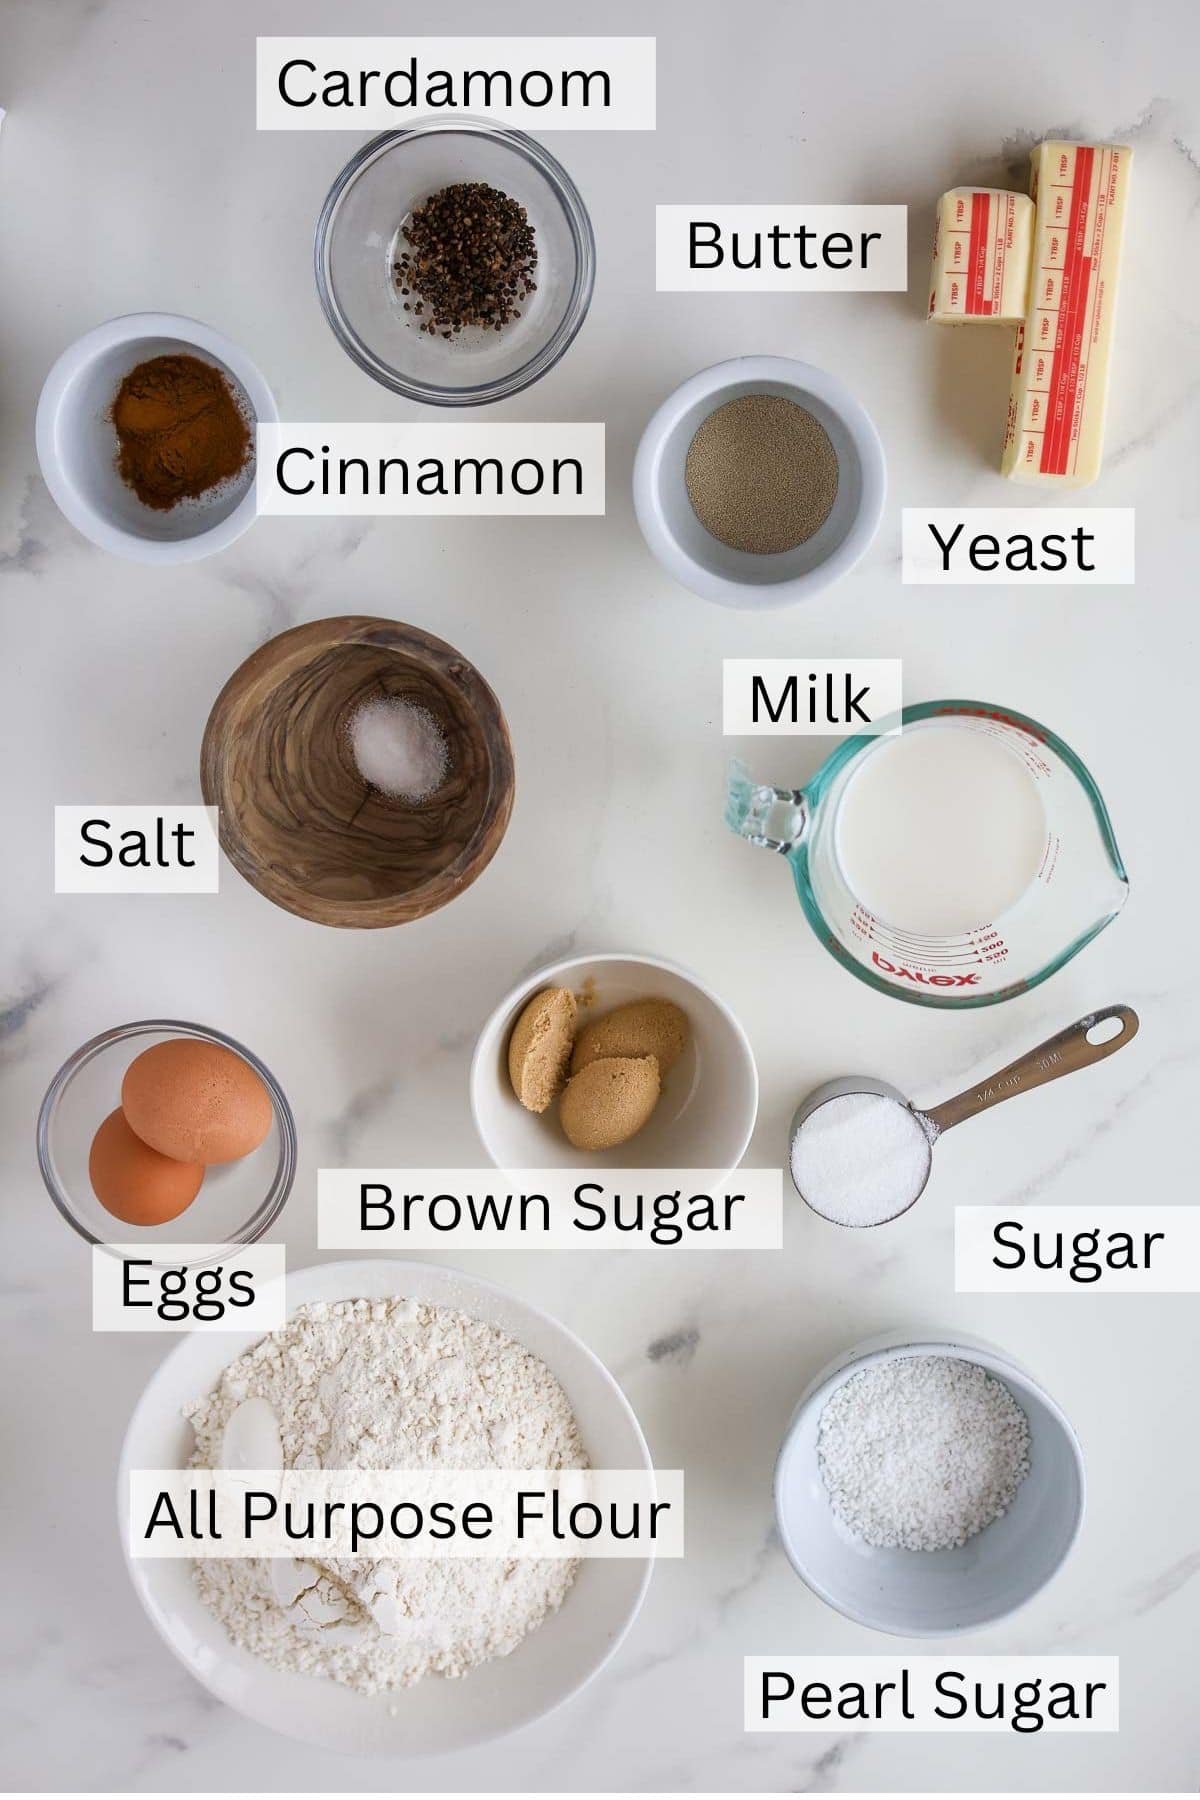
- Cardamom seeds flavor the dough. You can use pre-ground cardamom but the flavor is improved if you grind the seeds yourself.
- Instant yeast acts as the leavener in this recipe.
- Pearl sugar tops these buns with a final bit of crunch and sweetness.
See the recipe card below for exact amounts and detailed instructions.
Substitutions
- You can substitute a plant based milk for the regular whole milk.
- While this recipe calls for instant yeast, you can certainly swap active dry yeast for the instant yeast by proofing it in the warm milk for about 10 minutes prior to adding it to the dough.
- Crushed sugar cubes can stand in for the pearl sugar in a pinch.
Equipment Needed
- Spice grinder or mortar and pestle (to grind the cardamom seeds)
- Stand mixer to mix and knead the dough (you can also do this by hand if you prefer)
- Rolling pin
- Small offset spatula (not necessary but nice to have for spreading the filling)
- Pizza wheel (a sharp knife will also work)
- 2 rimmed baking sheets
- Parchment paper
- Pastry brush for brushing on the egg wash
How to Make Swedish Cinnamon Buns (Kanelbullar)

- Combine the ingredients for the tangzhong in a saucepan and cook, whisking constantly, until a paste forms. Set aside to cool to room temperature.

- Combine the dough ingredients in the work bowl of a stand mixer fitted with a dough hook attachment. Mix and knead as directed. Cover the dough and let it rise until 1 ½ - 2 times its size.

- While the dough is rising, mix the filling ingredients together. Once the dough has risen, roll into a 16 x 20 inch rectangle. Spread the filling evenly over the entire surface of the dough.

- Fold the dough into thirds like a business letter along the longer side (the 20 inch side).

- Cut the dough into 12 strips.

- Twist the dough strip and wrap it around your fingers to create a bun shape, tucking the end through the center (see the video included in this post for more help). Repeat with remaining dough strips and transfer to a baking sheet lined with parchment paper. Let rise for 45 minutes. Brush with egg wash and sprinkle with pearl sugar.

- Bake at 400 degrees for 12-14 minutes.

- Cool and enjoy!
Expert Tips
- Use the tangzhong method as outlined in the recipe. The simple process of creating a roux with water, milk and flour and adding it to the dough makes a HUGE difference in the final product. The dough itself is silky and smooth, and the buns emerge from the oven soft and tender with a golden brown crust. It's 5 minutes well spent.
- Start with whole cardamom seeds and grind them yourself. I can't stress what a difference this makes. Your buns will have amazing cardamom flavor and be that much more authentic to what you would find in a Swedish bakery.
- Roll the dough out on an unfloured work surface and use a dough scraper to help coax it off of the surface if necessary. It's nice if the dough sticks to the countertop just enough so that it keeps it in place as you are rolling. If you've floured the surface, this won't happen. A dough scraper is an inexpensive and excellent tool to have in your kitchen and will easily help the dough release from countertop.
- If you are having a hard time twisting and shaping the buns because they seem too warm, pop them into the refrigerator briefly. Depending on the time of year and the temperature of my kitchen, sometimes the strips of filled dough become too soft and are difficult to work with. Simply cover them with plastic wrap and place them in the refrigerator until they firm up slightly and continue with the recipe.

Recipe FAQs
My overwhelming preference is to use decorticated cardamom seeds which are simply cardamom seeds that have been removed from their pods. These seeds are then ground in a spice grinder or mortar and pestle before using them in the recipe. This gives the very best flavor and prevents you from having to take the seeds out of the pods yourself (which is a bit of pain). Pre-ground cardamom can be substituted but it will not result in as good of a final product.
Basically a small amount of the flour and liquid (water, milk or a combination of the two) is cooked on the stove for a very short period of time creating a roux-like mixture. This process gelatinizes the starches in the flour allowing them to absorb more liquid and results in a higher rise (hello billowy buns!) and a more tender, moist bun that stays that way for a longer period of time. Check out this blog post for more information about the tangzhong method and how to use it in recipes.
Yes! You have a couple of different options. Either let the dough rise at room temperature until about double in size and then transfer the dough to a 9x13 baking dish and cover it tightly with plastic wrap. Store in the refrigerator until you are ready to shape the buns and proceed with the recipe (up to 24 hours). OR, shape the buns as directed the night before baking and wrap with plastic wrap. Transfer to the refrigerator until you are ready to bake them the following morning. Be sure to give them 45 minutes or so to warm at room temperature before popping them into the oven.
While these Swedish Cinnamon Buns are always best the day they are made, they keep well in an air-tight container at room temperature for a day or two.
Absolutely! They freeze really well. Simply cool them completely and pop them into a freezer safe container or bag. The will keep for a couple of months. Either thaw them on the counter top or pop them in a 300 degree oven until warmed through.
Cinnamon Bun Day (Kanelbullens Dag) is celebrated each year on October 4, and it's a beloved tradition in Sweden. Bakeries are filled with freshly baked buns and it's a perfect opportunity to bake some at home and join in the celebration!
What to Serve with Swedish Cinnamon Buns
A good cup of coffee is about the best and most traditional accompaniment with Swedish Cinnamon Buns, but tea, Swedish Glögg (for something a little boozy) or even this Cardamom Hot Chocolate would be delicious as well!
If you are hosting a fika gathering, brew a pot of coffee and serve these cinnamon buns as the star of the show alongside:
- Swedish Crispbread (knäckebröd) (storebought or homemade) and an assortment of cheeses
- A Swedish cookie or two (pepparkakor and/or chokladsnittar would be nice)
- Fresh berries or other seasonal fruit
More Iconic Swedish Baked Goods to Try at Home
Looking for more iconic Swedish baked goods to try? I've got these delicious options for you:


If you tried this Swedish Cinnamon Buns (Kanelbullar) recipe or any other recipe on my website, please leave a 🌟 star rating and let me know how it goes in the comments below. I love hearing from you!
Recipe
Swedish Cinnamon Buns (Kanelbullar)
Equipment
- Spice grinder or mortar and pestle (to grind the cardamom seeds)
- Stand mixer to mix and knead the dough (you can also do this by hand if you prefer)
- Rolling Pin
- Small offset spatula (not necessary but nice to have for spreading the filling)
- Pizza wheel (a sharp knife will also work)
- 2 rimmed baking sheets
- Parchment paper
- Pastry brush for brushing the buns with egg wash
Ingredients
For the Tangzhong:
- 5 tablespoons water
- 5 tablespoons whole milk
- 3 tablespoons all-purpose flour
For the Dough:
- 6 tablespoons melted unsalted butter cooled
- ½ cup whole milk slightly warm
- 2 teaspoons instant yeast
- 1 teaspoon cardamom seeds, freshly ground (or 1 teaspoon ground cardamom)
- 1 teaspoon salt
- ¼ cup granulated sugar
- 3 cups + 2 tablespoons all-purpose flour
- 1 large egg
- All of the tangzhong cooled
For the Filling:
- 5 tablespoons soft unsalted butter
- 1 teaspoon all-purpose flour
- Pinch of salt
- 3 tablespoons packed light brown sugar
- 2 teaspoons ground cinnamon
For the Egg Wash and Topping:
- 1 large egg
- 1 tablespoon water
- Pearl sugar for topping
Instructions
- Make the tangzhong: Combine water, milk and flour in a medium saucepan. Whisk until combined and no lumps remain. Place saucepan over medium heat and cook mixture, whisking constantly, until it thickens, about 1-2 minutes. Set aside to cool.
- Make the dough: While the tangzhong is cooling, begin preparing the rest of the ingredients for the dough. If you haven't already, melt the butter and warm the milk to give them a chance to cool slightly. Combine yeast, cardamom, salt, sugar and flour in the bowl of a stand mixer. Whisk briefly by hand to combine.
- Attach the dough hook to the mixer. Add melted and cooled butter, slightly warm milk, egg and the cooled tangzhong (it can be slightly warm to the touch) to the dry ingredients. Mix on medium low until fully combined, scraping down the sides of the bowl as necessary.
- Increase mixer speed to medium and knead mixture for 4 minutes or until dough is smooth and clears the side of the bowl. It's okay if it's sticking to the bottom of the bowl. You can also mix and knead the dough by hand but it will take longer, more like 8-10 minutes.
- Cover bowl with plastic wrap and allow the dough to rise for an hour or until 1 ½ or 2 times its original size. The time will largely depend on the temperature of your kitchen.
- In the meantime, make the filling. Combine butter, flour, salt, brown sugar and cinnamon in a medium bowl. Using a fork, mix ingredients together until a smooth, spreadable paste forms.
- Once the dough has risen, preheat oven to 400 degrees. Line two baking sheets with parchment paper. Remove the dough from the bowl and place it onto a clean countertop. Roll out with a rolling pin until it is in the shape of a rectangle that is about 16 by 20 inches in size. The dough should be smooth enough that you do not need to add flour during the rolling process. If yours is sticking the rolling pin, however, sprinkle a little flour over the dough as necessary to prevent this from happening.
- Using an off-set spatula, spread filling in a thin layer over the entire surface of the dough.
- Fold the dough like a business letter along the long side (the 20 inch side): bring the top third of the dough down over the center third and bring the bottom third up over both the center and top third. You may need a metal dough scraper to help coax your dough from the counter top if it is sticking. Roll out folded dough just to flatten slightly.
- Using your dough scraper, sharp knife or a pizza wheel, cut the folded dough into 12 equal size pieces.
- Working with one piece of dough at a time, twist the strip of dough as you hold it between your thumbs and forefingers until it has a nice spiralized appearance.
- While you continue to hold the dough in the thumb and forefinger of one hand, use your free hand to wrap the twisted strip of dough around the three middle fingers of the hand that holds the dough strip, tucking the last bit of the dough strip up and through the center of the circle you have just created. Place shaped bun on a prepared baking sheet. Once you have six buns shaped and placed on one of the baking sheets, cover with plastic wrap and set aside. Continue with remaining buns, shaping and placing them on the second baking sheet before covering with plastic wrap. Let covered buns rise for an additional 45 minutes.
- Meanwhile, make the egg wash. Whisk egg and water together in a small bowl. Once the buns have risen and are ready to go into the oven, remove plastic wrap and brush the surface of each bun with the egg wash Generously sprinkle pearl sugar over the top of each bun.
- Starting with the batch of buns you shaped first, bake one pan of buns at a time for 12-14 minutes or until golden brown. Repeat with remaining pan. Move to a wire rack to cool slightly and serve.


So so delicious. Absolutely loved them and will make them soon again. Will become my go to recipe.
Thanks, Anja!
Kristi
I bake these rolls all of the time, and they are always a delight. We’re lucky if the batch lasts more than two hours, they’re so delicious. Once you get the hang of it, the wrapping/folding technique is pretty straightforward, though some of my rolls still resemble brain lol. Highly recommended!!!
Thanks, Elaine!
Kristi
Currently making the Kanelbullar and I am excited to see how they turn out. I tried your recipe because I wanted to try the tangzhong method.
I have to admit I am struggling with the measurement "tablespoon" for butter, maybe it's my metric brain but it would be super helpful to have a more precise measurement like grams (and while we're at it, those measurements would help for the flour in the beginning of the recipe as well) - I am pretty sure I used way too much butter in the dough because of it.
Other than that great straightforward recipe, I'm sure they'll taste great, a bit more butter has never a recipe 🙂
Hi Franzi,
Thank you so much for baking the kanelbullar and for taking the time to leave such a thoughtful comment. I’m so glad you decided to try the tangzhong method!
6 tablespoons of butter (what is called for in the recipe) is approximately 85 grams. Butter measurements in tablespoons can definitely feel imprecise, especially if you’re used to baking by weight (which I completely understand and agree is more exact). The good news is that this dough is actually quite forgiving. If a little extra butter found its way in, the buns should still bake up beautifully and taste delicious (as you noted, butter rarely ruins anything 😊).
That said, your feedback is very helpful. I have included the gram measurements for the flour (there is a toggle at the bottom of the recipe - you have to click on "metric" to make them appear) but there is no weight for the butter - just tablespoons. I will definitely go in and fix this.
I hope you love how the buns turn out, and thank you again for such a kind and constructive note. Happy baking!
Kristi
Making these today and alittle trouble with the twisting. Used youtube to get a better idea how to do it, but you mention to look at your video. Where is it???
Hi Barbara,
Sorry you had trouble with the twisting and locating the video! It's actually embedded into the recipe card. I'll be sure to add that into the post itself. Thanks so much for pointing this out. I hope they were yummy anyway!
Kristi
I knew that these buns were going to be perfect the moment I saw the pictures! I followed the recipe to a T, and they are absolutely delicious! Now this recipe is staying at the top of my favs! Thank you for your work!
Thanks, Tanya! I'm so glad you enjoyed them!
Kristi
My daughter and I just baked a batch and they are so delicious! I can see why they're paired with fikka as they are on the lighter end (vs American bun/roll). They were done baking after 10 minutes so I think I'll try baking them at 420 instead. Our only issue working with the dough is that it wouldn't roll out to 16×20. It was more like 12×19. At some point, we stopped, covered it for about 15 mins then came back to roll, hoping the gluten would loosen up a bit. It was a tad better, but still not as pliable as American rolls/buns. We also would love to find a way to make each piece even. Some were super tiny and some were large (my fave).
Nevertheless so delicious!
My daughter is now going to test out sticking the buns in the fridge (unbaked) overnight, then bringing to room temperature on the counter (which I assume will take over an hour) the next morning before baking. We're praying for make-ahead tips from you so that I don't have to be up at 1am for Kanelbullen dag! Lol
Thank you!
So glad it went well, Serenity! See my response to your other comment for make ahead tips. Please keep in touch and let me know how it goes!
Kristi
Hello! So happy I've come across your website when my daughter is obsessing all things Swedish.
She wants to bake "a TON" of these for October 4th Swedish Cinnamon Roll Day. She wants to serve them to neighbors, friends, "the whole world" early in that morning (7am). She's excited to use your recipe and we'd appreciate it if you could answer her questions:
1. How can she nake many kanelbullar in advance?
2. Is it possible to double or even triple the recipe?
3. Should she bake them all in advance, freeze, then warm them early October 4th morning?
4. Or should she bake as many as she possibly can the day before (October 3rd), place in plastic tubs, and slightly heat the morning of serving?
5. Or is it best to make all of the knots and place them (prior to baking) in the fridge the night before, then bake? (I'm afraid I won't have the fridge space for so many and we only have 4 sheet pans).
6. Can two sheet pans bake at once or does it have to be one at a time?
Thanks in advance!
Hi Serenity,
Sorry for the late reply! I am in Norway this week eating lots of delicious things. 🙂 Yes you can definitely make these in advance! A few options: You can make the dough and let it rise the first time at room temperature and then transfer it in bulk to a greased 9 x 13 baking dish. Cover with plastic wrap and transfer to the refrigerator overnight. Shape in the morning and bake. OR Shape the rolls the night before and cover with plastic wrap and transfer to the refrigerator and bake in the morning (you need quite a bit of fridge space for this). My favorite way to make these in advance is to bake them and freeze them and rewarm in a 300 degree oven before serving. All of these methods work really well! You can also bake two sheet pans at once. I would rotate the pans half way through baking and keep an eye on them. You can double or triple the recipe but it still might be easiest for shaping purposes to only be working with one batch at a time. So excited for you to celebrate Cinnamon Bun Day, and I love your daughter's enthusiasm! Please let me know how it goes or if you have any other questions.
Happy Baking,
Kristi
This recipe is cinnamon bun perfection! After much testing, I can assure you, this recipe is the best!
I didn’t make these but my friend did and they turned out amazing. She left the leftovers at my places and I was quick to finish them all.
Hi Kristi,
These buns are the best I’ve ever made. The taste is fantastic and remind me of the buns we ate in Kopenhagen. I have made quite a few of your savory recipes, they are also really good.
When baking your recipes my only concern is if I use the right amount of flour. But they turned out great, even though I used only 380 grams of T65 bread flour (I hadn’t noticed your reply on Perrins comment). Greetings from the Netherlands!
Taste of home without having to pull out my Swedish cookbooks and metric measuring tools. I’m going to try to make the dough the day before and refrigerate them once shaped.
I would love it if you could supply the weight of the ingredients, or at least for the main portion of flour. That's the one I'm most concerned about getting a different amount on.
Hi Perrin,
I will definitely do that! In the meantime, the weight of the main portion of flour is 435 grams. Hope this helps!
Kristi
Dear Kristi,
I would like to bake these fresh in the morning and take them to coworkers; is it possible to leave them pre-made resting in the fridge overnight and just bake them in the morning? Sorry if the question has been asked before och ack så mycket,
Marina
Hi Marina,
Yes, I think if you shape the night before and wrap them tightly in plastic wrap, you should be able to easily bake them in the morning. Just give them 45 minutes or so to warm up a bit before popping them in the oven. Hope this helps!
Kristi