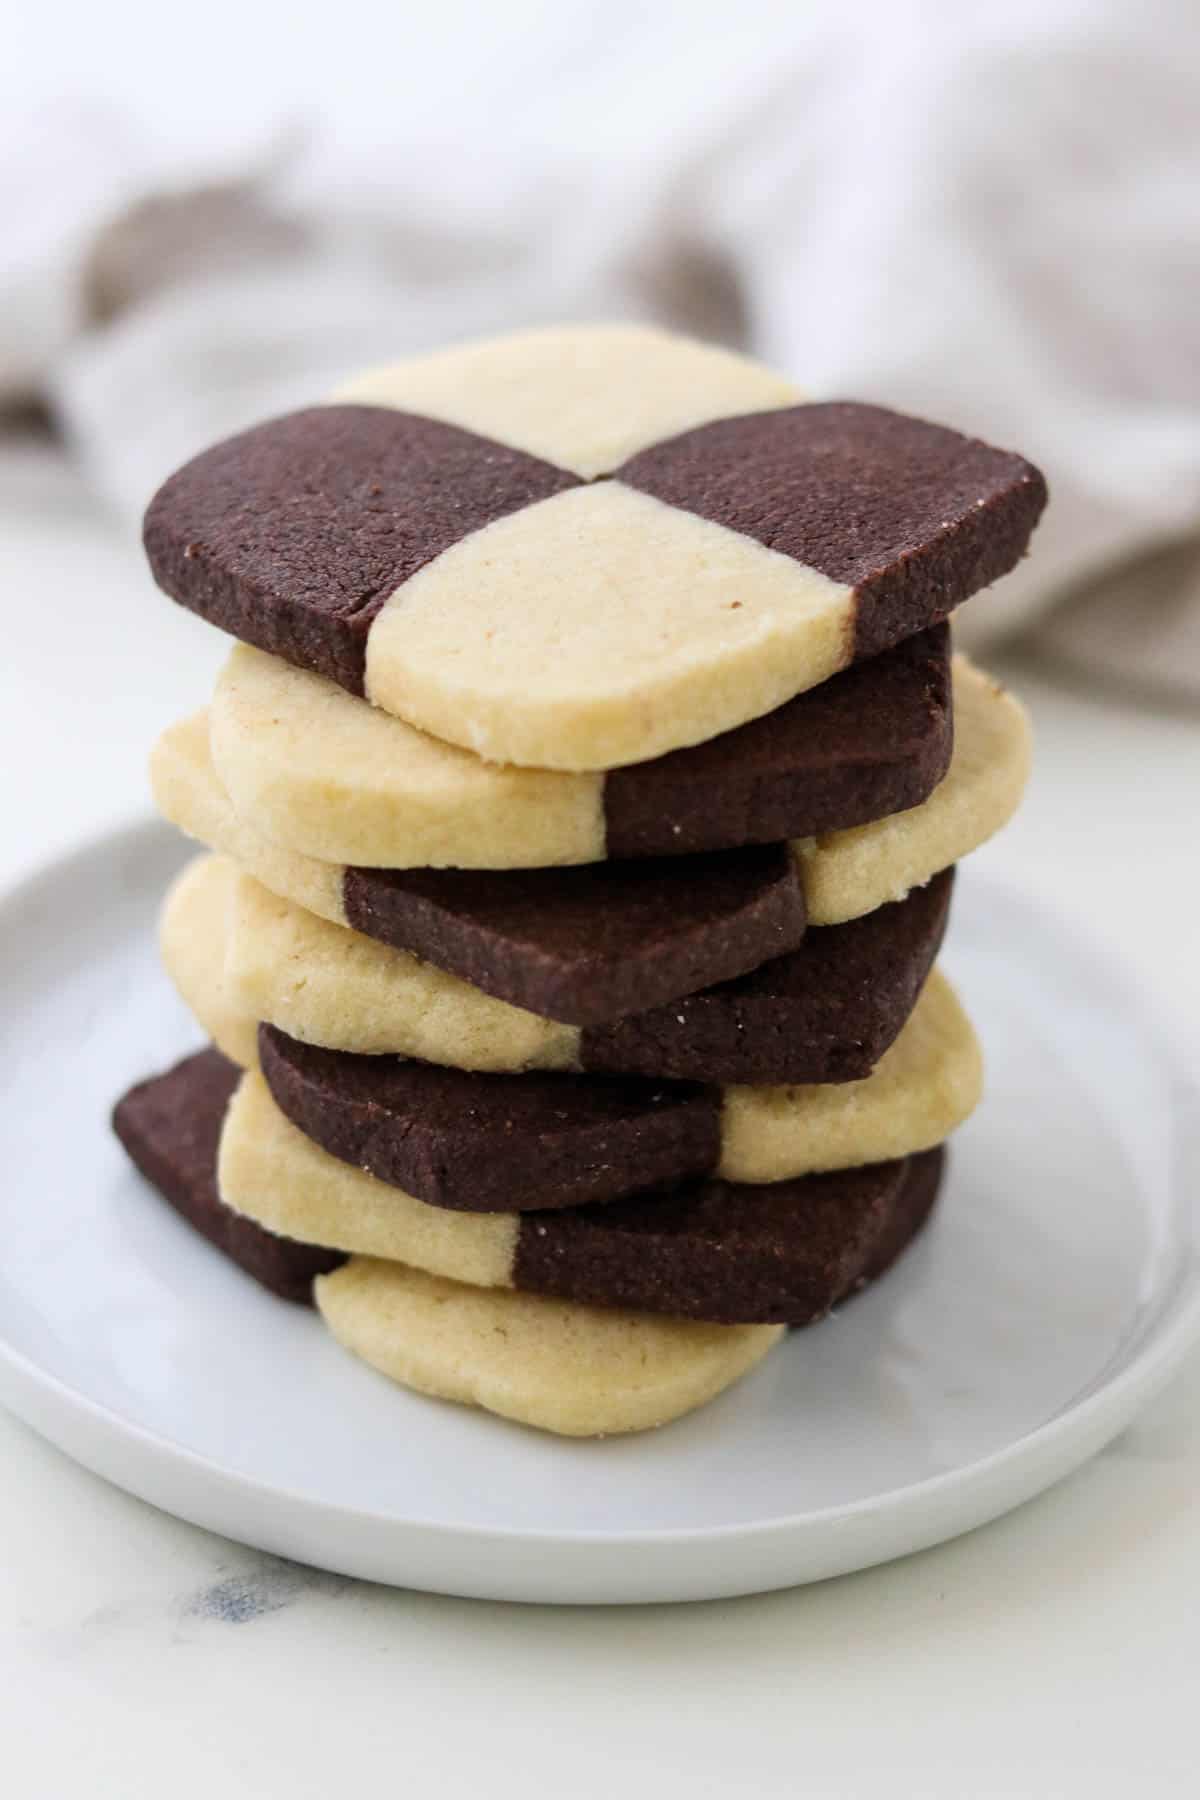
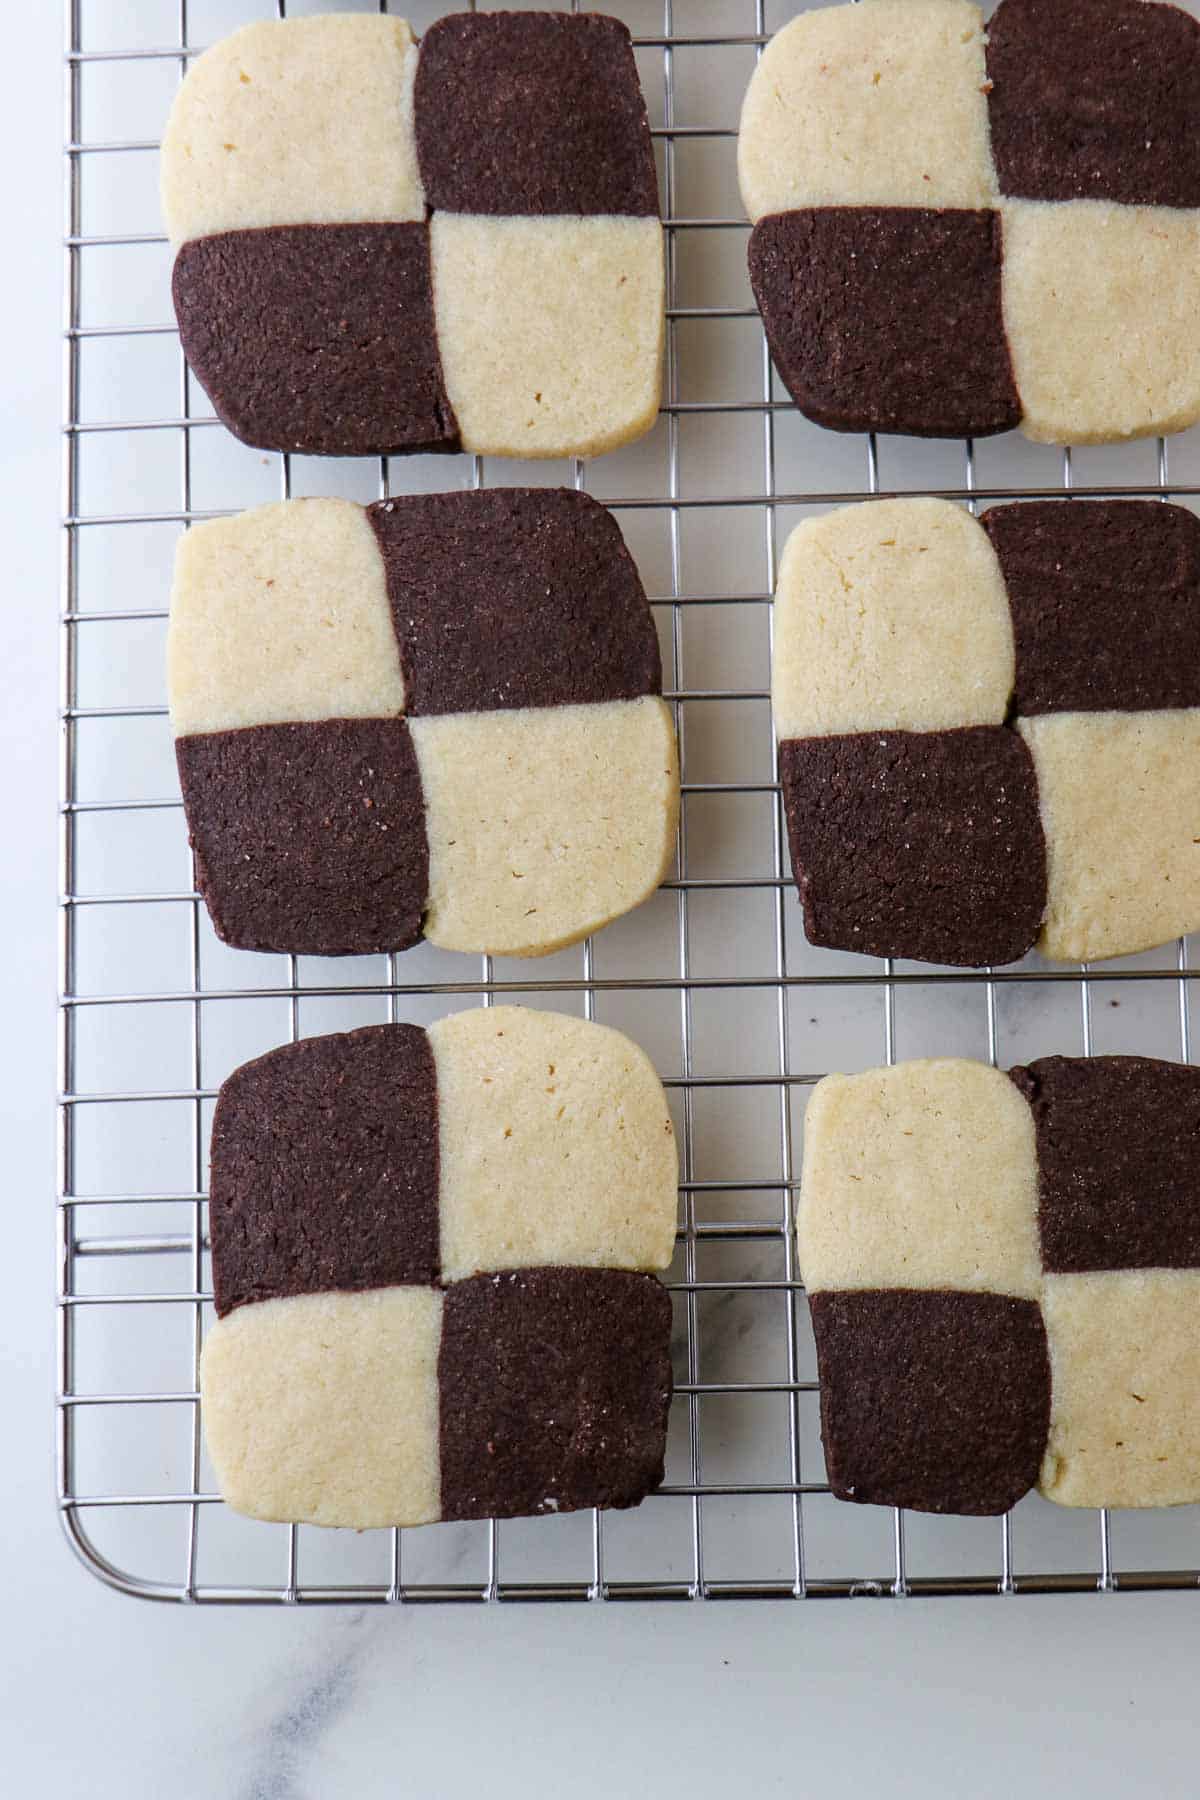
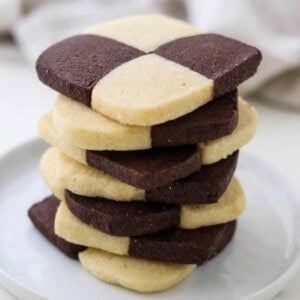
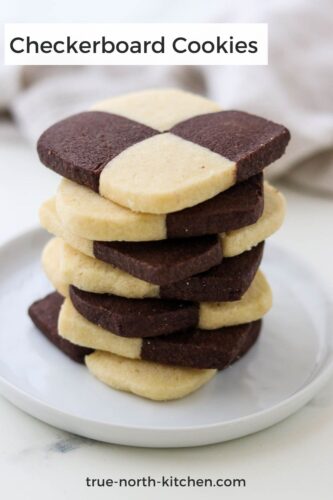
Swedish Checkerboard Cookies (Schackrutor) - Easy Chocolate & Vanilla Shortbread
If you've ever stepped into a bakery in Stockholm, chances are you've seen neat rows of Schackrutor - Swedish Checkerboard Cookies whose name literally means "chess squares".
Buttery and tender and flavored with both vanilla and chocolate, these cookies are as lovely to look at as they are to eat. And while they might seem fancy, they are surprisingly easy to make at home.
After a recent visit to Stockholm, I knew I needed to recreate schackrutor at home in my own kitchen. They had quickly become one of my favorite fika treats, and I wanted an easy recipe that captured the essence of this classic cookie without too much fuss.
Looking for more iconic Swedish cookie recipes to add to your fika or holiday cookie tray? I suggest my great-grandmother's ginger cookie recipe (pepparkakor), these thin and crispy Swedish oatmeal cookies, Swedish Kolasnittar (Caramel Slice Cookies) and mandelmusslor (Swedish almond tart cookies.
Why You'll Love this Recipe
- ♥️ One cookie dough quickly turns into two by removing half and adding chocolate to the remaining portion. So easy!
- ♥️ The process for creating the checkerboard pattern is very simple and forgiving.
- ♥️ The cookies tast amazing - so tender and buttery with a bit of vanilla and chocolate in each bite.
Ingredients
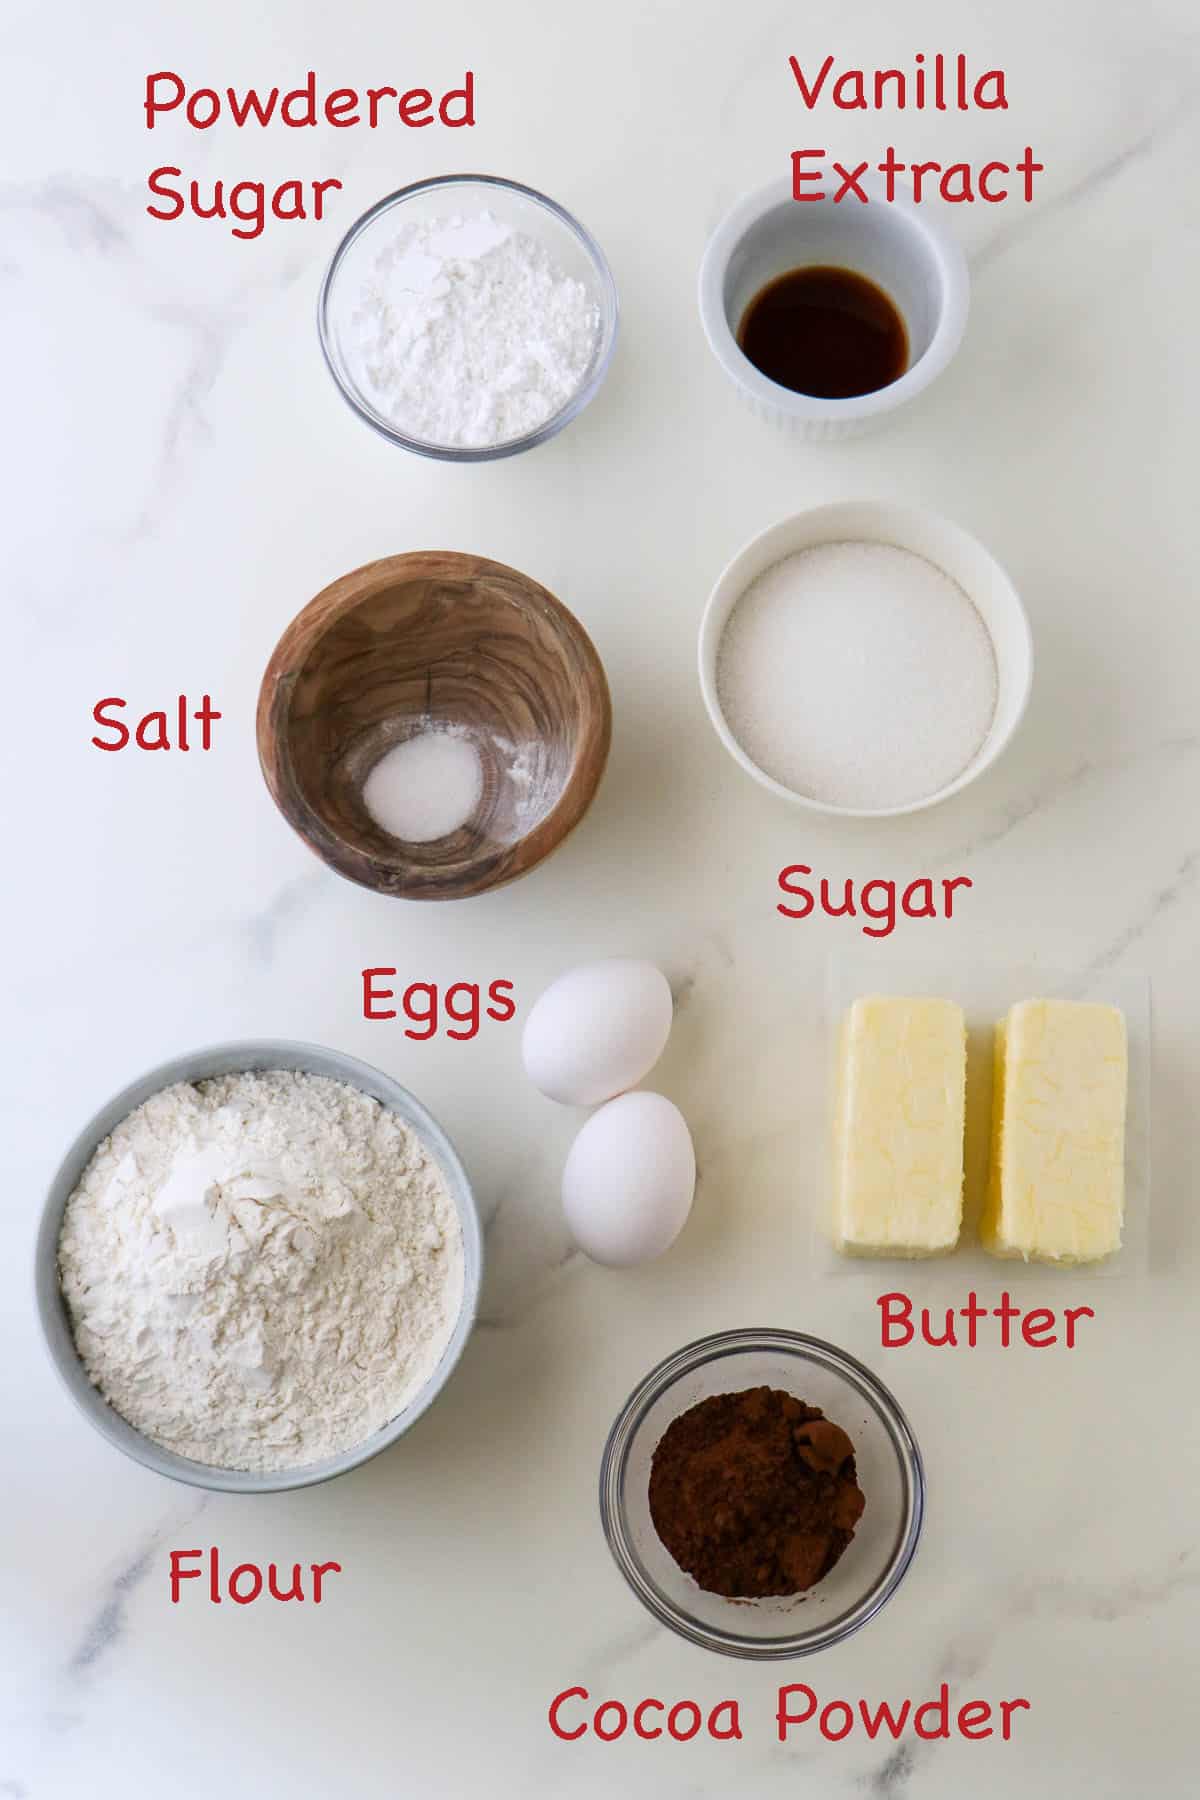
Ingredient Notes:
- A combination of granulated sugar and powdered (confectioner's) sugar bring the right amount of sweetness. The powdered sugar also helps maintain the clear, crisp lines between the two colors of dough when they bake.
- Dutch-processed cocoa powder adds just the right amount of chocolate flavor to the chocolate portion of the dough, and because of its darker color it gives the checkerboard pattern a stark contrast. You can use natural cocoa powder here instead, but the color won't be as dark.
- I measure my all-purpose flour using the dip-and-sweep method - fluff the flour, dip the cup in and level it with the back of a butter knife. Each cup of flour weighs about 141 grams (5 ounces)
Equipment Needed
- A stand mixer or hand-held mixer is helpful for thoroughly mixing the dough.
- A rolling pin, dough scraper and a ruler will assist you in forming the dough portions into equally-sized rectangles.
- A scale is nice if you want to get two precisely equal halves of dough (one vanilla and one chocolate).
- A sharp knife (such as a chef's knife) will make quick work of cutting the dough into slices once it has chilled.
How to Make Swedish Checkerboard Cookies (Schackrutor)

- Begin by combining the room temperature butter, granulated sugar, powdered sugar and salt in the bowl of stand mixer. Mix on medium-high speed until fluffy and light in color, about 3 minutes, scraping down the sides of the bowl as necessary.
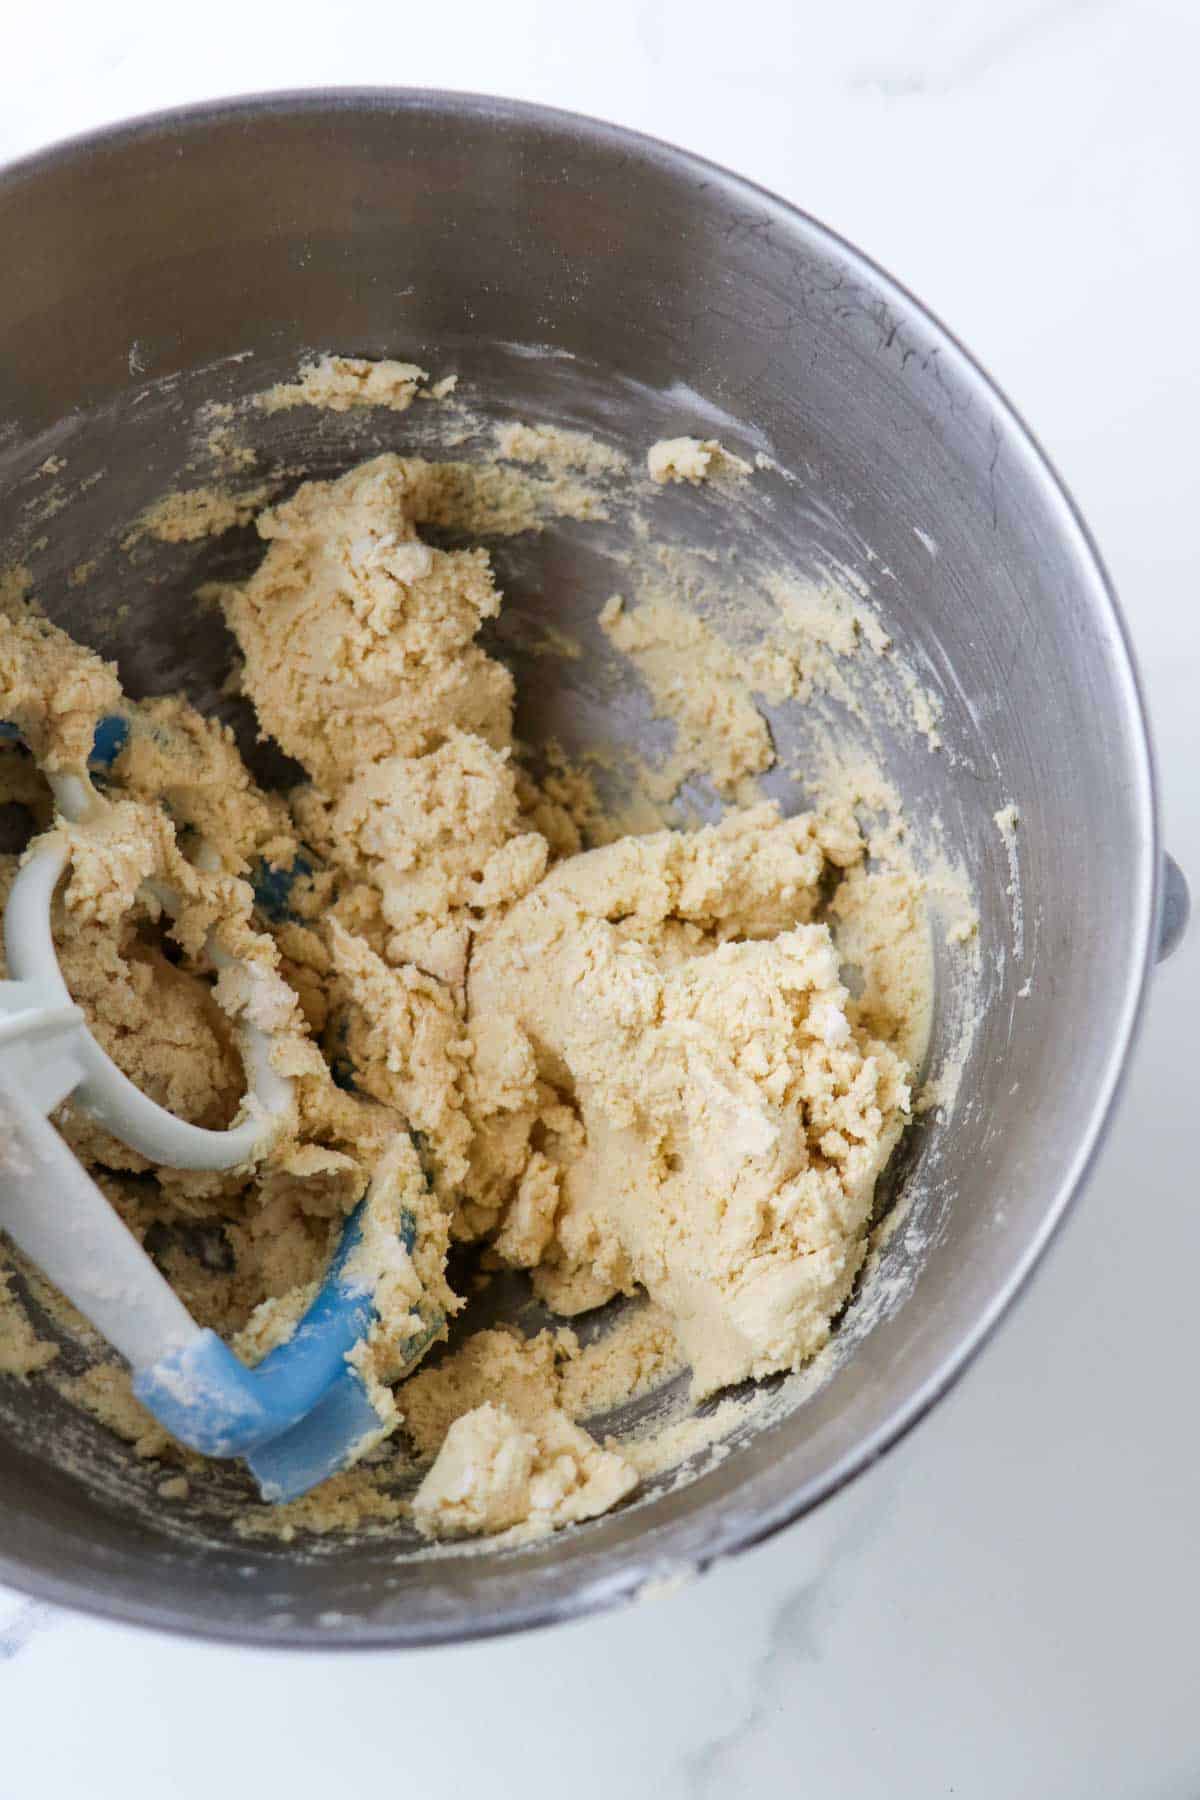
- Add the egg yolks and vanilla extract. Continue to mix until thoroughly incorporated. Finally, reduce the mixer speed to low and add the flour. Mix until the dough just comes together.
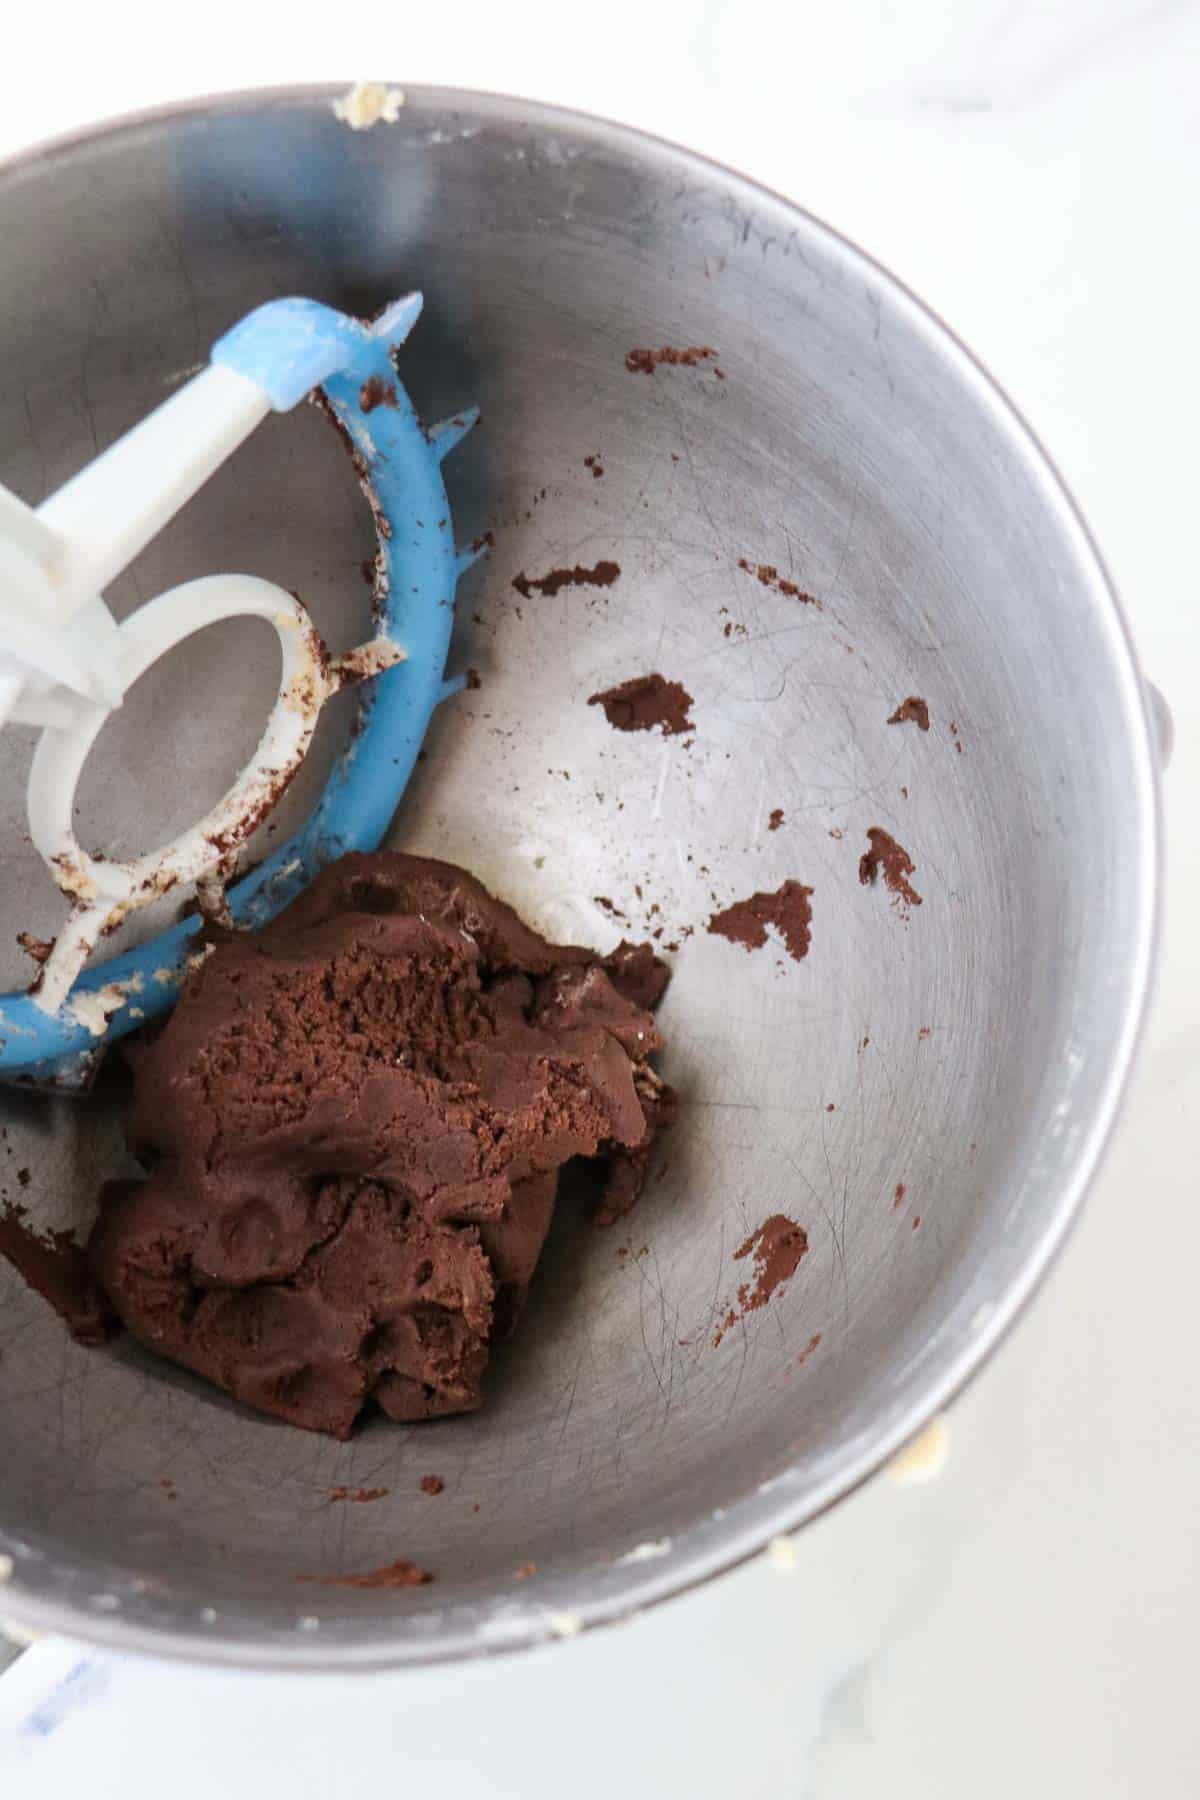
- Remove half of the dough and transfer it to a separate bowl (you can either eyeball it or you can weigh the full portion of dough on a scale so that you can accurately split it into two even halves). Add the cocoa powder to the half of the dough remaining in the mixer bowl. Mix on low speed until fully incorporated and no streaks of vanilla remain.

- On a clean work surface or a piece of parchment paper, shape each half of the dough into a rectangle that is 9 inches long, 2 inches wide and 1 inch tall (I use my hands, a rolling pin and a dough scraper to help me create evenly-shaped rectangles).
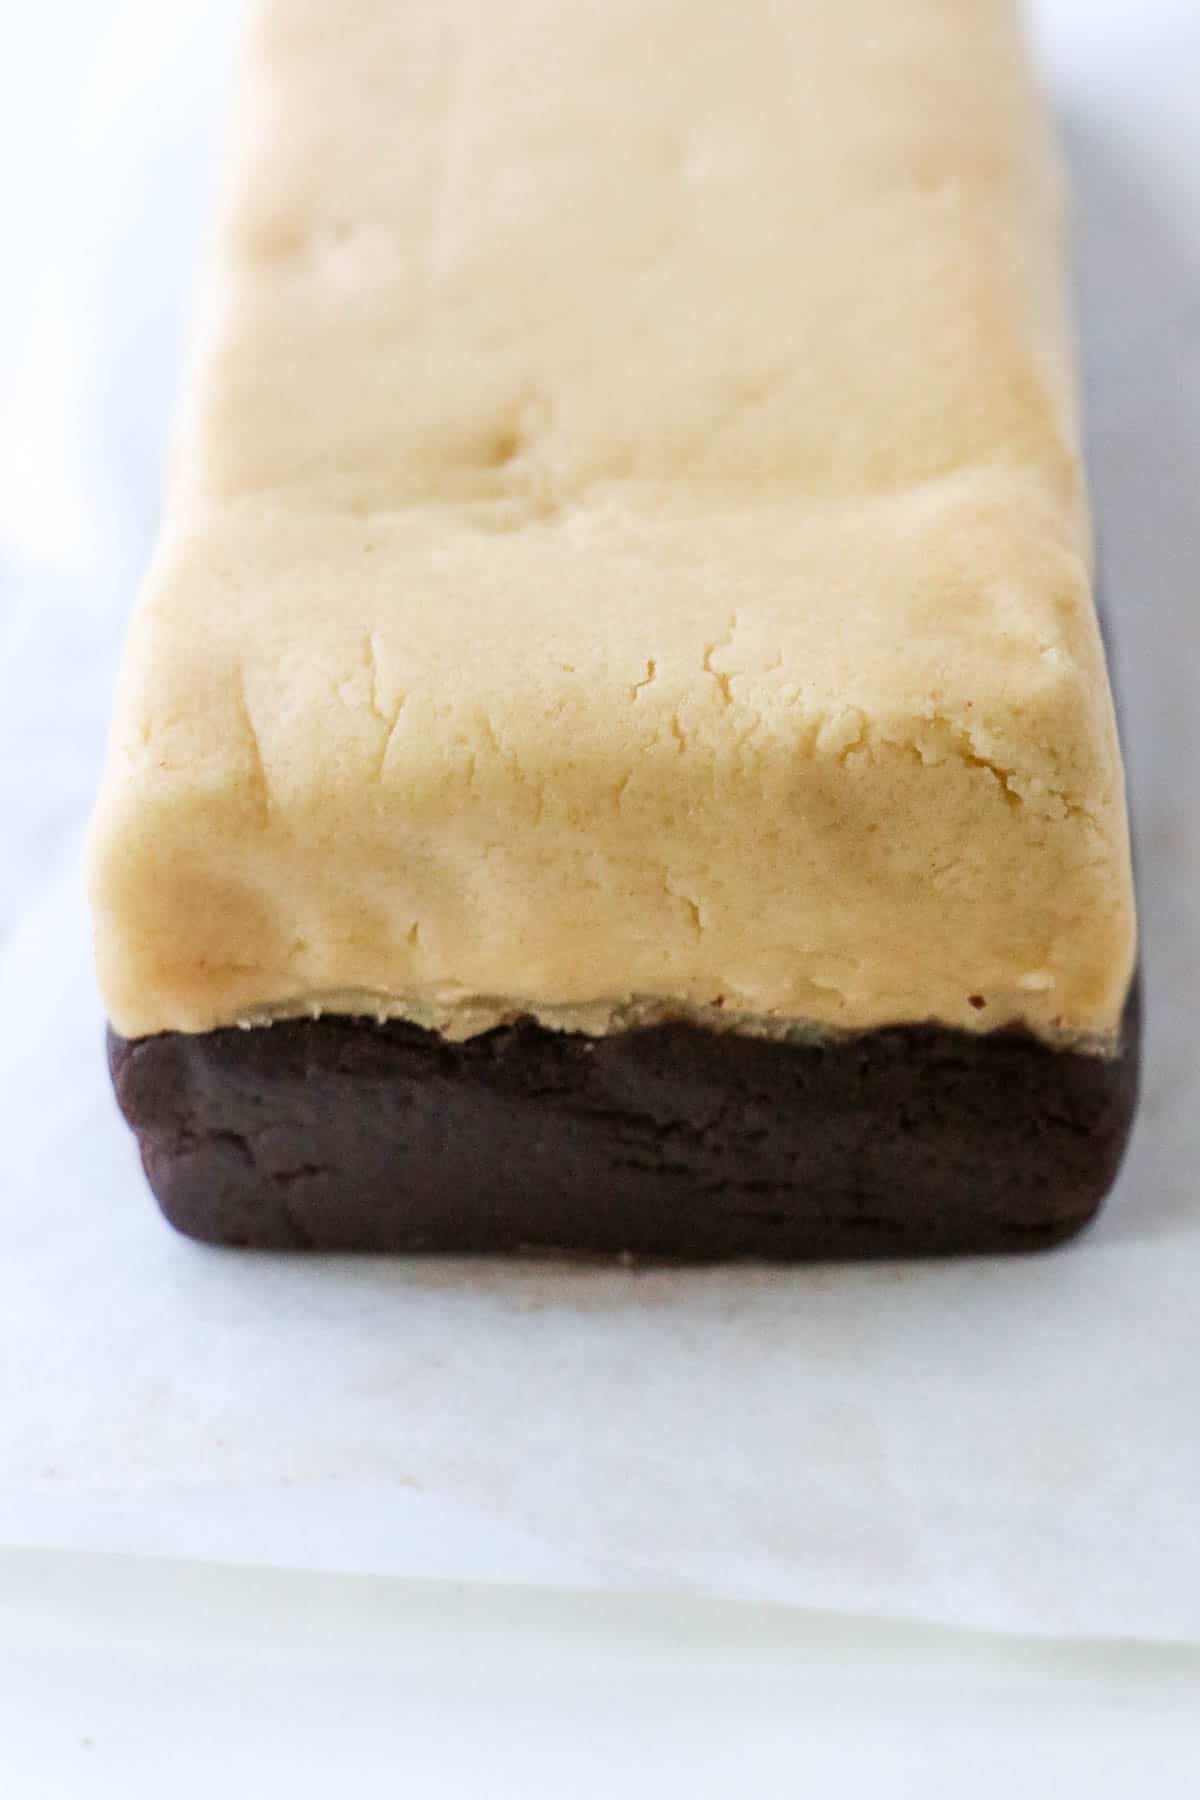
- Stack the halves on top of each other, carefully wrap the whole log in plastic wrap and chill for at least 3 hours or up to 2 days.
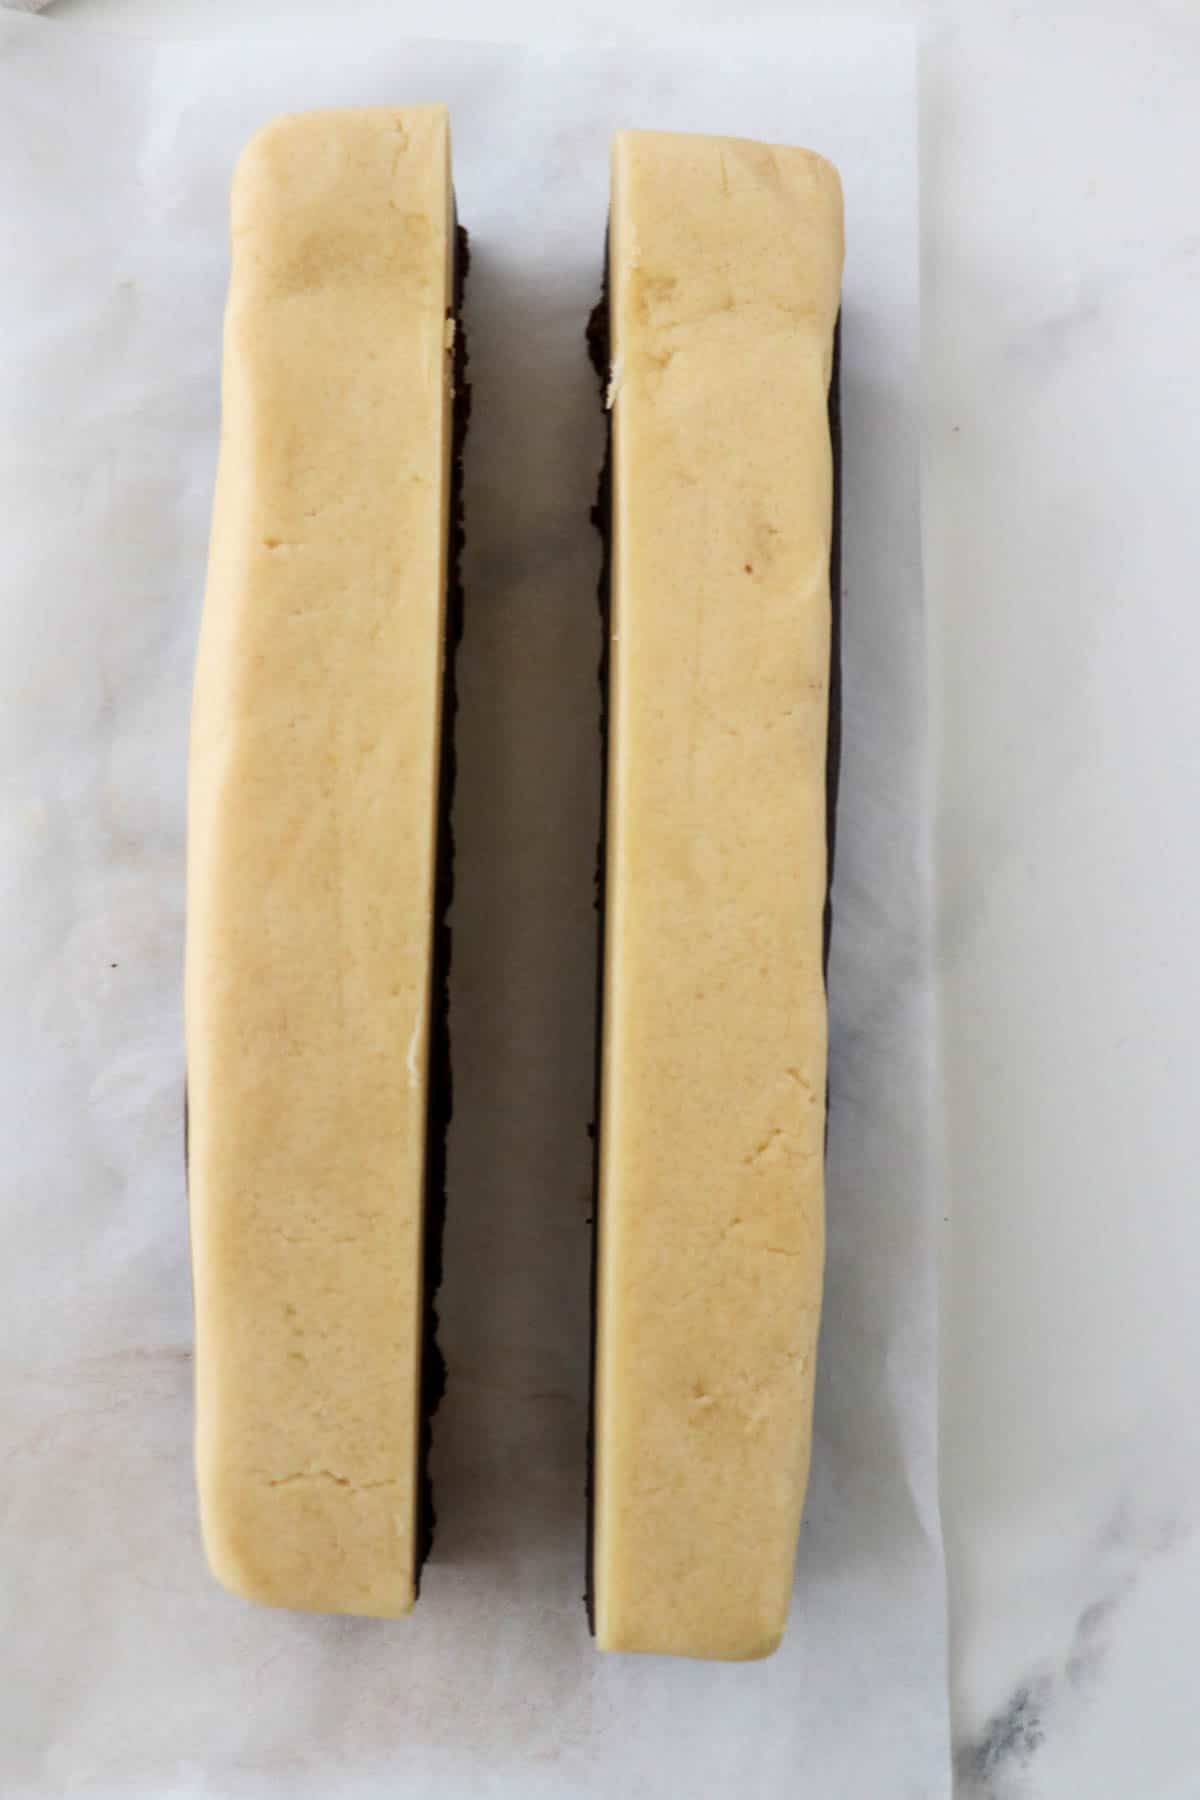
- Remove the dough from the refrigerator and slice in half lengthwise.
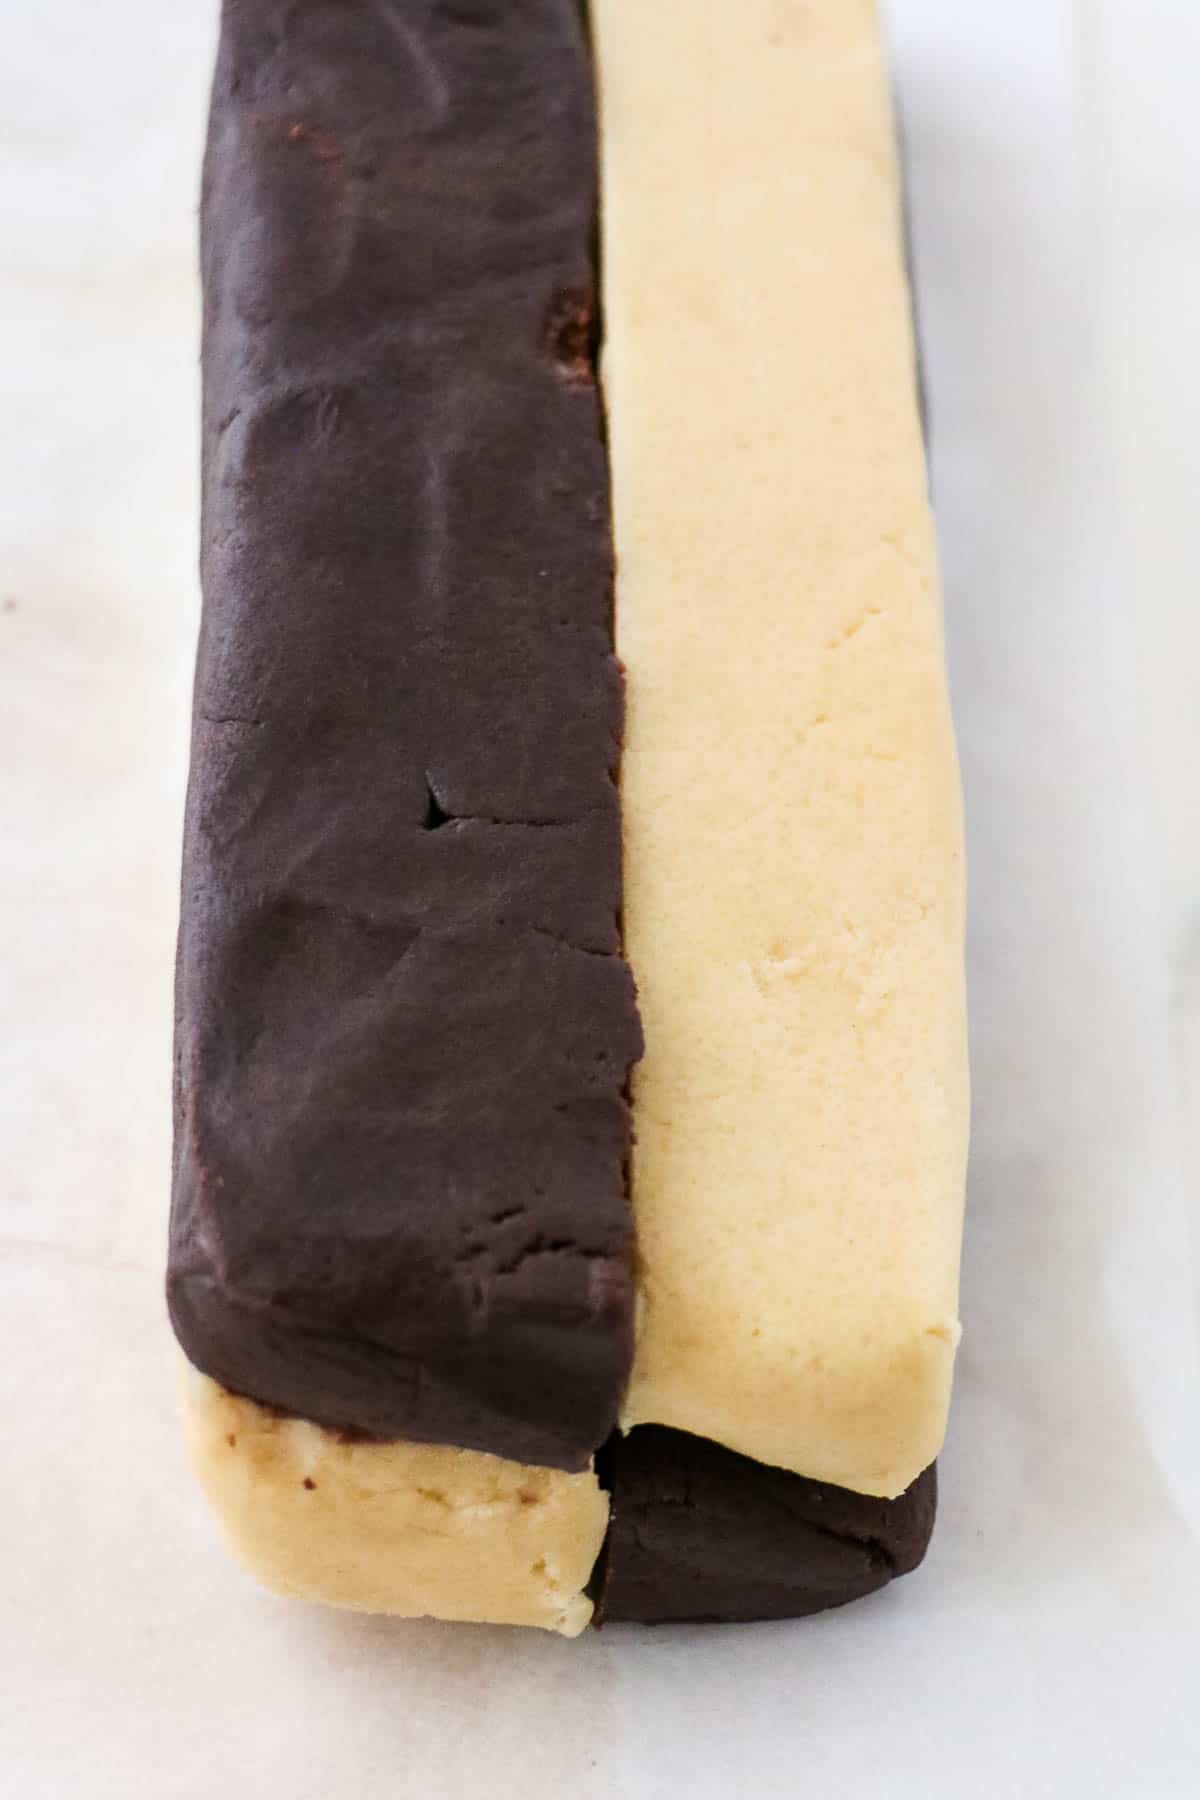
- Flip one of the long strips of dough around so that the vanilla and chocolate doughs alternate in a checkerboard pattern. Press together lightly to help the dough stick together.
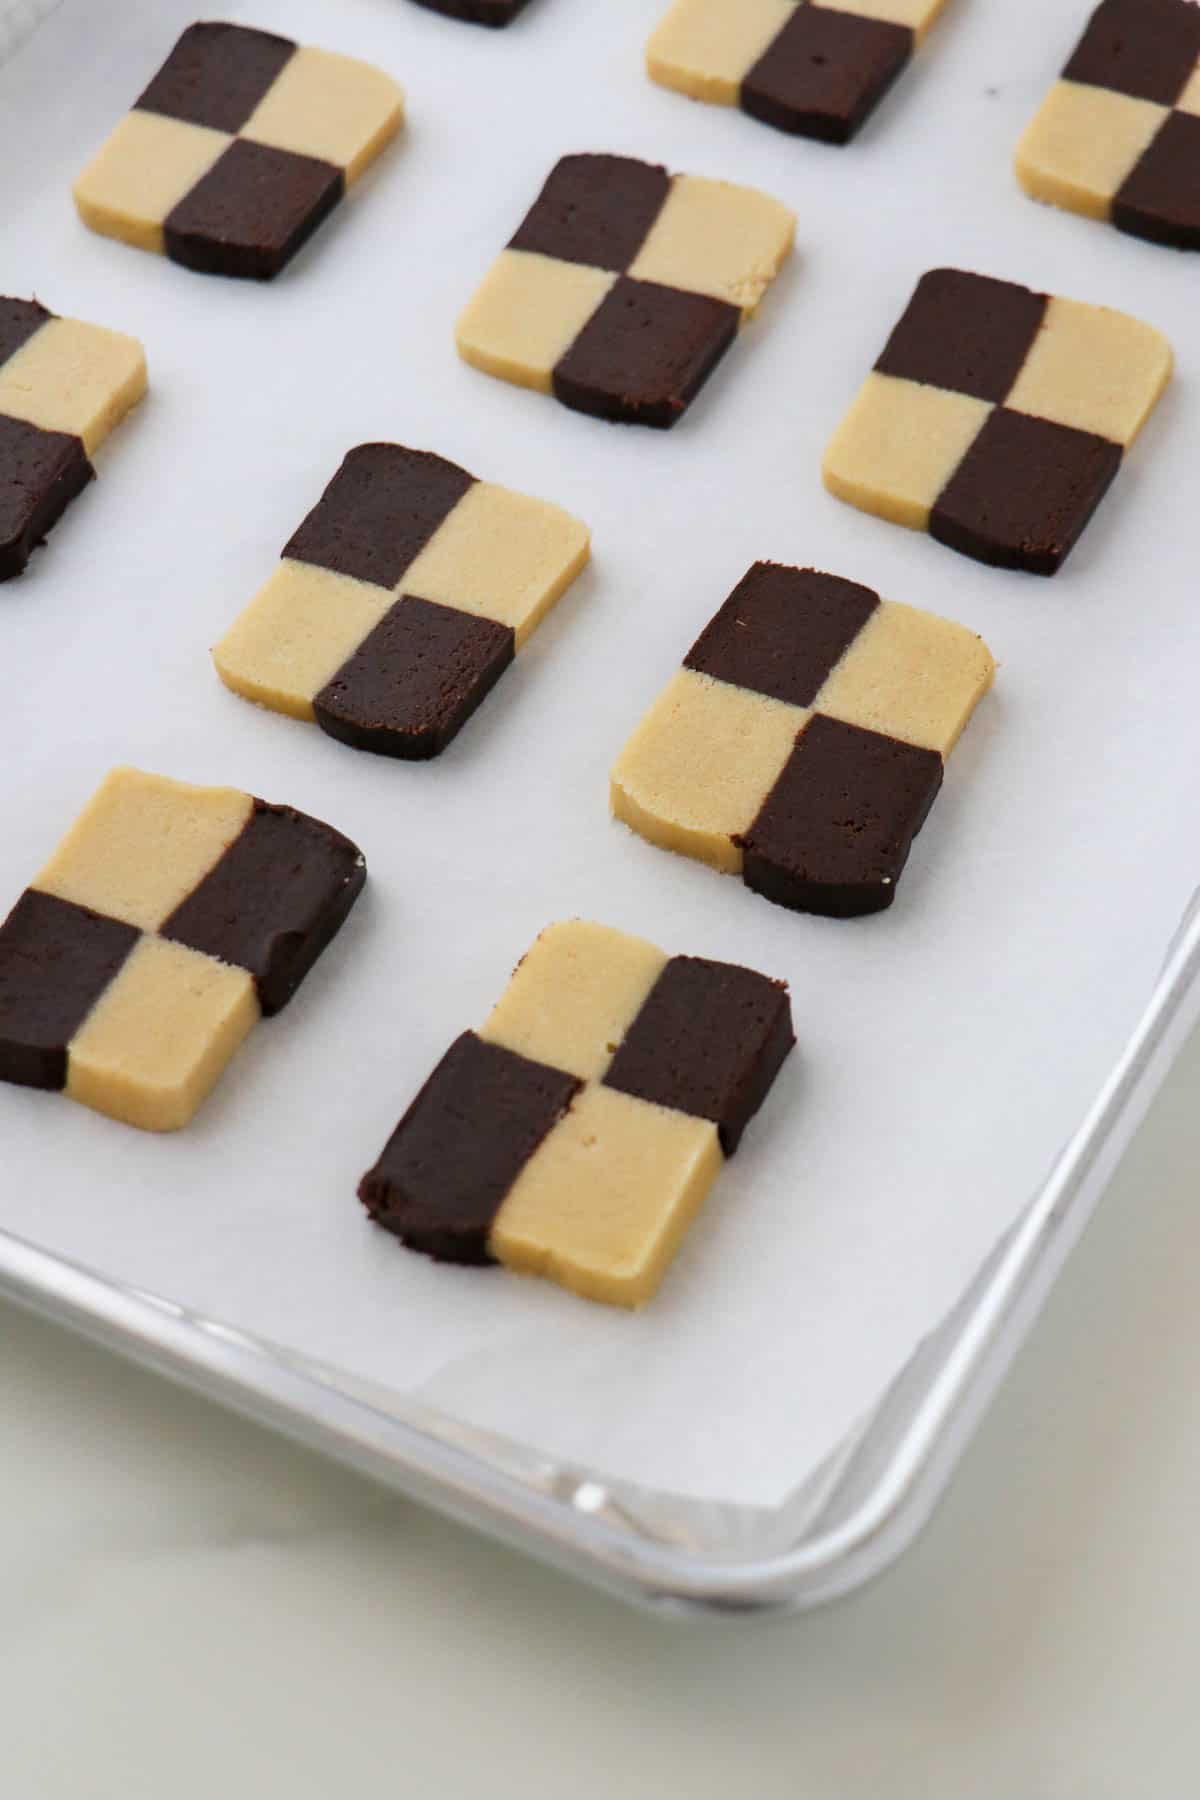
- Slice the dough log into ¼ inch slices. Place each slice on the prepared baking sheets, leaving about an inch of space between each cookie. Bake at 325 degrees for 15-18 minutes.
Expert Tips
- The color and flavor of Dutch-processed cocoa is so much better than natural cocoa. It is worth seeking out! I like the Hershey's Special Dark brand which is widely available. For more information on Dutch-processed cocoa, see the FAQ section below.
- If you see some vanilla streaks in your chocolate cookie dough after mixing, simply knead the dough with your hands to make sure that the cocoa powder is evenly mixed throughout the dough.
- Use a scale to weigh the cookie dough and divide that number in half if you want to get two EXACTLY even halves of dough (no worries if you don't want to be that exact about it....you can always just eyeball it and estimate).
- When you are shaping the dough into rectangles, it helps to press something with a straight edge (like a dough scraper) up against the edges of the dough to help give it a rectangular shape, especially at the corners which will otherwise tend to be rounded.
- Once you cut the dough lengthwise and flip it around, press the pieces gently together to help them adhere to one another. If you are cutting the cookies and they fall apart, no worries! Just put the pieces on the baking sheet where they belong. They will fuse together in the heat of the oven and you will have lovely checkerboards.

Recipe FAQs
These Checkerboard cookies can be stored in an airtight container at room temperature for up to 3 days. Freeze for longer storage (see instructions below).
Yes! They freeze very well. Place the completely cooled cookies into a freezer safe bag or container and seal tightly. The cookies will keep in the freezer for up to 3 months.
Cocoa is naturally acidic. Dutch process cocoa has been neutralized to balance the acidity of the cocoa. The result is a smooth, rich tasting cocoa that is darker in color than natural cocoa. By comparison, natural cocoa has a more astringent, bitter flavor that can only be neutralized by using it conjunction with baking soda, a naturally alkaline ingredient which tames the acidity.
Dutch process cocoa is a really nice choice in this recipe because it creates a rich, chocolatey cookie that is beautifully dark in color.
Click the "Metric" button below the ingredient list in the recipe card to view weight conversions.
What to Serve with Schackrutor
Honestly, you really can't beat a cup of really good, strong coffee with these checkerboard cookies - it so perfectly compliments the vanilla and chocolate combination. If you want to double down on chocolate, give my Cardamom Hot Chocolate a try! And for a boozy accompaniment, a cup of warm glögg (mulled wine) would also be lovely.
There is a tradition in Sweden known as sju sorters kakor (literally, seven kinds of cookies) which dates back to the late 19th or early 20th century. It is tied to the culture of fika gatherings in which the host would serve seven different kinds of small cookies to guests. Any less than seven was considered insufficient and any more was considered excessive. Consider hosting your own fika gathering with seven types of cookies, including these checkerboards!
More Scandinavian Cookie Recipes to Try
Looking for more delicious Scandinavian cookie recipes? Give these favorites a try:
If you tried this Swedish Checkerboard Cookies (Schackrutor) recipe or any other recipe on my website, please leave a 🌟 star rating and let me know how it goes in the comments below. I love hearing from you!
Recipe
Swedish Checkerboard Cookies (Schackrutor)
Ingredients
- 1 cup unsalted butter room temperature
- ¾ cup granulated sugar
- ⅓ cup powdered sugar (confectioner's sugar)
- ½ teaspoon salt
- 2 large egg yolks
- 2 teaspoons vanilla extract
- 2 ¼ cups all purpose flour
- 3 tablespoons Dutch-processed cocoa powder
Instructions
- Combine the butter, granulated sugar, powdered sugar and salt in the bowl of a stand mixer fitted with the paddle attachment. Mix on medium-high speed until fluffy and light in color, about 3 minutes, scraping down the sides of the bowl as necessary.
- Add the egg yolks and vanilla extract. Continue to mix until thoroughly incorporated.
- Reduce the mixer speed to low and add the flour. Mix until the dough just comes together.
- Remove half of the dough and transfer it to a separate bowl. Set aside.
- Add the cocoa powder to the half of the dough remaining in the mixer bowl. Mix on low speed until fully incorporated and no streaks of vanilla remain.
- On a clean work surface or a piece of parchment paper, shape each half of the dough into a rectangle that is 9 inches long, 2 inches wide and 1 inch tall (I use my hands, a rolling pin and a dough scraper to help me create evenly-shaped rectangles). Stack the halves on top of each other, carefully wrap the whole log in plastic wrap and chill in the refrigerator for at least 3 hours or up to 2 days.
- Preheat the oven to 325 degrees, move the baking racks to the lower third and upper third positions and line two baking sheets with parchment paper.
- Remove the dough from the refrigerator and slice in half lengthwise. Flip one of the long strips of dough around so that the vanilla and chocolate doughs alternate in a checkerboard pattern. Press together lightly to help the dough stick together.
- Slice the dough log into ¼ inch slices. Place each slice on the prepared baking sheets, leaving about an inch of space between each cookie.
- Bake for 15-18 minutes, or until the cookies are just about to start turning brown on the edges, rotating the pans halfway through.
- Cool slightly on the pan and then use a metal spatula to transfer to a metal cooling rack to cool completely.
Notes
- Use a scale to weigh the cookie dough and divide that number in half if you want to get two EXACTLY even halves of dough (no worries if you don't want to be that exact about it....you can always just eyeball it and estimate).
- When you are shaping the dough into rectangles, it helps to press something with a straight edge (like a dough scraper) up against the edges of the dough to help give it a rectangular shape, especially at the corners which will otherwise tend to be rounded.
- Once you cut the dough lengthwise and flip it around, press the pieces gently together to help them adhere to one another. If you are cutting the cookies and they fall apart, no worries! Just put the pieces on the baking sheet where they belong. They will fuse together in the heat of the oven and you will have lovely checkerboards.

My favorite cocoa powder for baking is either Droste Cocoa Powder from Holland for a rich, dark profile or Valrhona Cocoa Powder from France with a more reddish hue. Both Dutch processed (alkalized to reduce the acidity).
Hi Lizza,
Thanks for your comment! Those are both excellent choices and will make deliciously dark cookies.
Kristi
One of my favorite cookies! Everyone keeps asking me to make them because they're convinced they must be hard no matter how easy I say it is.
Hi Sierra,
I love that! I agree...they are so much easier than they look. Glad you (and everyone else) are enjoying them! Thanks so much for the feedback!
Kristi
Looks amazing. Also one of my favorite cookies! Traditionally they are made smaller, I would say half of this size, it's one of many what we call ''småkakor'' =''small cookies'' in Sweden.
Hi Tove,
Thanks for your comment! You could definitely make these smaller by adjusting the size of the rectangles when shaping the dough. These are my absolute favorites - I hope you give them a try!
Kristi
These are one of my favorite cookies. So butter and tender and actually easy to make, despite their impressive appearance. I give them as gifts sometimes and I get lots of recipe requests. They remind me of the cookies we had in Sweden!