Sourdough Danish Rye Bread (Rugbrød)
So...do you have a sourdough starter bubbling away on your countertop yet? Many of you must because I've had several recent requests for a sourdough version of rugbrød, the dense Danish rye bread that is often used as the base for smørrebrød. So I figured it was probably time to get this recipe up on the blog!
I've been making this sourdough rugbrød for several years now, long before I created this easy overnight version that I posted on the blog last fall. At the time, I figured that a lot of people don't keep sourdough starters at home, and they might appreciate a version that relies on commercial yeast for leavening. But, there is something to be said for making the real thing with your very own sourdough starter. Not only is it satisfying to use wild yeast for leavening, it also creates a delicious bread with a subtle tang that you will only get through the sourdough process. Sourdough bread also lasts longer than bread leavened with commercial yeast thanks to its acidic nature. So let's get started with the basics, shall we?
WHAT IS RUGBRØD?
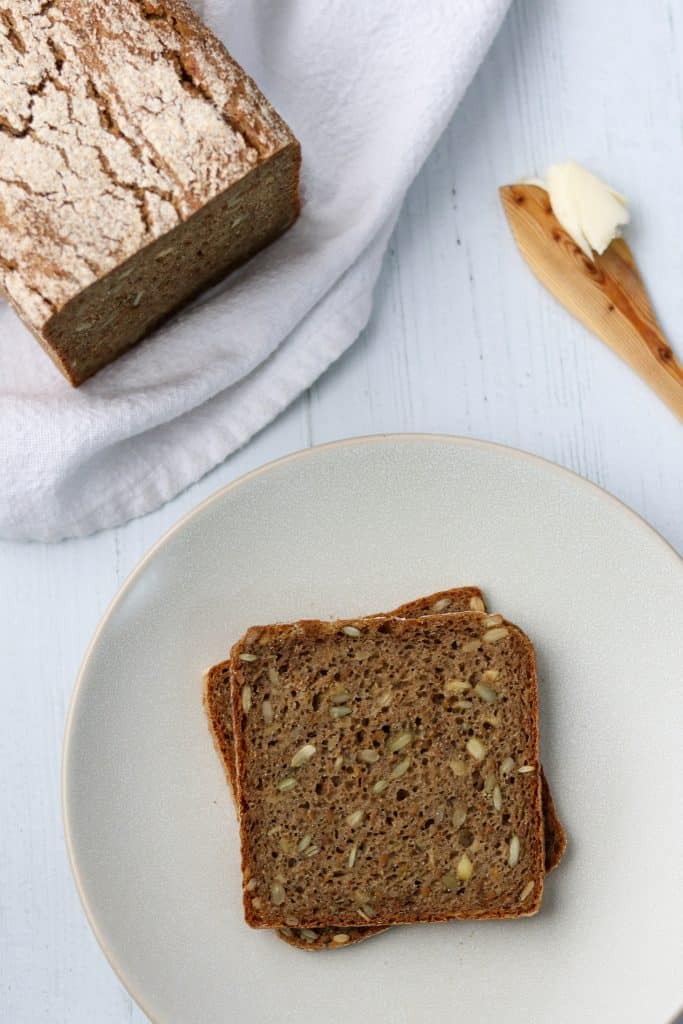
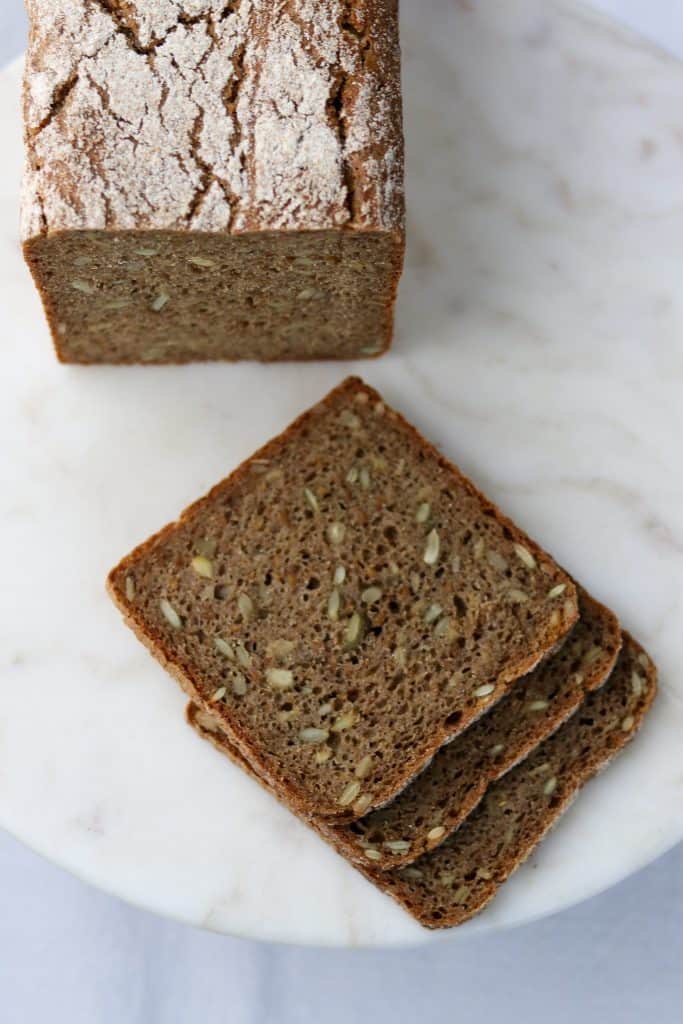
Rugbrød simply means "rye bread" in Danish. It is a sturdy, dense loaf that is comprised of rye flour, chopped rye grains and is often studded with sunflower, pumpkin and/or flax seeds. It is almost always baked in a 13 x 4 inch pullman pan with a lid. This helps the rye bread bake properly and gives it its characteristic square shape.
Rye breads, particularly those baked here in America, often have a variety of ingredients added to them to enhance their color (making them darker in appearance) and flavor. Common additions include caramel coloring (no thank you), stout beer, cocoa powder, espresso powder and molasses. Rugbrød, in contrast, has very little additional flavoring, perhaps just a little molasses for sweetening. It is meant to be a very straightforward bread so that it can serve as a neutral base for a variety of different sandwich toppings. Sometimes I will come across a rugbrød recipe that calls for flavor enhancers such as caraway, fennel or anise seed in the dough, but this seems to be more of an exception than the rule. Again, simple is the name of the game here.
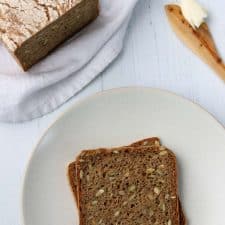
When it is served, Rugbrød is typically sliced thin (a little less than a quarter of an inch) and buttered liberally with salted butter. There is actually a word in Danish, tandsmør, which means "tooth butter". It refers to buttering your bread generously enough so that when you bite into it you can see your teeth marks in it. You butter lovers know what I'm talking about. It may be enjoyed as is, simply slathered with butter, or it can be piled with additional ingredients to form the base of smørrebrød, the famous Danish open sandwich.

WHAT MAKES RYE SO SPECIAL?
Rye has many unique qualities that make it quite different from wheat, both as a whole grain and in flour form:
- Rye has historically been important for the Nordic region as it is a hearty plant that can tolerate poor soil and weathers cold and wet conditions better than most grains. It was the primary grain relied upon for bread-baking in the north for centuries and is still popular today.
- Rye flour has less gluten than wheat flour. Gluten strands form the structure of bread and trap gases produced by the yeast so that your bread leavens properly. Because gluten doesn't form well when rye flour is mixed with water, rye breads are always more dense in structure and have a closer crumb that wheat breads.
- Rye flour holds more water than wheat flour and contains certain enzymes that convert starch to sugar. This can cause rye breads to be overly moist and have a gummy texture if not handled and baked properly.
- Your sourdough starter will help your loaf of rye bread succeed. While rye's unique qualities can make it challenging to use in a bread recipe, your sourdough starter can help counteract some of those challenges. Using a sourdough starter contributes certain acids to the dough which help neutralize some of the negative effects of the enzymes that can cause the bread to have a gummy texture.
- Rye breads get better with a little age. Unlike wheat breads which are best eaten shortly after cooling, both the texture and flavor of rye bread improves after a rest of 24-36 hours.
- An interesting fact: There is a fungus called ergot that can attack rye plants causing the grains to become highly toxic to humans and trigger hallucinations if ingested. Some historians believe that ergot-infested rye was the cause of the hallucinations that led to the Salem witch trials in Massachusetts in 1692. Fortunately, modern industrialization has all but eliminated any risk of ergot-infected rye as any diseased grains are removed prior to processing.
The Sourdough Process
Making sourdough rugbrød is really quite simple. Here is a quick overview of the process from start to finish:
Weighing Your Ingredients in Grams
The first thing you might notice about the recipe is that it is written in grams. Don't let that intimidate you. Most sourdough recipes are written by weight in grams and it is actually a really easy and accurate way to bake. Simply zero out your kitchen scale with the bowl you plan to use sitting on top. Set the scale to grams and start weighing! Seriously....easier than cups and spoons. Just remember to zero out your scale every time you add a new ingredient.
The Day Before You Bake: Refresh Your Starter
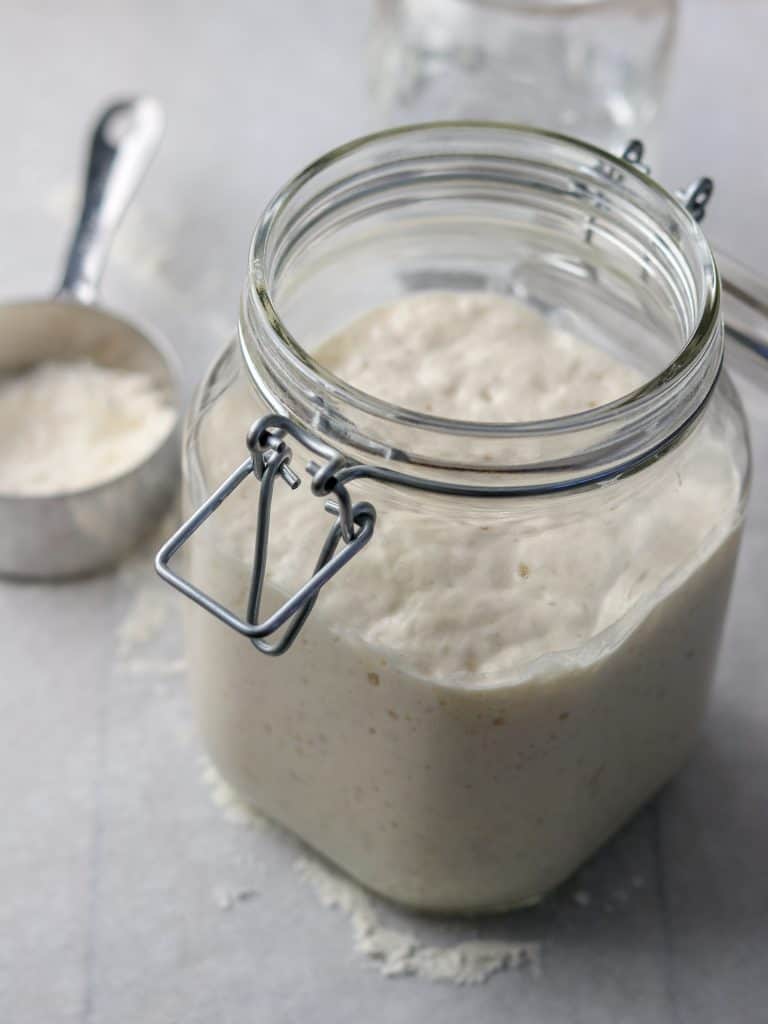
It's best to a use refreshed and ripe sourdough starter when you begin to build your dough. What does "refreshed and ripe" mean? Simply that you fed your starter about 8 hour prior to when you plan to use it. It should be bubbly, active and puffy throughout.
The Night Before You Bake: Create a Levain
This recipe calls for a levain, which is a term for a portion of the dough that will ferment overnight before we mix the final dough. A levain consists of water, flour and a bit of ripe sourdough starter.
The Night Before You Bake: Create a Soaker
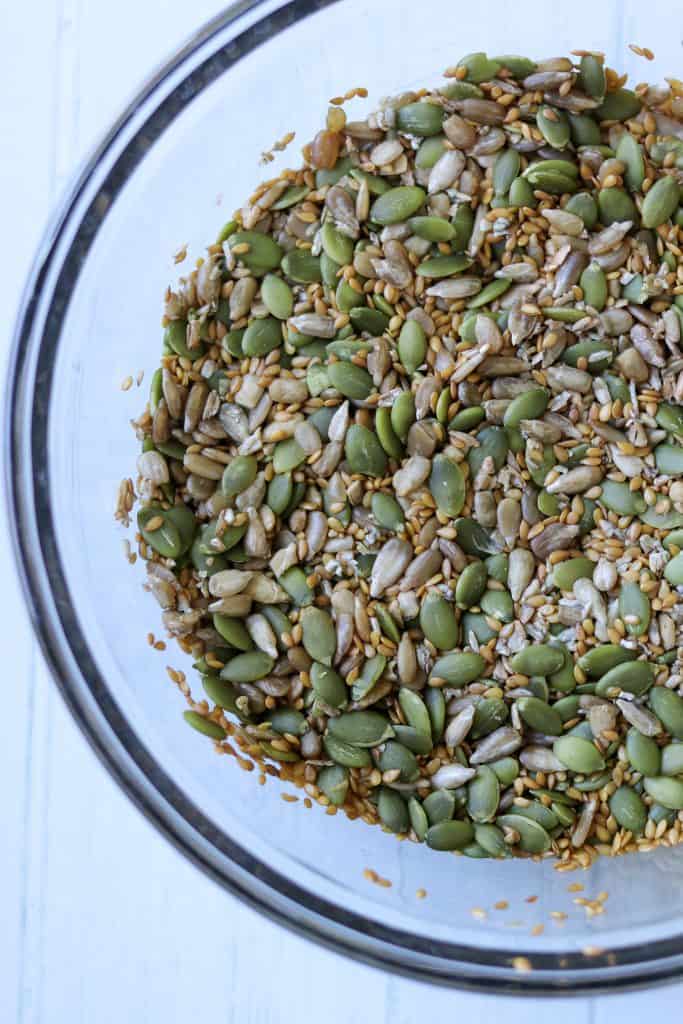
This recipe also calls for a soaker. This is a mixture of rye chops (or Bob's Red Mill 7 Grain Hot Cereal Mix) and seeds that will sit overnight in water prior to adding it to the final dough. Soaking these ingredients overnight in water helps soften them so that they will have a pleasant texture in the final loaf. And there is no need to drain the soaker prior to adding it to the final dough.
The Next Morning: Build Your Final Dough
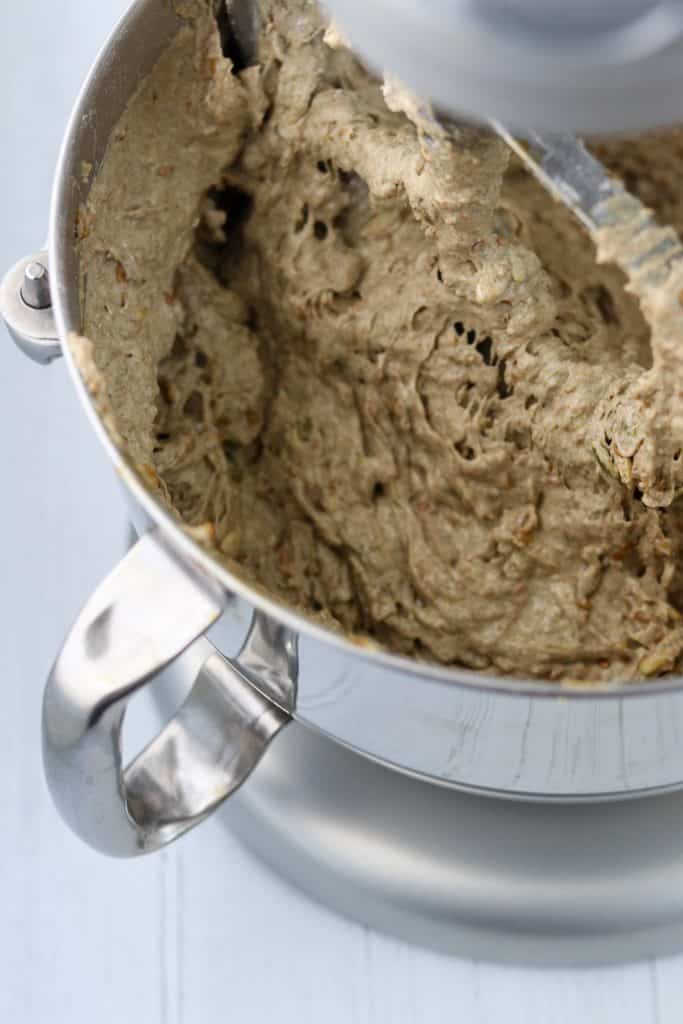
Your levain and soaker have been sitting overnight and it's time to put the final dough together. This couldn't be easier. Simply add all the ingredients for the dough to the bowl of a heavy duty stand mixer. Mix on low for a few minutes and then increase the speed to medium for a few minutes, scraping down the sides of the bowl occasionally. That's it! There is no kneading of this dough by hand as it is far too sticky to do so.
The Rise
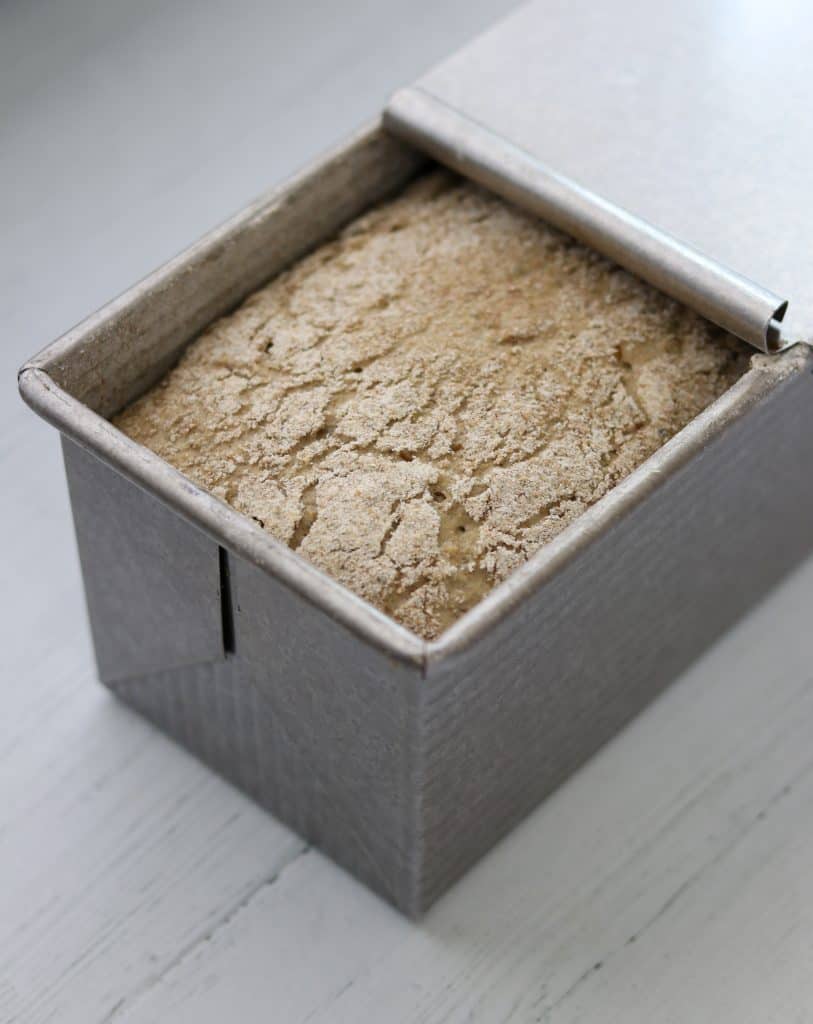
From here we scrape the dough into a greased and floured 13 x 4 pullman loaf pan with a lid. And then we wait. We let the dough rise and do its thing while we attend to whatever it is that we need to do. The dough should come within ½ inch of the top of the pan before we pop it in the oven. This will take anywhere from 1 ½ hours to 4 hours depending on the temperature of the dough and the temperature of your kitchen. Be patient and move your dough to a warmer spot if you want to speed things up a little. I will often turn the oven on and then let the pan sit on top of the stove while the oven preheats.
The Bake
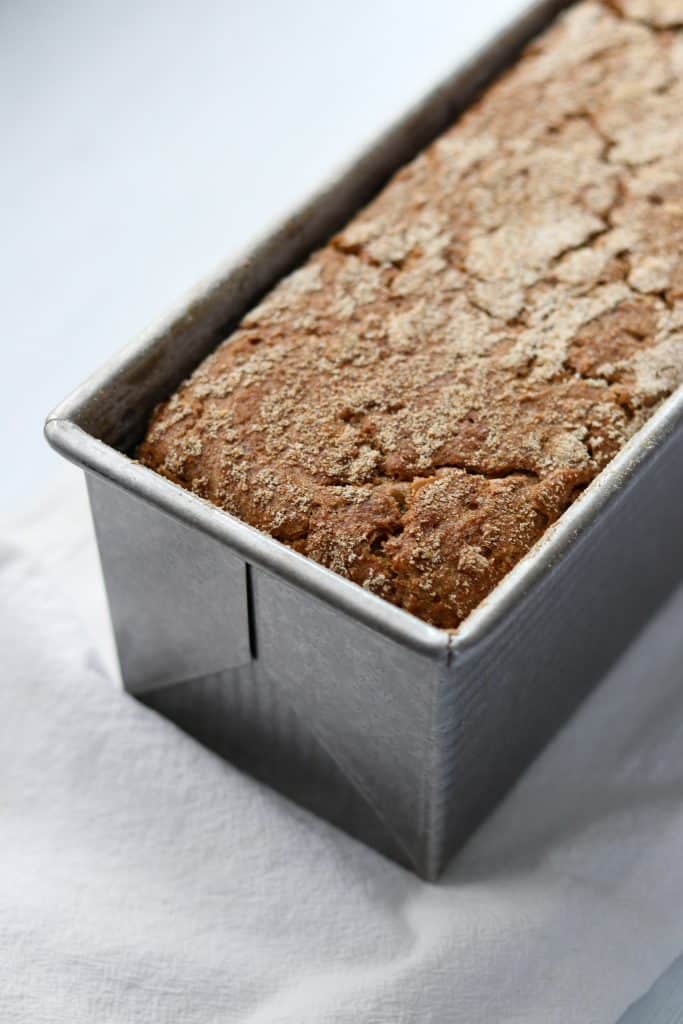
So what's up with the different baking temperatures in this recipe? They really do have a purpose, I promise. This method of baking helps prevent the enzymes that produce a gummy texture in rye breads from developing by keeping the loaf from spending too much time in the temperature zone where enzyme formation is the most favorable. The texture of your your bread will be moist and cooked evenly all the way through....just like you want it to be!
If you make your own smørrebrød at home or would like to, please give this sourdough rugbrød a try. It is one of the most delicious and nutritious breads out there and a great way to dip your toe into the world of sourdough. And using it as a base for a Nordic open sandwich will give you a true taste of authenticity. If you are new to smørrebrød, there are several open sandwich recipes on the blog to get you started:
- New Potato Smørrebrød with Garlic Aioli and Crispy Shallots
- Roasted Beet Hummus Smørrebrød with Avocado and Pickled Onions
- Roasted Broccoli Smørrebrød with Whipped Ricotta
- Roast Beef Smørrebrød with Remoulade and Crispy Shallots
- Italian Salad and Ham Smørrebrød
- Balsamic-Glazed Mushroom Smørrebrød with Garlicky White Bean Puree (vegan)
- Easy Garden Tomato Smørrebrød
- Chickpea Salad Smørrebrød
- Caramelized Leek and Snap Pea Salad Smørrebrød
- Smoked Salmon and Fennel Salad Smørrebrød
- Roasted Salmon Smørrebrød with Creamy Mustard Dill Sauce and Pickled Beets
- Beet and Celery Root Cake Smørrebrød with Herbed Skyr Sauce
- Roasted Butternut Squash Smørrebrød with Spicy Harissa Mayo and Pepitas
Recipe
Sourdough Danish Rye Bread (Rugbrød)
Ingredients
Special Equipment Needed:
- Kitchen scale
- Heavy duty stand mixer
- Pullman loaf pan with lid (13 x 4 inches in size)
Ingredients for the Night Before:
For the Levain:
- 300 grams dark rye flour
- 100 grams bread flour
- 350 grams water
- 70 grams ripe sourdough starter
For the Soaker:
- 75 grams rye chops or 7 grain hot cereal such as Bob's Red Mill
- 1 cup raw sunflower seeds (131 grams)
- 1 cup raw pumpkin seeds (142 grams)
- ½ cup flax seeds (65 grams)
- 285 grams water
Ingredients for the Day of Baking:
- All of the Levain
- All of the Soaker
- 200 grams dark rye flour
- 130 grams bread flour
- 180 grams water
- 18 grams salt
- 2 tablespoons molasses
Instructions
- The night before, make the Levain and the Soaker: Combine the ingredients for the Levain in a medium bowl. Stir with a spoon to combine (mixture will be thick and the texture of wet cement). Cover with plastic wrap and leave at room temperature overnight, approximately 12 hours. Combine the ingredients for the Soaker in a small bowl. Cover with plastic wrap and leave at room temperature overnight, approximately 12 hours.
- The next morning, grease a 13 x 4 inch pullman loaf pan (with a lid) and dust it with rye flour. Set aside.
- Combine the Levain and the Soaker (no need to drain) in the bowl of a heavy duty stand mixer. Add remaining dough ingredients. Using the paddle attachment, mix on low speed for 3-4 minutes, scraping down the sides of the bowl occasionally. Increase speed to medium and continue to mix and periodically scrape down the sides of the bowl for another 4 minutes.
- Using a sturdy spoon or spatula, transfer the dough to the prepared loaf pan, distributing it evenly across the length of the pan and smoothing out the top with a rubber spatula (if you are having trouble smoothing out the top, dampen the spatula slightly with water). Dust the surface of the loaf generously with rye flour. Put the cover on the loaf pan and let it rise until it comes to within a ½ inch of the top of the pan. This may take anywhere from 1 ½-4 hours depending on the temperature of your kitchen and the dough.
- Meanwhile, preheat the oven to 500 degrees. Place the covered loaf pan in the oven and bake for 15 minutes. Reduce the temperature of the oven to 400 degrees. Bake, covered, for an additional 15 minutes. Pull the loaf pan from the oven and remove the lid. Reduce the temperature of the oven to 325 degrees and continue to bake, uncovered, for an additional 45 minutes. Remove loaf from the oven and tip out onto a wire cooling rack. Let cool completely before slicing. Rye breads improve after a bit of resting time. If you can wait until the following day to slice into it, wrap the completely cooled loaf loosely in foil and let it cure until the next day. The bread will keep for about 4 or 5 days at room temperature wrapped loosely in plastic wrap and a layer of foil. For longer storage, wrap tightly and freeze.

Hello again, Kristi,
After baking your regular Danish Rye Loaf about 6 times over the last months, I decided to give this sour dough style a try. I dutifully got the starter going and went for seven days. I HAD to bake on the 8th day. I followed the recipe exactly. On baking day, yesterday, I got the bread into the pan about 1 in the afternoon. At 5pm, the rise was minimal. I even turned the oven to warm a bit with the bread inside several times. Didn’t seem to matter. It was 5/8” from the rim, but I decided to bake it anyway. After the first 30 minutes when the lid comes off, the bread had reached the lid. I finished off the next 45 minutes, But, I decided to give it that five more minutes on a baking sheet out of the pan. It was pretty damp before that. Finally, just now, I tasted the bread. It had been out on the counter overnight. The top had a crack all along the top, which the regular rye recipe has never done. The inside was damp, but it cut nicely. The taste was definitely sour dough, which I love. So, I am calling it a success. One question-since I am baking only one loaf at a time about once a week, is there a good reason to keep such a large batch of the souring dough? Can I cut it back? Seems like such a waste of flour. Thanks, again, for your wonderful recipes.
Hi Patricia,
How wonderful! Congratulations on your first sourdough! You can definitely cut back on it as long as you keep the ratios the same. And you can always put it in the fridge for a few days in between (so you don’t have to feed it on those days). Just be sure to take it out a day or two prior to baking to get it going again. And don’t forget to try making sourdough crispbread with that leftover starter! So good. The recipe is on my website. Thanks so much for the feedback!
Kristi
I didn’t know you had a recipe for sour dough crisp bread. Wahoo! I have been making the regular ones weekly. I end up shaking with neighbors, so they go quickly. I will get right on it today!
Do you have a recipe for an overnight, no knead sour dough rye baked in a Dutch oven? If so, I would love the link.
Thanks many times over,
Patricia
Let me know how it turns out! I don’t have any no knead recipes, but I will be on the look out for one for you.
Hi Kristi, Grow, Forage, Cook, Ferment has a nice light rye recipe that I have now made about four times, it fits nicely in my 4 quart Dutch oven. I even increased it by 25% to get a little bigger loaf. I can now “flip” it pretty accurately out of the Brotform basket into the pan.
Hi Patricia,
I will check it out! I hope that your starter is thriving and happy!
Kristi
Few questions: Can I use steel cut oats for thecracked rye?
Would sesame seeds be good for the sooker?
Can I use a 10"x5" loaf pan?
Other recipes uses Malt Syrup. Is molasses better and give the bread a darker color th han malt syrup?
Thank you!
Hi,
I think steel cut oats might work just fine. I would give it a try. Sesame seeds will be good as long as you enjoy them. They are a little more flavorful that the other seeds in the mix, but that might be a good thing! You can use a smaller loaf pan. I have had several people use a standard sized pan and a sheet pan as a lid for the covered portion of the baking and they say it works just fine. Baking times remain the same. Malt syrup and molasses both work here. Molasses has a stronger flavor which works really nicely with the rye. It's also easier to find here in American grocery stores. Hope I answered your questions! Happy baking to you!
Kristi
One last question: can I top the rye bread with additional seeds? Thanks again!
You can! Maybe just keep an eye on them to make sure they aren't getting too dark in color. I'm guessing they will be fine as the cover is on while the oven is at its hottest.
This bread is amazing!!! I baked yesterday and somehow managed to wait almost 24 hours to eat it 🙂 I made the following substitutions based on taste and materials on hand:
- 75 g. Bob’s Red Mill 10 grain hot cereal + 100 g water; no seeds in the soaker
- added 9 g Cocoa and 10 g. Caraway seeds
- 130 g. Rye flour in step 2 (that was all I had) and the rest in bread flour
My loaf pan can only go up to 450 degrees, so I baked as follows:
20 minutes @ 450
15 minutes @ 400
Took the lid off
55 minutes @ 325
Bread was slightly under baked; I probably should have just left it in longer at 325. The crumb is nice and regular, and the cereal I believe adds the nicest texture. With the caraway and cocoa it’s almost like a pumpernickel. Absolutely delicious and easy, thank you!!
Hi Sam,
So glad to hear the bread worked out for you! Your variation with the cocoa and caraway sounds amazing and I bet it has a nice dark color, too. Thanks for taking the time to leave me some feedback! It is greatly appreciated. Enjoy the rest of that loaf!
Kristi
I have been married to a Dane for 26 years and have just made my first Danish sourdough rye using this recipe. I followed the recipe exactly as written and my loaf turned out perfectly!! Thank you!!!!
Hi Amy,
Thanks so much for your comment! I'm so glad you liked the bread and that the recipe worked perfectly. Thanks again for taking the time to let me know. I really appreciate it. Happy baking!
Kristi
quick question - why is there no true bulk ferment? many other recipes call for a short bulk, into pan, then overnight in the fridge. i've been using your method and i'm pretty happy with it, but wondering if it's turning out underfermented from a lack of a longer bulk ferment. thanks!
Hi Colin,
Thanks for your comment! I use an overnight fermentation with any of my sourdough breads that have less than 30% rye flour. Jeffrey Hamelman's book, Bread sums up bulk fermentation for rye breads nicely: "Bulk fermentation time decreases as the rye percentage increases. One reason for this is that in rye breads there is little of the gas-trapping properties present in wheat gluten so lengthy bulk fermentation will not improve dough volume and crumb structure...Lengthy bulk fermentation has the tendency to overacidify the dough, resulting in bread with an unpleasantly sour flavor." Hope this helps! Happy baking!
Kristi
I am obsessed with this bread! I baked it for my Danish father and he now demands a loaf a week. I've swapped out half the seeds for hemp hearts and wheat germ, just for more variety, and it was still outstanding. It'll be fun to play around with. Thank you for a great recipe!
Hi Kristen,
Thanks for your comment! I'm so glad you and your dad are enjoying the bread. I'll have to try it with a little hemp hearts and wheat germ! That sounds delicious! Please let me know if you come up with any other fun variations I should try. Happy baking!
Kristi
Hi Kristi,
I just found your site and this bread recipe looks fabulous! I would love to try it but I don't have all the ingredients on hand. Can I possibly sub oats for the pumpkin and sunflower seeds? Can I sub honey for the molasses?
Thank you!
Hi Elizabeth!
Welcome and thanks for your question! You can omit the seeds entirely and reduce the amount of water in the soaker to 150 grams. And you can definitely sub honey for the molasses! Let me know how it turns out!
Kristi
Hello Kristi, thank you for this fantastic recipe! After an oven disaster with a different rugbrød recipe in May, I’ve been searching and evaluating others, and yours seemed like the best option for me. I had to make a few adjustments for scale, but the results were perfect.
I have two 4x9 Pullman pans, not a 4x13, so I did some math to scale up the recipe. Whether calculating in square inches or cubic inches, the multiplication factor was 1.38, so I multiplied all the ingredients by that amount. I also weighed the nuts so I’d have that for reference.
I subbed coarse rye meal for rye chops, and I think they are pretty equivalent. And I used a greased baking sheet as a lid, per your other tips. Everything worked out, filled the pans exactly, and created wonderful, tender rugbrød that we’ve just enjoyed for breakfast. Thank you again!
Hi Jim,
I can relate to those rugbrød disasters! I've had more than my share. I'm SO glad you enjoyed the recipe and that it worked well, even with having to do a little baker's math. Thank you so much for taking the time to leave me a comment. I really appreciate the feedback. Enjoy those rugbrød loaves!
Kristi
Hi Jim! How long did you bake the 4x9 loaves?
Hi Jillian,
In case Jim doesn't get back to you, I recommend baking the smaller loaves for the same amount of time as the larger loaf. Hope this helps!
Kristi
This is such a good recipe. My first attempt at rugbrøt and it was a huge success. Thanks! One question: I didn't have any rye berries so I just used whole spelt and whole barley grain in the soaker. Bread turned out just fine so I was wondering what benefit younger from cracking the berries?
Hi Rob,
So glad you enjoyed the bread! The general reason for using cracked grains rather than whole is to help them soften more thoroughly and assimilate better into the bread. Sometimes if you are using whole grains in a bread dough, they can be too hard in the final product, especially the grains around the outside of the loaf. I'm so glad to hear that this wasn't a problem! Thanks so much for your feedback! I really appreciate you taking the time to let me know how it turned out. Happy baking!
Kristi
Hi Krisiti!
I don't live in the US, and I'm not sure how to source the stuff for the soaker. Is it possible to substitute the rye chops by blitzing whole rye grains in the food processor? should I just use different seeds/nuts? just omit it entirely?
Thanks.
Hi Roi,
Thanks for your question! I think you could definitely try using whole rye grains that have been broken up in the food processor. For a little extra assurance that they will soften you could always use hot water to start the soaker. That might be worth doing. As far as the seeds go, you can absolutely eliminate them from the formula. That's actually how the recipe was originally written. If you choose to go that route, reduce the amount of water in the soaker to 150 grams. Please let me know how it goes and if you have any further questions. Happy baking!
Kristi
It turned out quit well!
I ended up needing to brake the rye berries on a mortar instead of the food processor. I hope that with further attempts I can make it even better 🙂
Thank you very much for the recipe and reply,
Hi Roi,
So glad to hear it went well! Those rye berries must be tough...I really thought the food processor would do the job! Good thinking with the mortar and pestle. Please keep in touch as you continue baking and thank you so much for the feedback! It is very much appreciated.
Kristi
Hi Kristi,
Love the look of the recipe and definitely going to give it a try.
Just wondering about eliminating the seeds as my wife has a nut and sesame allergy and all the seeds are processed in the same factories so need to avoid. If still using the rye chops do I add extra or just eliminate the seeds and what water would you suggest?
Hi Richard,
Thanks for your question! If you choose to eliminate the seeds, reduce the amount of water in the soaker to 150 grams. Everything else can remain the same. Hope you give it a try!
Kristi
OMG this recipe is the bomb. I was always so daunted by other recipes and the time they took to make. This was so easy and foolproof and I loved how you broke the recipe down. This literally was a 24 hour bake for me from time of soaking to out the oven. Am going to make my second loaf soon, Like you say it just gets better with age.
Hi Sarah,
I'm so glad you enjoyed the bread! I agree...rugbrød can be intimidating and I've had plenty of fails over the years as I tried to find a recipe that works. Thanks so much for taking the time to leaving me a comment. I really appreciate it!
Kristi
I’d like to try this loaf but don’t have a Pullman Tin to bake it in, could I do a round or oval loaf?
Thanks
Hi Anita,
The dough is really sticky and definitely needs a pan to bake it in. You could try using two regular 9 x 5 loaf pans rather than the Pullman pan and then use a baking sheet as a “lid” over the loaves while they need to be covered during the baking process. I haven’t tried this but other readers have had success with that method using the Easy Overnight Danish Rye recipe. I hope this helps! Happy baking!
Kristi
If baking in a 9x5 would you change the temperatures or duration at each? Its hard because you need to leave the lid on to gauge what's going on with the dough.
Hi Jocelyn,
I would keep the time and temperature the same. I've had other bakers tell me that has worked just fine for them. Please report back and let me know how it turns out!
Kristi
I am about to try your recipe but wanted to confirm your instruction to combine the soaker and levain in step 3. Do you mean to combine the entire contents of the soaker? This would include the original 285 grams soaking water or do I drain the soaker to get rid of excess liquid from the grains and seeds.
Hi Jean! Include the whole thing. No draining. Let me know how it turns out!
Is it best to use a rye starter for this, or will my whole wheat starter do?
Hi Jenna! Any starter will be just fine. I use a white bread flour starter. Happy baking! Kristi
I’ve been a quarantine baker, and tried this recipe after trying several other rye breads. I used wheat flour instead of white, and cracked rye instead of rye chops.
The result was delicious and soft, but still a bit “gummy” throughout the crumb. Does this happen during the proof/riseor bake? I had to proof mine a bit longer in the oven with a warm bowl of water to get enough rise. Also, I found my oven to be pretty slow to reduce temperatures. When i shifted from 500 to 400 degrees, it was still at 425 after 15 mins when I shifted down to 325.
Thanks again for sharing!
Hi Jason,
I'm so glad you've taken this quarantine time to up your rye baking game! I think the problem you are having is with using wheat flour rather than white. As you have probably learned over the last few weeks, rye can be very challenging to bake with! Adding regular white bread flour helps create a strong gluten network that helps keep a rye loaf from getting that gummy quality. Whole wheat flour also contains a fair amount of gluten, BUT if you put it under a microscope, you would notice that the flour has an almost razor-like sharpness to it. That's because it is ground from the whole kernel of wheat and isn't as 'soft" as white flour. This sharpness makes it difficult to create a strong and supportive gluten network because the gluten strands are continuously being cut by the ground but still sharp whole wheat flour. That's why 100% whole wheat breads have a tendency to be dense in texture. SO long story short.....if you switch the whole wheat flour to white, you should eliminate your gumminess problem. This is definitely a moist loaf, but it shouldn't be gummy. I hope this helps troubleshoot your situation! Happy baking! Kristi
I usually add wheat gluten to whole wheat bread to make them less dense. Would that solve the problem of a gummy bread?
Hi Maria,
I have never had this recipe turn out gummy, but yes, wheat gluten can help provide structure to rye breads and help with their tendency to have a gummy texture. Hope this helps!
Kristi
Thank you! Can these be made into rolls?
Hi Tikva,
Thanks for your question! I think you could but you would need to bake them in a muffin tin or something along those lines (because the dough is very wet, you can't shape it like a traditional bread dough for rolls). And I would adjust the baking time as they will bake more quickly than a whole loaf.
Kristi